
Mira Makes YouTube Usable
TL;DR: Mira is a small (5.6 MB), native Mac app that makes YouTube calm and pleasant: no Shorts, no sponsor segments, no recommendation rabbit hole. It folds SponsorBlock, Return YouTube Dislike, searchable transcripts, optional bring-your-own-key AI summaries, Picture-in-Picture, background audio, and a real Focus Mode into one signed app instead of the pile of browser extensions you have to maintain on your on. It collects zero data, has a long free trial and costs $39.99 for a lifetime license (or $2.99/month). If you only want ads gone and you are fine with YouTune in a browser, Brave or the Vinegar + SponsorBlock Safari combo does that for free; if you want YouTube genuinely de-Googled, FreeTube or Yattee are the better pick. For everyone who just wants one quiet, native place to watch, Mira is worth the money. eryone who just wants one quiet, native place to watch, Mira is worth the money.
Mira: Focused Video Player
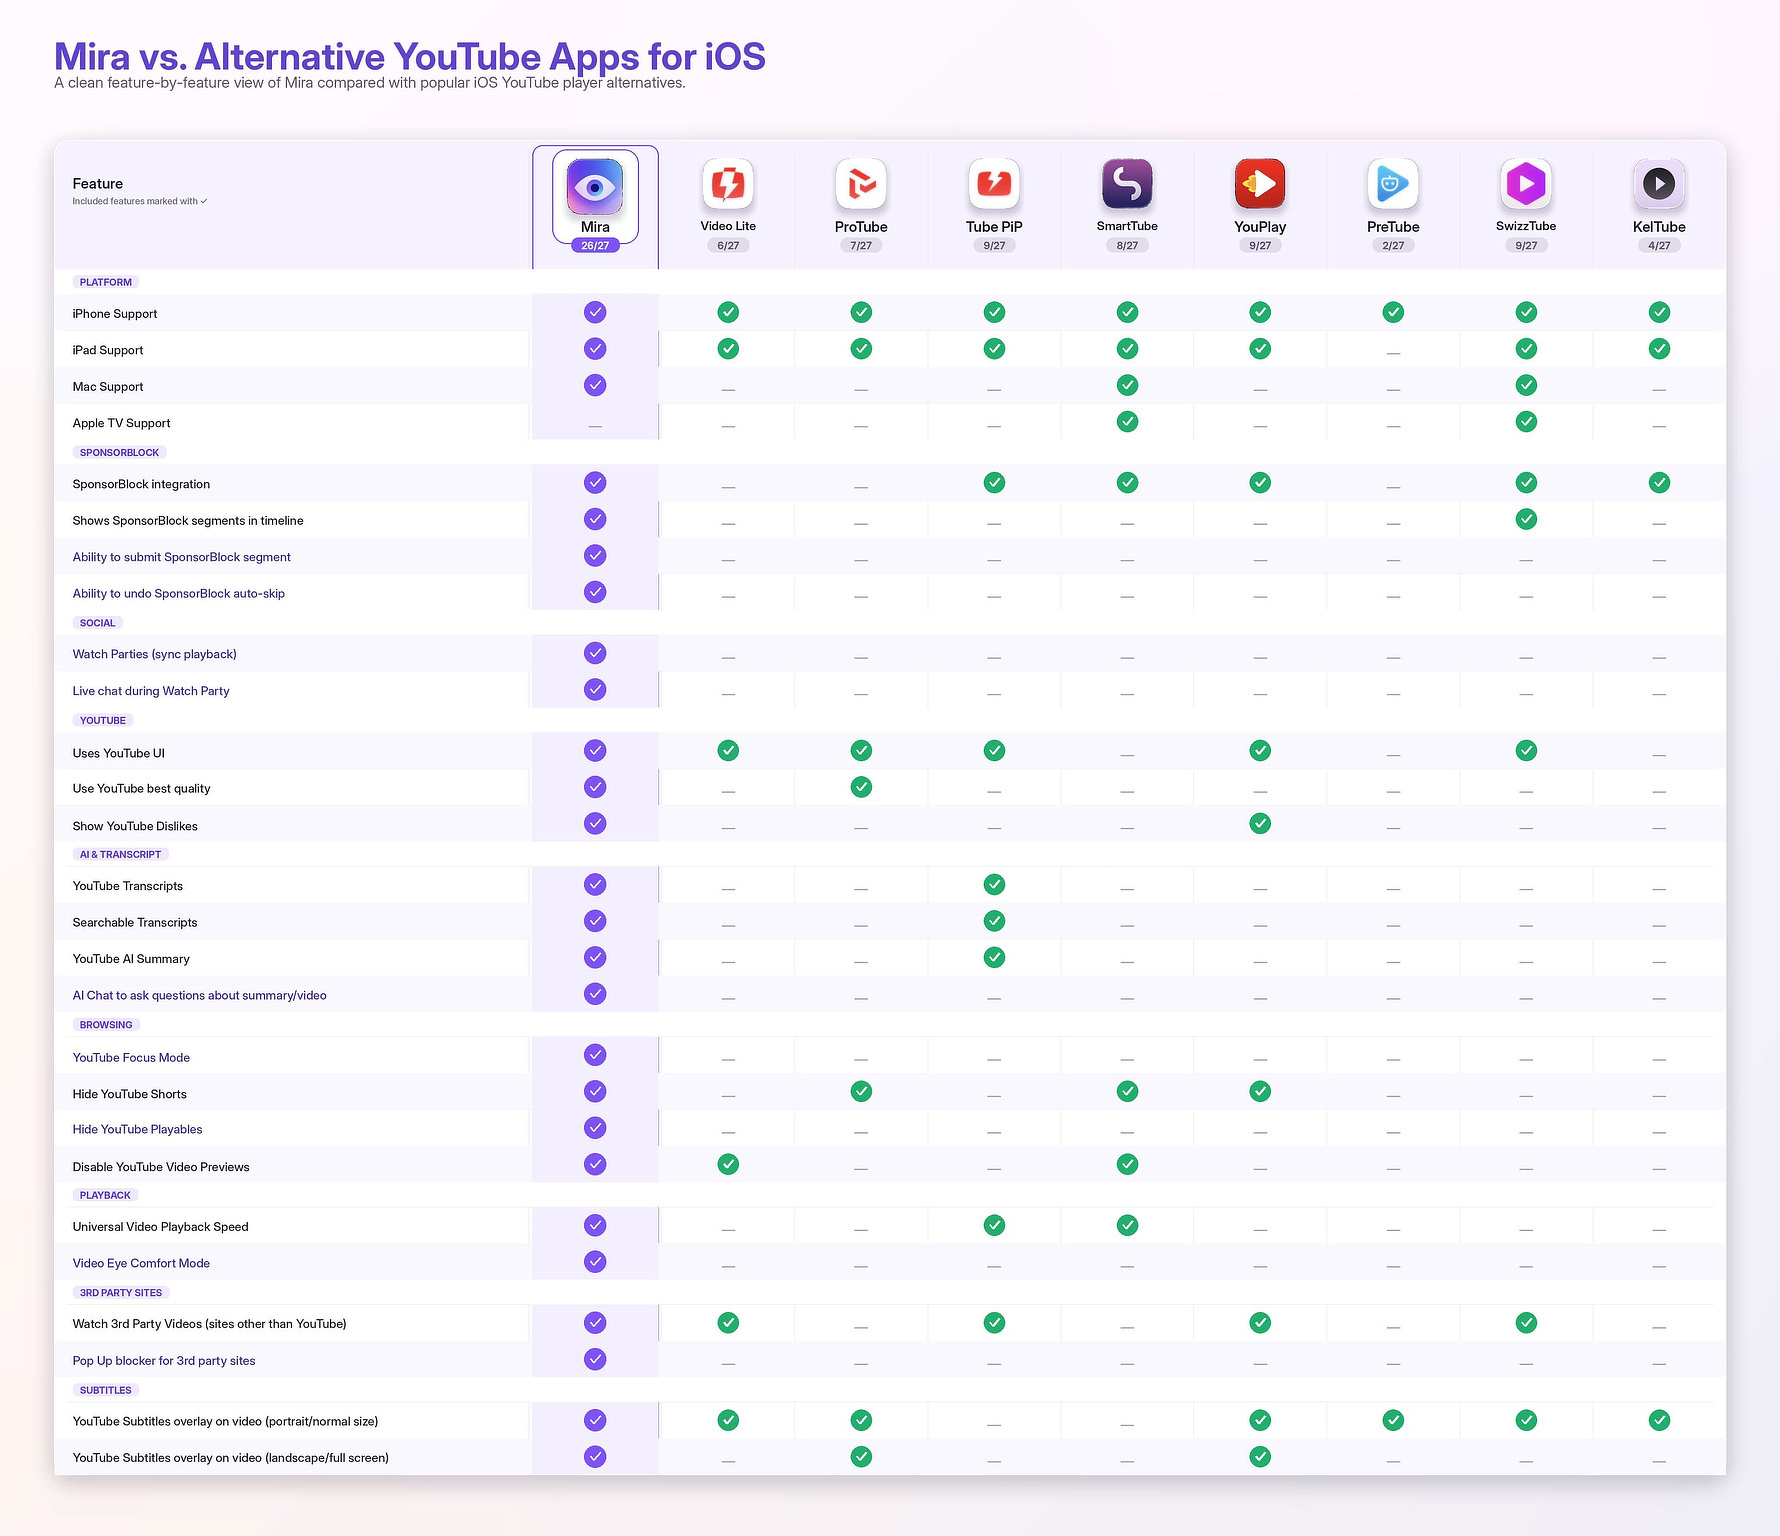
Buckle up. This is going to be longer than normal, but it's about an app in a pretty crowded field that needs lots of boxes checked in order to compete. Mira is a small but powerful native Mac app with unique YouTube enhancements. It also folds almost all the YouTube features you get from using DIY combos (e.g. Brave/Firefox plus Ublock, SponsorBlock, etc) or other stand alone players (Yattee, FreeTube) into one, unified experience.
If you haven't spent any time on YouTube in the past year you might not know how awful the experience has become: More ads, more Shorts shoved into every feed, autoplay previews chirping at you from the home page, and a "Continue watching?" nag that kills a three-hour lecture stream the moment you walk away. You can kinda sorta deal with the aggravation by piling on extensions like Return YouTube Dislike and the others I've mentioned, but you have to maintain that yourself and there is always the danger of one part not playing nice with another part.
Mira - Focused Video Player (its official App Store Name) is native on the Mac (and iPad and iPhone). It's not some giant Electron thing you get, unsigned from a GitHub page. It's from developer Nicholas Hershy (Hershkovitz Bros LLC) who shipped version 1.0 in May of 2026 (hence the lack of buzz), and it's been getting near-daily point updates since. It's on the App Store, and the home page is watchwithmira.com. Mira has the best privacy policy available, "The developer does not collect any data from this app." (Note: There are other apps named Mira and a video conversion app called Miro. Make sure you are testing the right one.) (Second note - Mira also works with all the big streaming services but for the purpose of this review, I'm concentrating on YouTube)
The Mac Experience
Mira operates like a browser for video. On the Mac it's a full tabbed app: ⌘T for a new tab, ⌃Tab to cycle, using standard Mac shortcuts. You can drag a link in from Safari, Mail, Notes, or Messages and it opens instantly. You can drag links back out to share them. That drag-in/drag-out behavior is Mac-only and it's the kind of small thing that makes the app feel native rather than a phone app stretched to fit a window.
Here's what you get:
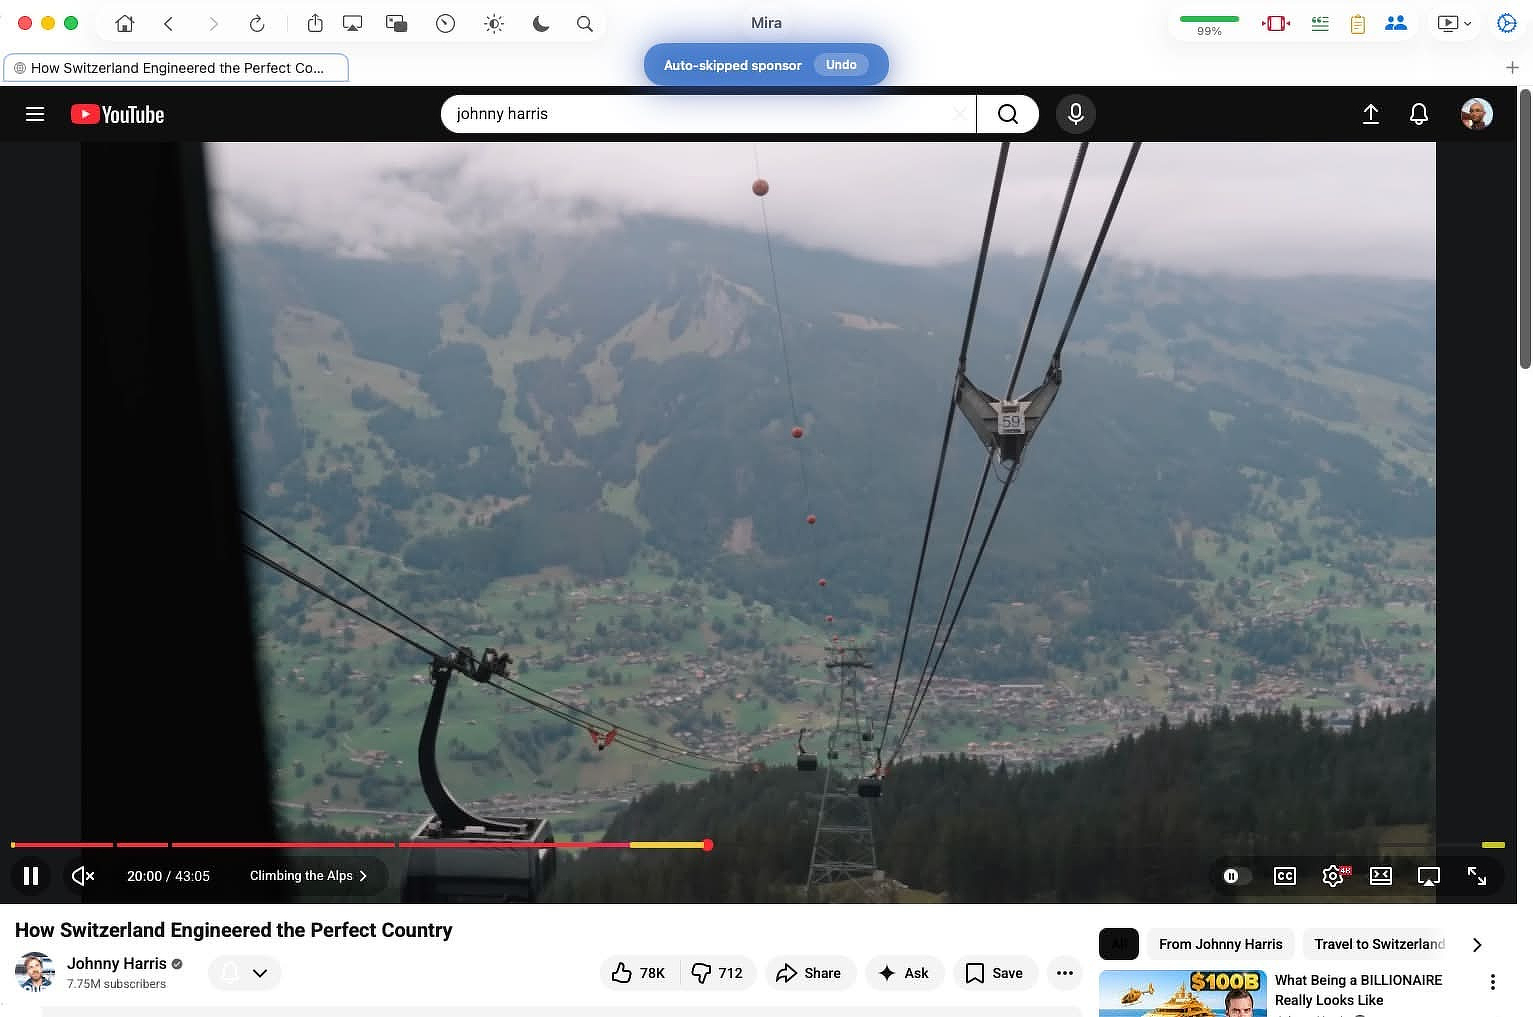
- SponsorBlock, built in. Skips sponsors, intros, outros, self-promos, "like and subscribe" reminders, recaps, and filler using the community timestamp database. You pick which categories to skip, you can color-code them on the timeline, and if it skips something you wanted, an Undo toast lets you jump back. You can also submit new segments from inside the app.
- Focus Mode. Strips the YouTube homepage down to a search bar, and hides comments and the recommendation rail on a video page. This is the feature that changes how you use YouTube; you go to watch a specific thing instead of falling into the feed.
- Set-and-forget UI tweaks. Hide Shorts everywhere, hide Playables, kill autoplay thumbnail previews, force theater mode, default to best quality (up to 4K). Set once, stays set.
- Return YouTube Dislike, integrated. A color-coded ratio bar shows the like percentage so you can judge a video before committing.
- Auto-dismiss "Are you still watching?" so long playlists, lectures, and live streams don't die when you step away.
- Picture-in-Picture and background audio. Float a video over your other apps, or lock the screen and keep the audio going.
- Transcripts. Open a video's full transcript, search it like a document, and tap a line to jump to that moment. This works without any AI key and is reason enough to keep the app open if you research from video.
It runs on macOS 14 or later.
AI with BYOK (but only if you want it)
I think the AI features are valuable, but you do you. Mira doesn't try to sell you marked up tokens or a subscription that coincidentally tracks your viewing habits. It's strictly BYOK from the usual suspects, Claude, OpenAI, and Grok. Mira's AI Summaries include key takeaways, quotes, an outline, a 15-second version, "explain like I'm 12," fact-checked claims, plus a follow-up chat, all gathered, I assume, from a well-constructed prompt that runs in the background.
The reality: you're paying the AI provider directly, pennies at a time. The docs note a $5 preload lasts a long time because a summary costs a fraction of a cent. The catch is that you need billing enabled on the provider account; a bare API key with no payment method returns an error. The good news is that transcripts work without any of this.
Provides More than Brave/Firefox with Extensions
I can already hear that guy in the back sneering because he uses Brave. Yes, iBrave blocks YouTube ads for free, it has SponsorBlock-style features and a built-in PiP, and it costs nothing. If your only goal is "no ads," Brave is the cheaper answer, no argument. Mira earns its price by adding features you don't get in a browser. If any of these appeal to you, you need an app.
- It's a single-purpose app, not a browser tab. Video lives in its own Dock icon and its own window, separate from the 40 tabs you have open for work. That separation is the actual product.
- Focus Mode has no real Brave equivalent. Brave removes ads; it doesn't strip the recommendation feed and comments to stop the infinite-scroll trap. That's a behavior change, not an ad fix.
- SponsorBlock, dislikes, best-quality, theater mode, hide-Shorts, and dismiss-the-nag are bundled and pre-wired. In Brave you assemble most of this from extensions and settings and maintain it. Mira ships it as toggles.
- One purchase covers iOS and iPadOS too, where Brave's YouTube handling is weaker and background audio is a fight. Mira gives you background play and PiP on the phone in the same app.
- Transcripts, in-app search, and bring-your-own-key AI summaries have no Brave counterpart at all.
- No data collection. Apple's privacy label lists "Data Not Collected," and the AI key stays on-device. Brave is privacy-minded too, but Mira's surface area is tiny by comparison.
- Watch Together sync rooms with chat for up to 10 people; Brave has nothing like it.
If you just want ads gone, Brave (or any browser with uBlock Origin) does that for free, and Mira's $40 lifetime price only makes sense if Focus Mode, transcripts, and the all-in-one packaging are value added for your personal use case.
The other free-and-cheap route worth naming is the Safari-extension stack: Vinegar (Two dollars, one-time) replaces YouTube's player with a plain native HTML5 player, kills most ads and the autoplay cruft, restores PiP and background-ish playback, and pairs with the free/cheap SponsorBlock for Safari to skip segments. For a lot of Mac users this is the actual default alternative to a wrapper, and it stays inside Safari. What it doesn't give you: a separate app window, Focus Mode's feed-stripping, transcripts, AI, or Watch Together. It's the minimalist's answer; Mira is full-featured.
The Competition - Free and Paid
I've tested a lot of apps in this category and the one that comes closest to matching Mira is Friendly Streaming Browser. Friendly is the same core idea as Mira: one native-feeling window that wraps Netflix, YouTube, Disney+, Prime Video, Hulu, Spotify, and the rest, with a built-in YouTube ad blocker, Picture-in-Picture, and some media-player extras (local file playback, brightness/contrast/transparency adjustments). It's published by Sensor Tower, it's been on the Mac App Store since around 2012, and it's free to download with an optional paid tier (a few dollars) for extra ad-blocking and to tip the team.
I wouldn't recommend it to anyone though. It's literally owned by a data mining company, Sensor Tower, and one read through its privacy policy should send you screaming out of the room.
https://sensortower.com/friendly-privacy-policy
The closest comparisons are the open-source YouTube front ends. Two are worth knowing:
FreeTube is free, privacy-first, blocks ads, integrates SponsorBlock, and runs without a Google account. It's an Electron app and a YouTube client, full stop.
Yattee is the one that overlaps Mira's cross-platform story most directly: free, open-source (AGPL), native, and it runs on macOS, iOS, and tvOS. It routes through Invidious/Piped instead of YouTube's own API, blocks ads, and bundles SponsorBlock, Return YouTube Dislike, PiP, AirPlay, queue, and history. If you want a privacy-respecting, no-account, genuinely free native app and you don't need the streaming-service wrapping or AI, Yattee is the strongest free alternative on the Mac and deserves a real look before you pay for anything.
MacTube still works, but its last release was February 2022.
FreeTube and Yattee are both excellent and free, so Mira has to justify itself against them. Things Mira does that the open-source crowd generally doesn't:
- It's not YouTube-only. Mira wraps Netflix, Disney+, Max, Hulu, Prime Video, Apple TV+, Twitch, and more in the same window, and you can add any public video site as a custom platform with popup blocking. FreeTube and Yattee are YouTube clients, full stop.
- Watch Together with synced playback and chat across Mac, iPad, and iPhone. That's a feature you normally need a separate service (or a Discord screen-share) to get; none of the open-source clients do it.
- In-app AI summaries with your own API key. The others have transcripts and SponsorBlock; none of them summarize.
- It uses the real YouTube signed-in experience, so your subscriptions, history, and watch state are intact. FreeTube and Yattee deliberately avoid the Google account (Yattee even proxies through Invidious/Piped), which is great for privacy but means a different, account-less experience. Mira's trade-off runs the other way: you stay logged into YouTube and get the full account, you just hide the noise around it.
- A genuinely native, signed, current Mac/iOS app from one universal purchase, versus an Electron app (FreeTube) or a third-party-instance-dependent client (Yattee).
If you want YouTube without the tracking, then Mira isn't for you. FreeTube and Yattee are the solutions you want.
Pricing
Three options, billed through Apple:
- Monthly: $2.99/month
- Annual: $19.99/year
- Lifetime: $39.99 one-time
You get 5 days of full access on install, after which the subscriptions start with a 7-day free trial; Lifetime has no trial. For an app you'd use daily, the $39.99 lifetime is the one that makes sense, and it's nice to see a lifetime option offered at all instead of subscription-only. All three unlock all platforms.
iPhone and iPadOS, If You're Interested
Mira is a universal app: one buy unlocks iPhone, iPad, and Mac. It syncs nothing to a Mira account because there isn't one. On iOS and iPadOS the controls collapse into a floating "eye button" in the corner that opens a tool menu and fades as you scroll, rather than the Mac's persistent toolbar. iPad lets you reposition the toolbar to the left, top, or right edge. The mobile versions add gesture controls (swipe up for fullscreen, pinch to crop a wide video edge-to-edge) and lean on an iOS built-in fullscreen player for the custom sites you add yourself, which sidesteps the usual mobile-web fullscreen breakage. Background play and PiP carry over, which is the main reason to want this on a phone: free YouTube on iOS won't play audio with the screen off, and Mira will. Both mobile platforms require iOS/iPadOS 17. One real limitation worth knowing: on iPhone and iPad, a Watch Together session drops if you background the app for more than about 30 seconds, because iOS won't hold the connection open. The Mac doesn't have that problem.
RegexPilot: Regular Expressions for Regular People (and no AI hallucinations)
RegexPilot by developer Kristof Polleunis, is an app designed to protect you and your work from the hallucinations and miscalculations AI can inject into the regular expressions you ask it to build.
Not Voodoo
It took a while, but I finally realized that regular expressions are not the computer voodoo I always assumed them to be. In 2026, even regular (non-developer) users are managing and searching large data sets of movies and tv shows, music, ebooks or even just collections of documents accumulated over the years. If you do find-and-replace in BBEdit, Nova, or Obsidian; clean up messy CSV exports; build filters in Hazel, Keyboard Maestro, or Alfred; or wrangle a marketing list full of inconsistent phone numbers, you are using regex whether you call it that or not.
Regular Expressions for Regular People
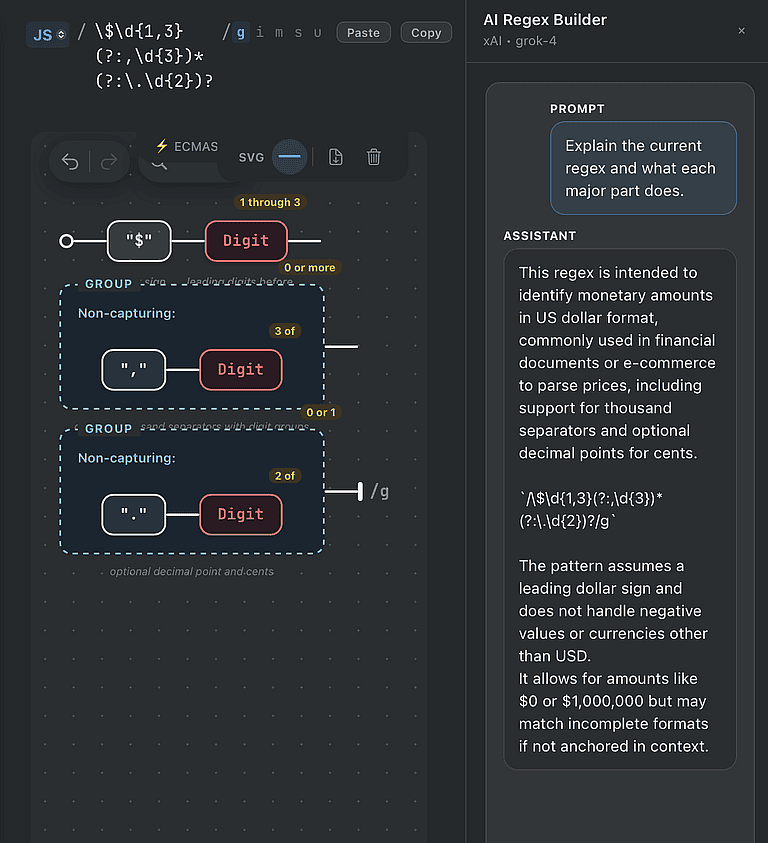
Although RegexPilot was built for people who already know how to build regular expressions, it has turned out to be a good tool for teaching the rest of us a thing or two. The way it works becomes quickly understandable. You describe what you want in plain English, get a draft, and then see it drawn out as a railroad diagram: anchors as start and end markers, character classes as colored pills, groups as bracketed branches. You fix the part that is wrong by dragging it, not by counting backslashes in a text field. Hovering over any node tells you what it does, and watching matches appear and disappear as you tweak teaches the difference between \b and \B, or what a lookahead actually does, faster than any reference page.
Why it's Better Than AI Alone
AI models are particularly good at writing regex, until they aren't. They fail, predictably, in a couple of ways. They rely on training data that doesn't differentiate between public and private IP addresses or it interprets all 10 digit numbers as belonging to US telephone customers. AI does pattern recognition. It doesn't think.
AI models also are prone to giving you the wrong flavor of regex. You're looking for something that will work in Python and you get a Javascript friendly version instead. If you're making a living doing this, you can't tell your customers "It worked in ChatGPT."
The honest fix for both is a verification loop: paste the draft into a tester, run it against the real engine, throw your edge cases at it, watch what lights up. RegexPilot is that loop collapsed into one window. The AI is built in (bring your own key for OpenAI, Claude, Gemini, and others, or run a local model through Ollama or LM Studio), and anything it generates renders on the canvas and executes against the selected language's actual engine immediately. The "did it hallucinate" check happens before you ever paste back into your code. You are not replacing the AI; you are giving yourself somewhere to catch it.
Worth Exploring Further
Although I've worked in tech for a long time, I'm not a developer qualified to speak on the pros and cons of this app for that kind of work. Suffice to say, the documentation alludes to broad compatibility with multiple flavors of regex and promises that per-pattern recognition happens in milli-seconds.
The Regular Details
Privacy - No analytics, no telemetry, no account, no email list, nothing leaves the machine by default. The voice dictation runs entirely on-device via a bundled Whisper model, and if you point the AI at a local model instead of a hosted key, the app never touches the network at all. The only thing phoning home is license validation.
Pricing - RegexPilot needs macOS 14 (Sonoma) or newer; the core app is about 8 MB, closer to 72 MB once the bundled engines are included. The JavaScript and TypeScript flavors are free forever, which for a lot of web work is the whole job. A single €19 one-time purchase unlocks all 21 flavors with their authentic engines, AI, voice, the full library, and every export format. There is a 30-day trial of everything, and no subscription, which in 2026 still deserves to be said out loud. Download it from regexpilot.com.
Roadmap - VS Code extension and a Raycast plugin are on the v1.1 roadmap, with a step-through debugger slated for v1.2. Bug reports go to his GitHub issues page, and he means it when he asks for them.
ProcessSpy After a Year

Activity Monitor is one of those apps you open when something is wrong and then quietly resent. It tells you a process called java is eating a core and offers you almost nothing else. No version, no path, no command line, no idea which of the four Java apps you have running is the culprit. For a tool that ships on every Mac, it is remarkably bad at answering the one question you actually have: what is this thing and why is it doing that?
I've spent the last year using ProcessSpy as my answer to that question, and at this point it has more or less replaced Activity Monitor in my day-to-day. It's the closest thing macOS has to Sysinternals Process Explorer, the tool Windows power users have leaned on for twenty years. That's a real gap on the Mac, and ProcessSpy is the first thing I've found that fills it without feeling like a half-finished science project.
The developer, Robert (@rob3rth), tells the origin story better than I can:
I was juggling several Java apps, each using a different JDK version — and I couldn't tell which process was which in Activity Monitor. All I saw was "java." No version, no path, no details. So I built ProcessSpy — a developer-focused tool that shows full command-line info, version details, environment variables, and more.
That's the whole pitch, and it's an honest one. If you've ever stared at three identical process names and had to guess, you already understand why this app exists.
Don't Let "Developer-Focused" Scare You Off
The marketing leans developer, but that framing undersells it. If you regularly install, test, and uninstall software — if you're the kind of person who reads a changelog for fun and wants to know what a sketchy-looking background process actually is before you trust it — this is for you too. Identifying what spawned a mystery helper, checking whether an app is running natively on Apple Silicon, confirming a signature before you grant permissions: that's power-user work, not just developer work.
The Features That Earn Their Keep
A year of updates has turned this from a clever utility into something genuinely deep. The ones I actually use:
Click-to-identify. Hit a shortcut, click any window on screen, and ProcessSpy jumps straight to the process behind it. This is the feature I didn't know I wanted and now use constantly. It's the fastest way to answer "what is this window and what's it tied to?"
The Inspector pane. Select a process and you get the full picture: command line and path, digital signature and signing organization, whether it's sandboxed or hardened-runtime, native vs. translated, memory footprint with peak tracking, and live disk read/write rates. This is where ProcessSpy stops being a nicer Activity Monitor and starts being a diagnostic tool.
Advanced Tree View with aggregate totals. Modern Mac apps spawn a small army of helpers and XPC services. ProcessSpy groups them, links related XPC services by their responsible PID, and rolls up CPU, memory, and thread totals so you can see an app's real footprint instead of its main process pretending to be lightweight.
Finished process recall. This one is genuinely uncommon. ProcessSpy remembers processes after they exit — their command line, environment variables, and history — and even shows a countdown of how long until it forgets them. If something flashes up, misbehaves, and vanishes before you can inspect it, you can still catch it after the fact.
History recording with CSV export. It logs CPU, memory, and thread usage over time on visual timelines, marks when an app was active, and exports to CSV. Transient spikes stop being a mystery you have to reproduce live.
Multi-property regex search and JavaScript filters. Quick search handles regex (wrap it in slashes, /java|node/) across multiple properties at once, so you can match "java" in the name and -Xmx in the command line in one go. For anything more involved, you can write real filters as JavaScript expressions with multiple conditions.
Menu bar dashboard and status bar indicators. A compact popover gives you live system health and the main-window tools without leaving what you're doing, and the status bar can show CPU, GPU, memory, and disk usage at a glance.
Run Shortcuts on process events. You can trigger a macOS Shortcut when a process starts or finishes. Niche, but if you live in automation it opens some genuinely useful doors.
There's also the quieter stuff that makes daily use pleasant: a Version column right in the main table, context-menu actions like Show in Finder, copy path, and search-this-process-online, and deep inspection of entitlements, Info.plist, and bundle ID. Several of those — environment variables, entitlements, the full history features — live behind the paid license.
What People Are Saying
There isn't much independent press on ProcessSpy yet — it's an indie tool from a solo developer, not a venture-backed launch — but the buyers who've left feedback on Gumroad are blunt in the way satisfied power users tend to be. One verified buyer, Arie Stavchansky, put it the way I would have:
I was looking for an equivalent to SysInternals ProcessExplorer for Windows. This is it — it has all the features. I love me a native macOS app!
Another, Daniel Jarusch:
All the information in one clear and intuitive interface — brilliant work, thank you very much!
That "native macOS app" point matters. ProcessSpy is built on native APIs and AppKit rather than some cross-platform wrapper, and it shows in how fast and responsive it feels.
Pricing and Availability
ProcessSpy runs on Intel and Apple Silicon Macs on macOS 14 (Sonoma) or newer, and it already supports macOS 26 Tahoe. It's distributed as an Apple-notarized, signed .app inside a roughly 4 MB .dmg, or through Homebrew:
brew install --cask processspy
The free version is fully functional for core monitoring. The paid license unlocks the deep-inspection features (environment variables; entitlements, Info.plist, and bundle ID), the history and CSV export tools, and removes the startup countdown screen the free version makes you sit through.
The license is a one-time $34.99 on Gumroad, good for one user across unlimited personal devices, with lifetime updates. That's up from the $24.99 some listing sites still show, so the price has climbed — but for a tool I open this often, and one that's shipped this many real updates in a year, it's an easy call. There's no subscription, which in 2026 is worth saying out loud.
If you've ever lost twenty minutes to a process you couldn't identify, ProcessSpy pays for itself the first time it hands you the answer in one click.
ProcessSpy is made by Robert (@rob3rth), who also builds Restretto (a REST client) and a couple of other focused Mac utilities. Worth a look if this one lands for you.
SmoothCSV: Finally, a CSV Editor That Doesn't Guess

If you've ever had to search for "how to make Excel quit removing leading zeroes," I have an app for you. SmoothCSV won't turn some random number into a date and then refuse to change it back. In fact, it won't format anything unless you expressly tell it to. It doesn't try to be a lightweight spreadsheet; it's a grid editor, first and foremost. It leaves your data as it is, with no helpful "guesses" at what you might be trying to do. That's the pitch, and it's enough to make this my CSV editor for most tasks.
Here to Stay
The first version of SmoothCSV shipped in 2011. The current v3 release came out last year; it's a complete rewrite built on Tauri, which is why it weighs in under 80 MB and opens a 100 MB file remarkably fast. The dev claims it's 12x faster than Excel. I can't verify that number, but I have some genuinely huge CSV files and it never blinked when I threw them at it. Cheers for speed, and for not being another Electron monstrosity.
The Features That Actually Matter
Most of the feature list is what you'd hope for and rarely get in one place:
- A real grid editor with row and column tools: insert, delete, move, hide, dedupe.
- Find and replace with regex support.
- Filtering through either a visual condition builder or SQL-style expressions.
- Multi-column sorting by text, number, date, or length.
- Multi-cell editing, the way multi-cursor works in a code editor.
- A command palette, so you can drive the whole app without hunting through menus.
For those who live in CSV files, it also has extras that make it more than a text editor with a few tricks:
SQL Console: Run SELECT queries directly against your CSV. If you've ever exported a table just to ask it one question, this collapses that round trip into the editor.
Customizable file formats: Control delimiter, quotes, encoding, and line endings per file, with rules you can save and apply automatically. This is the fix for the semicolon-delimited, Latin-1-encoded, Windows-line-ending file that some other tool flatly refused to open correctly.
Copy/Paste As: Copy a range as Markdown, HTML, JSON, SQL, or LaTeX. Handy for documentation or moving tabular data between formats.
Excel import/export, aggregation, transpose, auto-fill, and a CLI: These round out the functionality. The CLI lets you launch a file and jump straight to a specific row and column, and smoothcsv:// deep links let you wire it into larger workflows.
Licensing I Respect
You can download and use the fully featured version of SmoothCSV from the dev's website, for as long as you'd like, with no limits. The occasional nudge to buy a license is non-modal on purpose, so it doesn't interrupt your work. Like a few other stalwarts (Shottr and Immich come to mind), it's the kind of app you end up paying for because you're grateful and want to support the developer.
Who It's Not For
It's closed source, though that may change one day. If you're FOSS-only, this isn't for you. And if you're after spreadsheet functionality, look elsewhere: formulas across a living workbook, charts, pivot tables, collaborative editing. This is the wrong tool, and it isn't pretending otherwise.
See Also
A few other CSV editors worth a look if this one doesn't click:
SupaSidebar Boosts Privacy and Productivity
Most technically oriented people who value privacy do so because privacy is, and should be, a human right, not because they have something to hide.
Maintaining privacy in the current technical environment requires a real strategy and almost constant attention to an evolving landscape.
It is no longer enough to block trackers, ads, and cookies. Browser fingerprinting has become one of the primary privacy-violating mechanisms used by companies that want to identify, profile, and monetize you across the web.
One strategy many people use is spreading their work across multiple browsers. That has a second benefit: it lets you match the strengths of a particular browser to the task at hand.
Privacy and Productivity
The downside becomes obvious pretty quickly: you take a real productivity hit when your history, bookmarks, and open tabs are scattered across multiple places.
There are several tools that try to help with this. The one I like best is SupaSidebar, by developer Kshetez Vinayak. He stands out for being responsive, helpful, and clearly invested in fixing bugs and expanding the app’s usefulness. I bought SupaSidebar during the 2025 Black Friday sale and have been using it ever since.
SupaSidebar operates at the OS level. It is not a browser extension. It is built for exactly this use case: people who use multiple browsers and need a way to consolidate browser context without paying a constant productivity tax every time they switch.
Arc was a favorite of many Mac power users, and for good reason. Although it is still maintained for security, active feature development effectively stopped in early 2025. Arc introduced a genuinely useful way to manage browsing around spaces, context, and workflows. SupaSidebar recreates much of that experience, but does it across multiple browsers instead of inside just one.
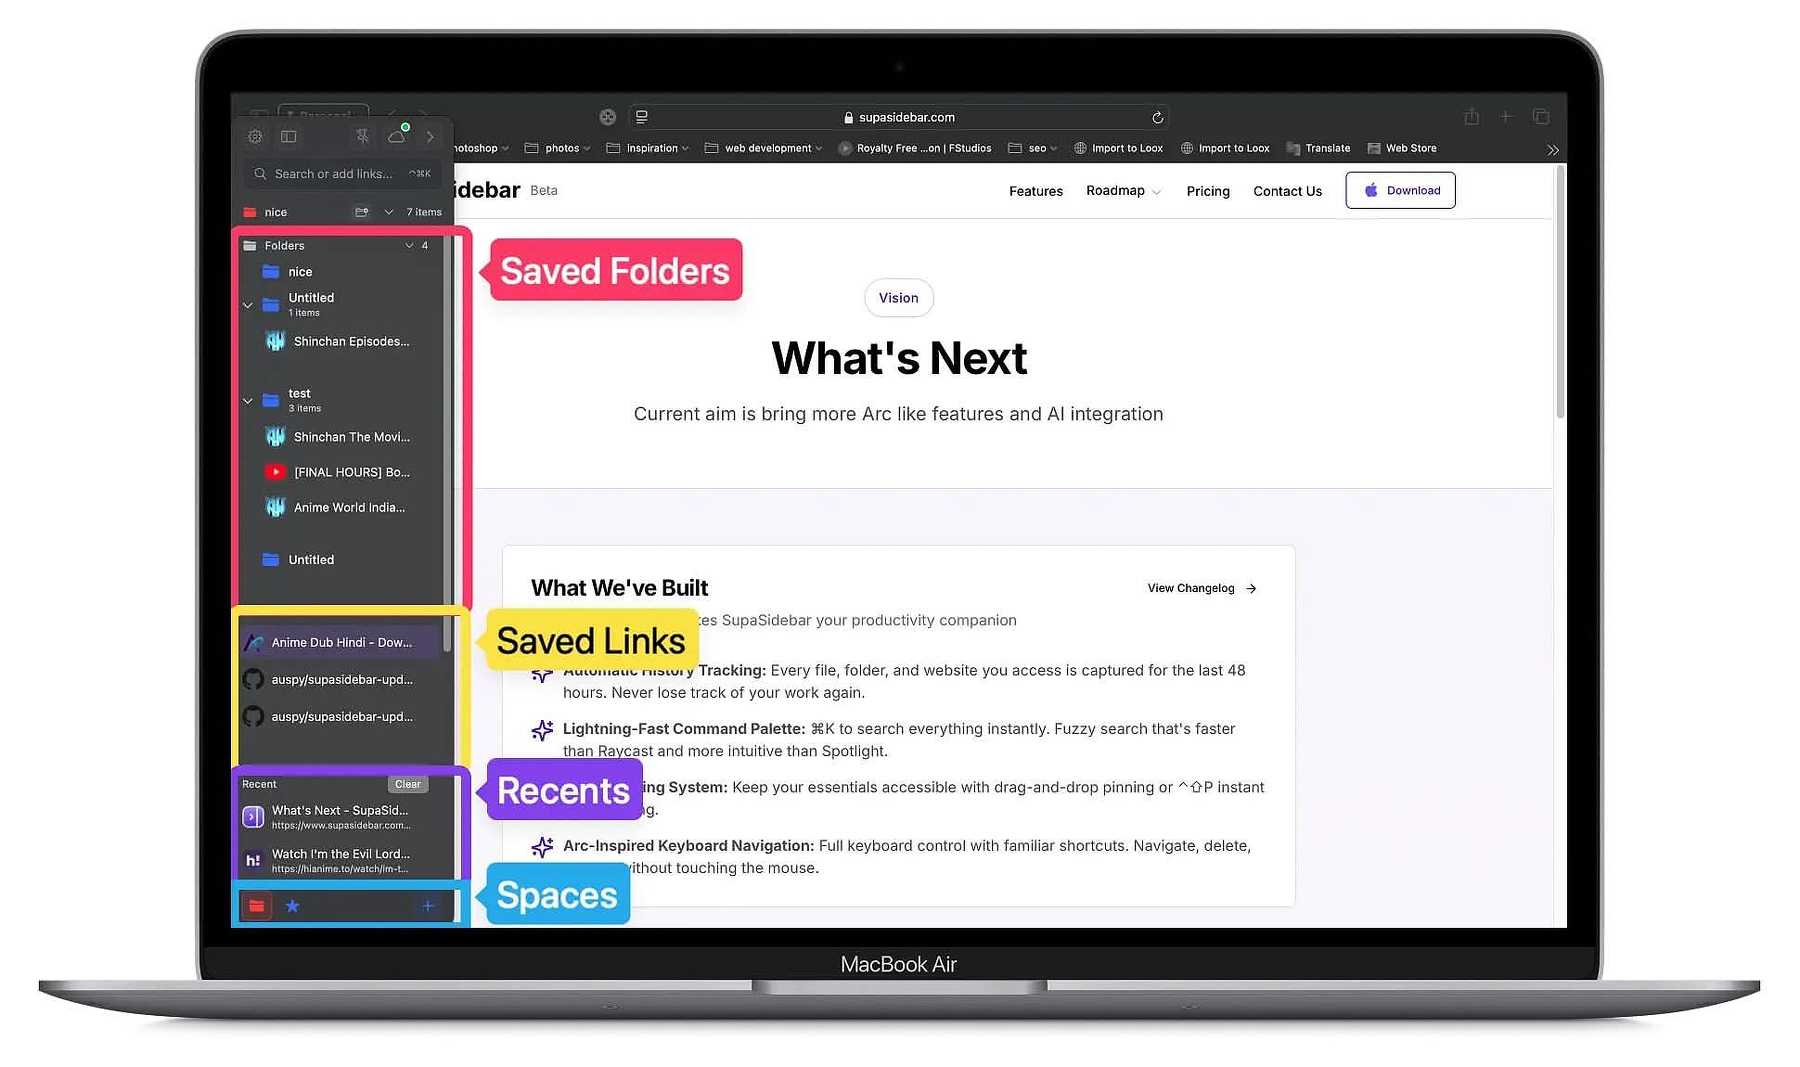
The power of SupaSidebar becomes obvious when you take the time to create spaces that match how you actually work. You might have a space for research, one for personal browsing, one for work, and separate spaces for projects that need to stay isolated.
Within a space, SupaSidebar aggregates tabs and bookmarks from every supported browser you have open. It pulls in Safari, Chrome, Firefox, Arc, and others. You get a vertical, organized, searchable interface showing your open tabs across browsers.
If your browser use is simple, the free version may be enough. It supports three spaces. Paid users get unlimited spaces.
SupaSidebar also has a command panel with fuzzy search across tabs, bookmarks, history, folders, and spaces. It works like a specialized version of Spotlight for your internet life.
Features
Some of the most useful features include:
- Recents tab: shows recently visited tabs across browsers, which is useful for recovering something without keeping every tab open and burning RAM
- Multiple ways to save links: right-click, drag-and-drop, command panel, auto-routing rules, and more
- Notes for saved links: add context to a link without leaving the app
- Browser profile linking: connect a space to a specific browser profile so links open in the right place automatically
- Auto-routing rules: send links to specific spaces or browser profiles based on conditions
- AI chat mode: integrates with OpenAI, Anthropic, and Gemini directly in the panel, with Markdown rendering and slash commands
Yes, But...
SupaSidebar is still, at its core, a beta app. But it has a clear purpose, it is actively developed, and it solves a real problem that many multi-browser power users have simply learned to tolerate.
The spaces model gives it more depth than simple tab aggregation. The pricing is also reasonable, and the free tier is actually useful.
Free: 0-3 spaces
Pro: $13.99/year with unlimited spaces, early access, and priority support
Lifetime: $34.99 one-time purchase, 5 devices, lifetime updates
Use BETA30 as a discount code for 30% off both paid options.
There are bugs and rough edges. I have seen tab synchronization inconsistencies, occasional lag when opening folders, and occasional page reloads when clicking tabs. The command panel also has some edge-case quirks around keyboard navigation.
But even with those issues, SupaSidebar is one of the more useful workflow apps I have added to my Mac setup recently.
If you stick with one browser for everything, you probably will not get much out of it. But if you live across Safari, Firefox, Chrome, Arc, and browser profiles, SupaSidebar fills a gap that Apple, Google, and Mozilla have not bothered to solve.
Cache Out - A Privacy Focused Free Tool For Multiple Browsers
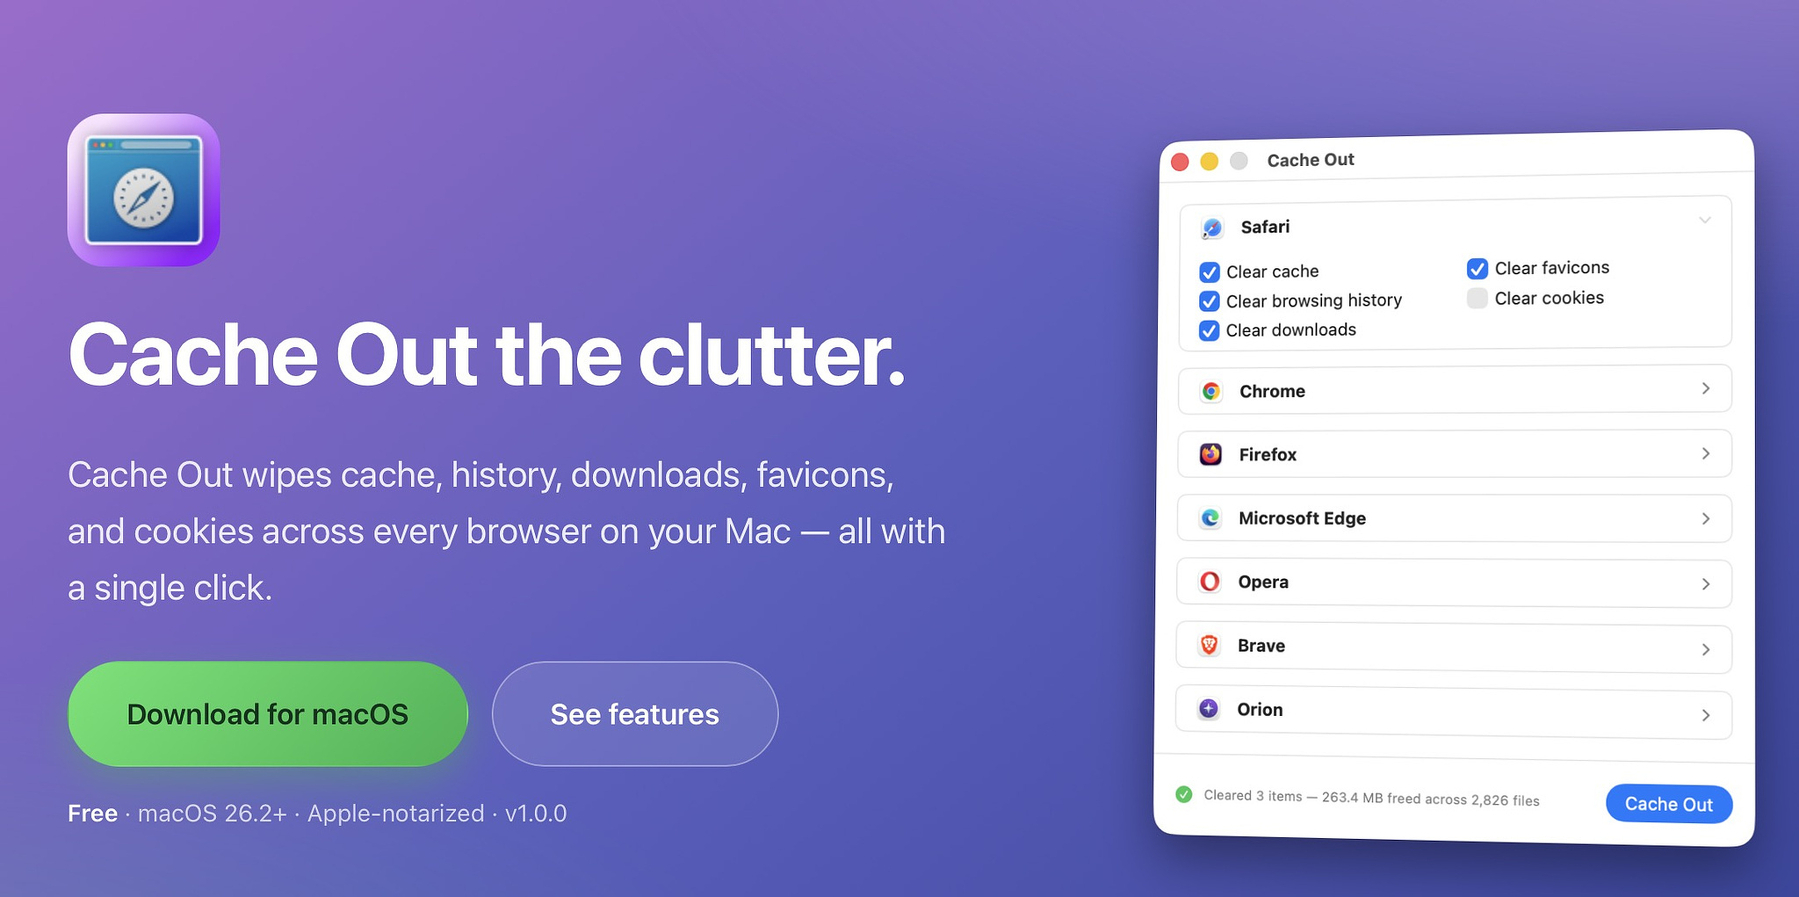
Cache Out, a free new single-purpose utility from veteran Mac developer Jim Mitchell, fits right into an app category that is severely underrepresented - utilities that work across multiple browsers from a single interface.
What It Does
Cache Out's superpower is selective data removal from a variety of popular macOS browsers with the click of a single button. It removes five categories of information - cache, history, downloads, favicons, and cookies. You select the browsers you want cleared from a list. You select the categories of data to remove. Then, you click a single button and BOOM. It's done. After the files are removed, you aren't left in the dark about what happened since you get a report on the number of files and MBs that were removed.
There are currently seven supported browsers:
- Safari
- Chrome
- Firefox
- Edge
- Brave
- Opera
- Orion
I'd like to see a few more on the list, including Vivaldi, Arc, and Atlas. Thankfully, Mitchell indicates that more browsers are coming.
Cache Out punches all the right buttons for a privacy-focused app. It doesn't phone home or collect analytics. It doesn't require an account or registration. It's Apple-notarized. Everything happens on your machine.
Why You Need It
Don't think that an app like this is the ultimate Boss Button. Most corporate-owned computers track Internet traffic in real time, so your IT department can still track your history if this is your only precaution. Still, most undermanned and overworked support workers don't care where you go as a general rule. Likewise, your home ISP can track your DNS requests for almost every site you visit unless you use a no-log VPN or a service like NextDNS that offers name resolution over HTTPS. Even then, you have to be savvy enough to set it up correctly.
Still, there are a lot of reasons for running clean browsers. In a world where browser fingerprinting is maximally invasive and pervasive, one defense is using multiple browsers to make yourself harder to track for the data scrapers of the world. You'll quickly build up GBs of data for almost every browser you use. If you're stuck with a small hard drive you can't upgrade (like my brand-new M4 Mac Mini's 256GB), you always have to be careful with space. Cache Out is the perfect app to do that.
Also, many countries, including my own, are seeing a rollback of civil liberties. To make matters worse, areas where people travel with their computers offer less privacy than you'd have at home. If you gave the slightest concern about the TSA, ICE, or the CBP looking through your browser history, use Cache Out before you travel.
Other Cross Browser Utilities
Here are utilities that operate across multiple browsers on macOS:
History & Data Aggregation
-
HistoryHound a Must Have Research Tool | AppAddict
St. Clair Software — Indexes and searches browsing history from multiple browsers (Safari, Chrome, Firefox, and more) in one place. Lets you do full-text searches across all your browser histories simultaneously. Useful for finding pages you visited without remembering which browser you used.
Macro & Automation Tools
-
Keyboard Maestro, The App That Makes Everything Better - Tips for the Automation Curious | AppAddict
Stairways Software — A powerful macro utility that can trigger actions in any browser. You can build macros that work in Safari, Chrome, Firefox, Arc, and others — filling forms, clicking elements, navigating pages, or switching between browsers automatically. -
Alfred
Running with Crayons — Launcher and automation tool with workflows that can interact with multiple browsers. Can open URLs in a chosen browser, search history, and trigger browser-based actions via custom workflows. -
How to Get The Most from Raycast | AppAddict
A launcher and productivity tool with extensions for Chrome, Safari, Firefox, and Arc. Extensions let you search tabs, bookmarks, and history across browsers from a single interface.
Password Managers (Cross-Browser)
-
1Password
Works via browser extensions in Safari, Chrome, Firefox, Edge, and Brave. The Mac app itself manages credentials centrally regardless of which browser you use. -
Bitwarden
Open-source password manager with extensions for virtually every major browser. The Mac desktop app serves as a central vault across all of them.
Ad Blocking & Privacy (System-Wide)
-
AdGuard for Mac
Filters ads and trackers at the system level, meaning it works across all browsers without needing individual extensions installed in each one. -
Little Snitch
Objective Development — Network monitor and firewall that works at the OS level, so it monitors and controls outgoing connections from any browser equally.
Developer / Inspection Tools
-
Proxyman
A macOS proxy tool that intercepts HTTP/HTTPS traffic from any browser (or app). Useful for debugging web traffic regardless of which browser made the request. -
Charles Proxy
Similar to Proxyman — a web debugging proxy that captures traffic from all browsers at the network level.
Bookmark Management
-
Raindrop.io Gets a Significant New Feature | AppAddict
Cross-browser bookmark manager with extensions for all major browsers. Centralizes bookmarks saved from any browser into one organized collection. -
GoodLinks | AppAddict
Read-later and bookmarking app with Safari extension built-in and support for sharing from other browsers via the share sheet.
Just Wondering Around Github, Looking for a Software Fix

The mark of a good Internet citizen is whether they star the GitHub repositories they like and whether they upvote helpful posts on Reddit. As someone who devotes a lot of time to online communities, racking up a few Internet points always feels good. I used to be slightly intimidated by GitHub. For the most part, it's full of indie apps by individual devs, so there isn't a marketing department designing websites and writing copy. It's just the same dude who coded the app you want to try. If you spend time looking around, you find that GitHub also contains plenty of goodies that aren't apps. There are repositories for scripts, app settings, Black Friday deals, and more. I'm not a dev, but even I have a couple of public repos. On one, I share my collection of 800 Keyboard Maestro macros, plus Hazel rules and Better Touch Tool actions. My other public repo is a collection of markdown documents with quotes from people wiser than me. I added over 300 new notes there last week.
One obsessive soul created a repo where he documented 1,600 Obsidian extensions AND another for 1,700 Raycast extensions. It's impossible, I think, to keep something like that up to date, but both are good resources.
You can see a list of 81 repositories I felt worthy of being added to my Raindrop collection here. Here are a few highlights. I'm always looking for more, so hit me up if you have anything to share.
macOS Apps & Utilities
MAS
Command-line interface for the Mac App Store. Search, install, update, and manage App Store apps from the terminal. Easy to use as part of a launchd item or cron job to force updates when the Mac App Store is being stubborn about doing it for you.
Mole
Terminal-based tool for cleaning, uninstalling, analyzing, optimizing, and monitoring your Mac. This is the free version that does almost everything the GUI (which is not free) does.
Cardinal
Fast macOS file search app using Everything-compatible syntax with filters for file type, size, tags, and content.
Obsidian
Obsidian Webclipper Templates
Customizable Obsidian Webclipper templates with LLM integration that automatically organize and categorize clipped web content into structured notes. I've tried every way known to mankind to get selected web content into my vault.
This is the way.
Automators Vault
Obsidian vault for the late great Automators Podcast community, containing automation-related notes, show notes, and resources.
Raycast
script-commands
Official Raycast collection of community-contributed script commands you can install and run directly from the launcher.
raycast_extensions_by_downloads
Auto-generated, regularly updated ranking of Raycast extensions sorted by download count.
Automation and Scripting
Tools for automating tasks on macOS and the command line.
Gum
Charm tool for writing interactive shell scripts with styled prompts, spinners, and formatted output.
Topgrade
Single command to upgrade everything on your system -- The Mac App Store, package managers, Homebrew apps, runtimes, and more -- all at once. See also Topgrade - Upgrade All the Things | AppAddict and How to Use Topgrade Silently and Automatically for Multiple Update Protocols (Free) | AppAddict
Privacy, Networking and Security
DNS Easy Switcher
Simple macOS app for quickly switching between DNS server configurations.
Betterfox
Firefox user.js configuration file for optimal privacy and security hardening without breaking normal browsing.
Curated Lists & Directories
Awesome lists, resource hubs, and community-maintained directories.
awesome-mac
High-quality, community-curated list of macOS software, tools, and resources organized by category.
open-source-mac-os-apps
Comprehensive list of open-source macOS applications available for free, organized by type.
Black-Friday-Deals
Community-maintained list of Black Friday deals on macOS/iOS software and books, updated annually.
AI & Language Models
Tools for running, hosting, and working with AI and local language models.
apfel
Exposes Apple's built-in on-device language model as a local OpenAI-compatible API server on macOS. Enables AI capabilities without cloud APIs or API keys.
llamafile
Distribute and run LLMs as a single self-contained executable file. Removes the complexity of setting up local models across platforms.
Why I Replaced Jettison with Ejectify after 15 Years
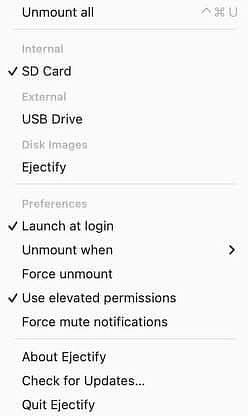
In trying to be open-minded, I recently agreed to try Ejectify, an app that performs a task for which I already had a solution: to automatically eject external disks from my Mac before it goes to sleep and to remount them when it wakes. I worked off a MacBook for a long, long time, and I needed a way to just shut it, unplug, and move on without getting nagged to death about thumb drives and external volumes. I've been using Jettison to do that since I saw it in Macworld in 2011. The developer, St. Clair Software, also makes Default Folder X, History Hound, and App Tamer.
The reason I opted to try Ejectify is that it ticks some boxes that are pretty important in 2026. It's open source and on Github, meaning you can essentially get it for free if you have the chops to build it. You can also see how the developer, Niels Mouthaan, responds to issues, both in troubleshooting and in planning for additional features. I've used other apps from Niels, and he has provided me with good support.
Aside from philosophical differences with Jettison, there are also some features added by using Ejectify.
- Volumes are managed individually, not as one size fits all, so you have more control.
- Provides a way to force unmount a disk on a case-by-case basis.
- Allows you to mute "Disks Not Ejected Properly" messages if you and macOS can't reach an agreement on what that means.
The full feature set (from the website):
- Helps prevent "Disk Not Ejected Properly" notifications after wake.
- Helps reduce the risk of data loss or corrupted volumes by safely unmounting them first.
- Lets you choose which supported volumes Ejectify manages, including external volumes, ejectable internal volumes, and disk images.
- Supports automatic unmounting when the display turns off or the system starts sleeping, then attempts to mount volumes again after wake.
- Includes force unmount, force mute notifications, and instant "Unmount all" actions, plus a global keyboard shortcut for manual unmount-all.
10 Ways to Get More Out of Apple Shortcuts
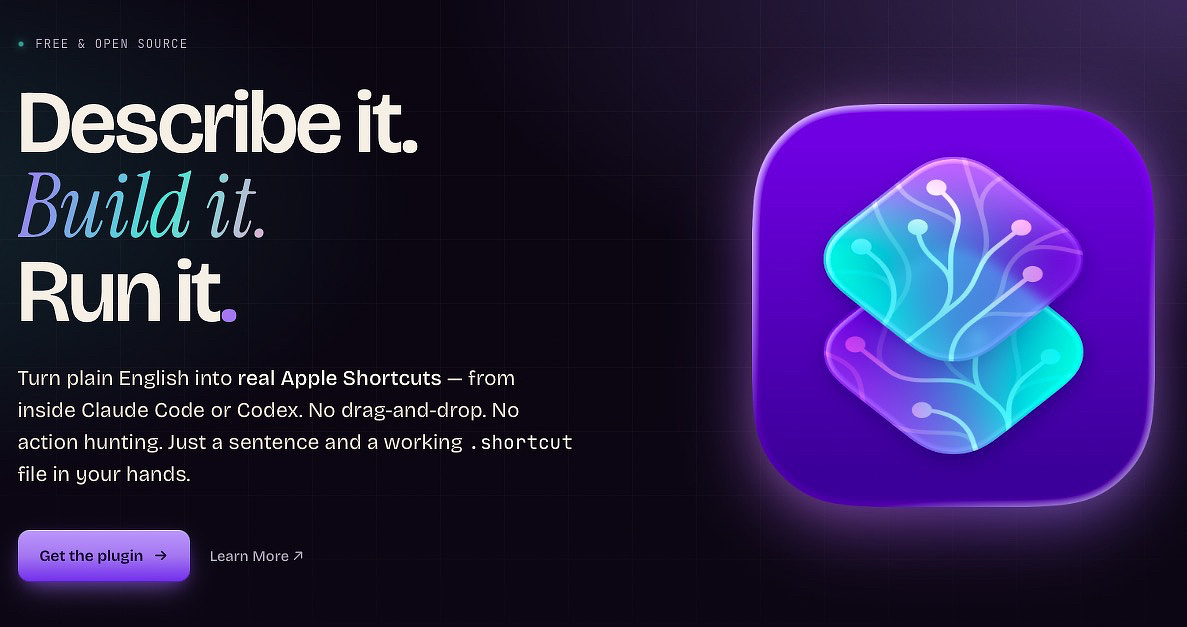
I like using Apple Shortcuts when it fits my workflow, but advanced features can be confusing. I manage simple loops and variables, but it’s slow and tricky. That’s why I was happy to see MacStories release Shortcuts Playground, a free plugin for Codex and Claude Code. It lets you describe what you want in natural language and creates a real Apple Shortcut you can use or share. You can read about it and get installation instructions for free if you have those platforms.
It’s been years since I updated my list of free and cheap apps that boost Apple Shortcuts, so here’s the 2026 edition.
Best Standalone App for Triggers - Shortery
Apps like Keyboard Maestro, Hazel, and BetterTouchTool can trigger Shortcuts but take time to learn. Shortery costs $29.99 and is easier to use. Apple also added some automation triggers in macOS:
- macOS Shortcuts covers basics
- Apps, Files and folders, Wi‑Fi/Bluetooth, Displays, Focus, Time, Wake/sleep
- Shortery adds extras
- Audio, Camera, Clamshell, Calendar, Keyboard hotkeys, Login/logout, LAN, Power details, Screen lock/unlock, Sunrise/sunset, More device triggers
Best Deep System Control: Shortcutie
For $10, Shortcutie offers 70+ system actions Apple won’t allow directly. It can change defaults without prompts, clear all notifications, quit all apps, scrape browser tabs, run JavaScript, and grab selected text from any window.
Best for Extra Shortcut Actions: Toolbox and Actions.app
Sindre Sorhus’s free app Actions offers 170 Shortcut actions for all Apple platforms. See a partial list here.
Toolbox Pro costs $5.99 one-time and adds powerful features for date/time, dictionaries, contacts, files, media, reminders, system tasks, and text.
Best for Persistent Data: Data Jar
Shortcuts handle temporary data well but can’t save it long-term. Data Jar (donationware) stores structured data for Shortcuts to read and update later, helping workflows track state over time—making Shortcuts act like apps.
Good for: settings, preferences, counters, lists, saved variables, workflow state.
Best for Notes-Centric Workflows: Actions for Obsidian
Actions for Obsidian adds Shortcut features to import web content, calendars, contacts, health data, and more into Obsidian notes.
Other Useful Shortcut Enhancers
- BarCuts: macOS Shortcuts Launcher — menu bar app shows relevant Shortcuts without clutter
- Menu Box — create custom Shortcut menus
Find helpful Shortcuts at:
Routine Hub
Matthew Cassinelli
Shortcuts Gallery
MacStories Shortcuts Archive
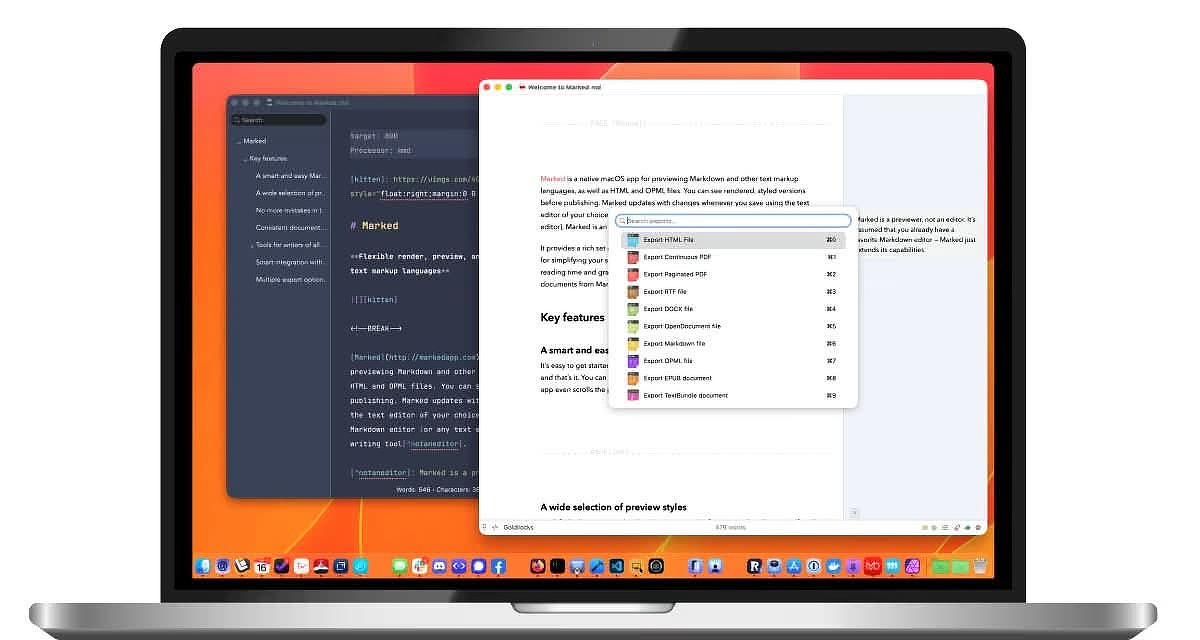
Marked 3 Is the Markdown Companion a Lot of Mac Writers Have Been Waiting For
Brett Terpstra has released Marked 3, and this is not just a routine update. It’s one of those releases that makes you stop and think about where a tool actually fits in your workflow. If you write in Markdown on a Mac, there’s a very good chance Marked has been the missing piece all along.
For years, I lived in Microsoft Word for anything that wasn’t email. That was the EdTech world: Word was the standard, `.doc` and `.docx` were the expected formats, and no one wanted to hear about alternatives. Never mind the huge app footprint, the licensing mess, the cost, or the absurdity of the entire Office suite when all you really needed was a word processor.
And whenever someone in tech tried to suggest something leaner — OpenOffice, Google Docs, anything that didn’t come with Microsoft baggage — the pushback was immediate and emotional. In 2015, we were literally one day away from canceling our Microsoft contract when the superintendent made a late-afternoon phone call to my boss with a $100K purchase order to renew. That was the kind of environment it was.
So yes, I value the freedom to choose my own tools now.
Plain text has become the backbone of the way I work. Obsidian handles notes and longer writing. Drafts is where quick capture happens. Blogging tools and publishing platforms fill in the rest. Markdown wasn’t hard to learn, and once it clicks, it’s hard to go back. But Markdown has one weakness: the writing experience is only as good as the tools around it.
That’s where Marked comes in.
Marked Defined
Marked is not an editor. That’s the first thing to understand. It works alongside your editor, taking Markdown and rendering it live so you can actually see what your writing looks like without breaking your flow.
It also works with HTML and OPML files, which makes it more flexible than a lot of people realize. And beyond rendering, Marked can convert documents to PDF, HTML, DOCX, and RTF. It also brings prose analysis, syntax checking, and integration with all sorts of writing and outlining apps.
Who It’s For
The short answer: anybody who writes.
If you’re a coder or a technical writer, you get a lot of useful extras:
- Syntax highlighting for code blocks
- MathJax and KaTeX support
- Mermaid diagrams
- MultiMarkdown, YAML, and Pandoc metadata support
- CriticMarkup
That’s useful, sure, but it’s not really why I care about it.
For the kind of writing I do, the most valuable features are the ones that help me clean up my prose before I hit publish:
- Spelling and grammar checking
- Sentence simplification tips
- Word count, sentence count, and sentence complexity
- Reading time
- Grade-level scoring
That’s the real value. Write where you’re comfortable, then let Marked tell you what the page actually looks like.
The Little Things That Make It Better
Marked has a bunch of features that sound minor until you actually start using them regularly. Flexible search. Automatic table of contents generation. Bookmarking. A visual document overview. Collapsible sections. Keyboard access almost everywhere.
It’s also a very nice Markdown reader, even when you’re not editing. Auto-scroll is there. So is distraction-free mode. And if you want to read faster, there’s even an RSVP-style overlay with adjustable WPM.
If you work with outlines or mind maps, Marked supports embeds from popular apps and can even turn an outline into a mind map directly. That’s a niche feature, but a genuinely useful one if your brain works that way.
There are also browser extensions for sending page URLs or selected content straight into Marked 3, which is a nice touch if you spend any time collecting notes from the web.
Integrations Matter
Marked works the way good Mac software should: it gets out of the way and plays well with the tools you already use.
That means it fits alongside Scrivener, Word, MarsEdit, Bear, Ulysses, Obsidian, and other writing apps. In v3, Scrivener rendering with live preview is new, and Bear and Obsidian callouts are now fully supported.
And for the automation crowd, there’s CLI support and AppleScript. That alone makes it much more interesting than a typical “pretty preview” app.
Final Thoughts
If you have a Setapp subscription, Marked 3 is already there. Otherwise, you can download it directly for a free trial or pick it up from the Mac App Store.
The lifetime price is $69.99, which is a little steep, though not outrageous for a serious utility you’ll keep using. The subscription option is $2.99 per month, which is much easier to justify.
Marked 3 is the kind of Mac app that quietly improves everything around it. It doesn’t try to replace your editor. It makes your writing workflow better by giving you a clearer view of what you’ve actually written, and that’s a pretty compelling trick.
And in classic Brett Terpstra fashion, it’s built by someone who clearly understands the people using it.
Airspace: A Polished Fix for a macOS Friction Point
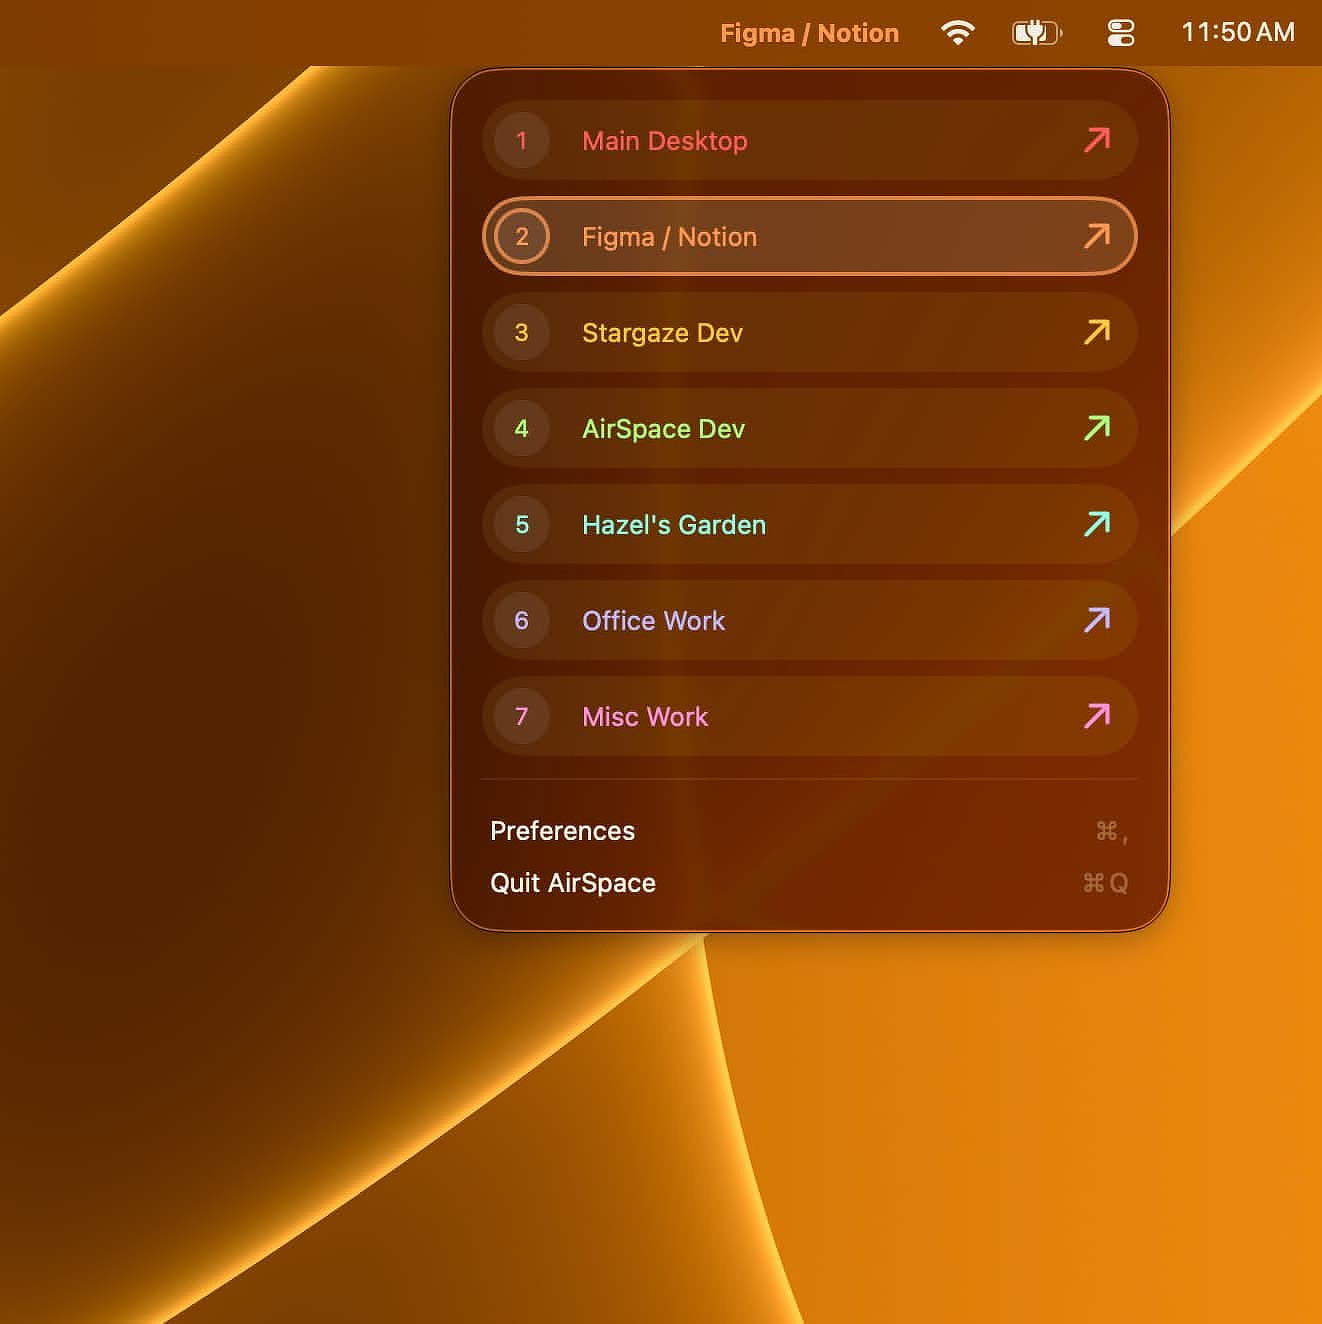
Airspace, an app I downloaded today, has a lot going for it. It removes a classic Apple friction point by letting you name your virtual desktops, customize their appearance, and assign keyboard shortcuts to jump between them. It also helps me illustrate a point.
Making a decision about the right price for an app has to be one of the hardest parts of releasing something new.
Some of the most versatile and useful apps in the Mac ecosystem are priced absurdly low. I am looking at you, BetterTouchTool. On the other hand, we have all seen apps with plenty of competitors that still carry what I consider an absurdly high price. My favorite example is the clipboard manager, Paste.
In reality, every software purchase comes down to what we value. Some people have strict requirements around aesthetics and would rather pay for polish than use something more functional. I think the ebook manager Calibre fits that description perfectly. I love it and use it every day for its incredible versatility, but it certainly is not easy on the eyes.
Two of my favorite notch apps show how wide the pricing spread can be. Droppy, which is not just a notch app but a full suite of utilities, costs 10 euro. Dynamic Lake, another app I like in this space, costs 40% more, still a fair price. It is well thought out and nicely designed, but it is much more narrowly focused on the notch.
There are personal factors, too. I live in the United States. I am retired. I have disposable income that I dedicate to buying software. I compensate by driving a 2005 Toyota and not playing golf like some of my contemporaries. But there are plenty of tech enthusiasts in less prosperous countries, students on tight budgets, and people for whom software pricing is a much more serious decision point than it is for me.
Now, more about Airspace.
Features
Custom Naming
Instead of Desktop 1, Desktop 2, and so on, you can have Writing, Development, Social, or whatever names fit the way you actually work.
Visual Personalization
You can choose custom colors for the menu bar indicator and switcher menu, making different Spaces easier to recognize at a glance.
User-Defined Shortcuts
You can assign your own shortcuts to switch between Spaces. If your writing tools live on Desktop 3, make Cmd+Option+3 the shortcut that takes you there.
Multi-Monitor Support
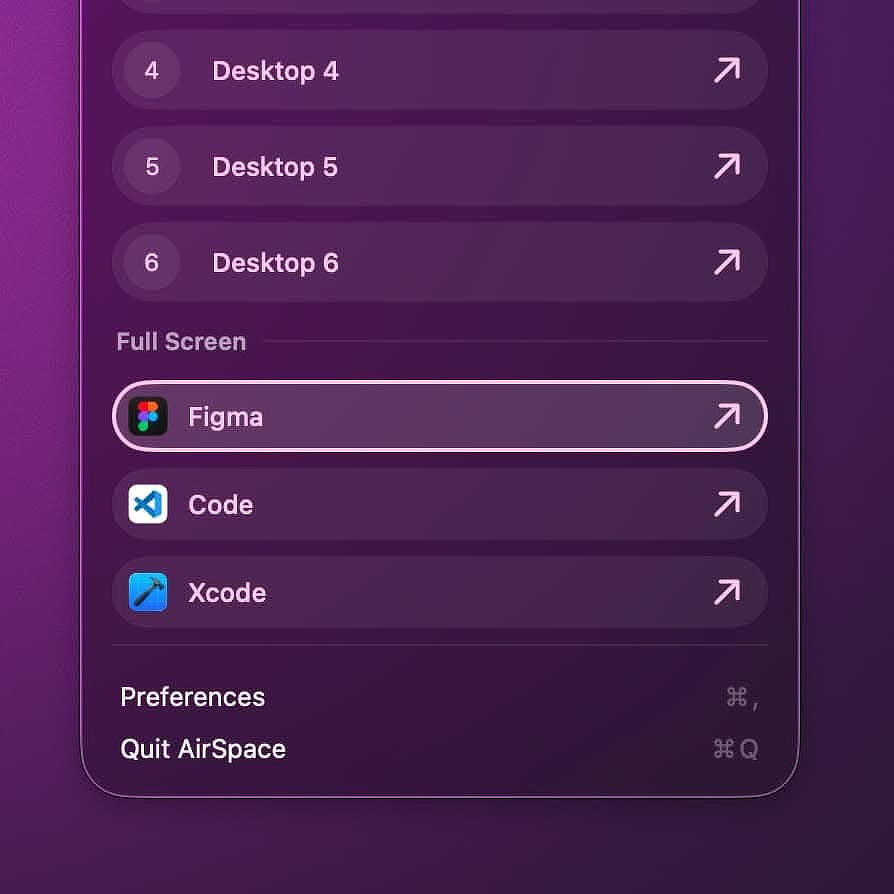
If you use a Mac mini or a laptop with an external display, you will appreciate that Airspace works across displays. It also handles selected full-screen apps, with one important exception noted below.
HUD Overlay
The current release supports a heads-up display switcher that shows your custom Space names and colors.
Selling Points
- No AI used in development, backed by documentation such as GitHub history, Figma files, and browser logs. Whether that matters to you depends on your stance on AI-assisted development, but it is refreshing to see the work documented transparently.
- Full-featured seven-day trial.
- Fully sandboxed and App Store approved, while still delivering the core functionality many users want.
- No tracking or data collection.
Caveats
- Because of public API limitations, Airspace does not track Spaces created by clicking the green traffic-light full-screen button. Those Spaces exist outside the normal Space registry and are not visible to Airspace. The developer is upfront about this.
- Onboarding is a process, not an event. If you use as many Spaces as I do, it takes a few minutes to get Airspace configured.
- There is no Mission Control integration. Custom names will not appear in Mission Control. That is an Apple limitation; Airspace cannot modify that UI. The workaround is to use Airspace's own menu bar indicator and HUD instead.
Similar Apps and Solutions
You can achieve some of what Airspace does with a Hammerspoon script or a Keyboard Maestro macro. There are also direct competitors like Spaceman and Contexts.
Aerospace, a tiling window manager beloved by people who like to fiddle, offers virtual workspace emulation that is similar in spirit, but it is not a true Spaces replacement.
Details
- Developer's website: https://hazels.garden/airspace
- Privacy policy: https://hazels.garden/privacy
- Price: $9.99
Bottom Line
Airspace is not trying to reinvent window management on the Mac. It's not a window manager at all.It is trying to make Apple's existing Spaces feature more usable, more readable, and faster to navigate. That is a narrow job, but it is a real one.
At $9.99, the price feels fair to me, especially if you already rely on Spaces as part of your daily workflow. If you only use one or two desktops, this probably will not change your life. But if you live across several named work contexts, Airspace turns a vague row of numbered desktops into something much closer to an actual workspace system.
DockDoor Pro - The Dock Apple Wouldn't Build
When the free app DockDoor was released in 2024, it was the first time I had seen a developer add window previews to the Mac Dock in much the same way that other operating system from Redmond handles them. For kicks, it also included a Windows-style application switcher, also free.
I have been updating some older reviews, so I went back to check on DockDoor. Not only does the original free version still exist, but the developer has also added a paid Pro version with a much larger feature set.
The splash page for DockDoor Pro puts its claim front and center:
DockDoor Pro - The Dock macOS Deserves
The official native Mac dock replacement with profiles, live window previews, media controls, a file tray, magnification, and everything Apple left out.
That is bold, but defensible.
What It Does
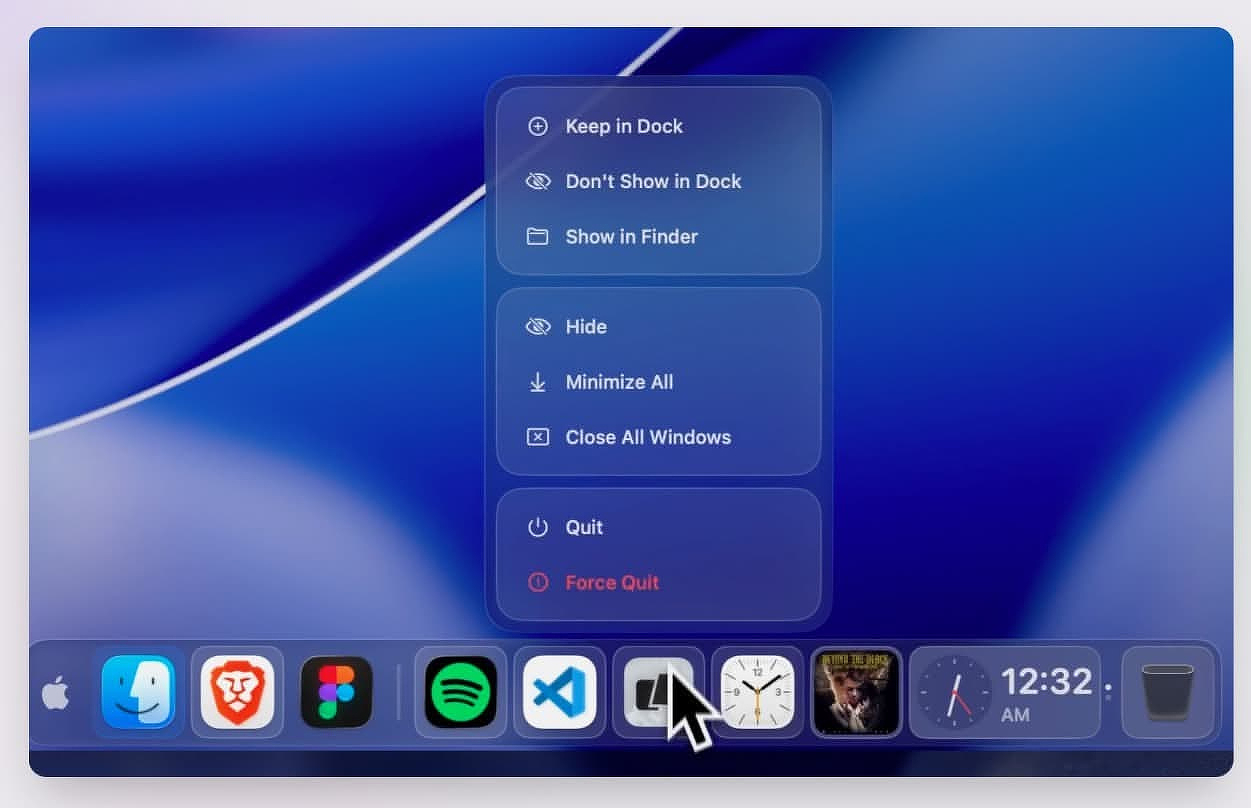
The real question with any Dock utility is whether it replaces the native Dock or merely augments it. DockDoor Pro can do either. I hid the native Dock completely and did not run into any problems.
The other killer feature, and one Apple will probably never give us for fear of waking the ghost of Steve Jobs, is the ability to exclude a running app from the Dock. You no longer have to stare at every app just because it happens to be open.
Dock Profiles - I work in multiple contexts. Some of my time is spent testing software and writing reviews. For that, I need quick access to a file manager, an uninstaller, Activity Monitor, Drafts, Obsidian, my Downloads folder, the folder where I keep rough drafts, the folder where I keep archives, and Reddit.
DockDoor Pro profiles can include:
- Pinned apps
- Folders
- Files
- Widgets
- URLs
- Design elements, including separators and spacers
When I switch to media management, I need a different setup: Calibre, Swinsian, Yate, digiKam, & ToyViewer.
When it is time to do research or just relax, I want Inoreader, FreeTube, Plex, Radarr, Sonarr, and websites like Mac Menu Bar and AlternativeTo.
DockDoor Pro gives you two ways to switch profiles. The easiest is to associate a specific app with a profile. When you open an app tied to another workflow, the Dock profile changes automatically. If you work with multiple monitors, you can also assign different Docks on a per-display basis.
One welcome feature is the ability to export Dock profiles as JSON. That makes it easy to move a setup to another Mac or keep a restorable backup in case an experiment goes sideways.
Control Panel - Each Dock contains a tiny icon that opens a control panel when long-clicked. It consolidates an app launcher, profile switcher, volume slider, audio device picker, and power controls. It is a well-designed bit of UI rather than a pile of bolted-on buttons.
File Tray - If you keep your Dock at the bottom of the display, scrolling on it reveals a file tray. You can drop files there temporarily, drag them back out when you need them, or send them via AirDrop directly from the tray.
Widgets - DockDoor Pro also includes small widgets that add live tiles directly to the Dock, including weather and system stats. They stay compact at rest and expand with more detail on hover. They also adapt to the Dock's design, so they do not look like afterthoughts.
The music widget is almost an app within the app. You get album art, a seek bar, and synchronized lyrics with a karaoke-style anticipation offset. Whether that is useful or just fun depends on how you work. I do not need lyrics in my Dock, but I understand the appeal.
Customization
This is the least opinionated Dock app I have used. If you are not inclined to fiddle, it looks fine out of the box. If you like to experiment, you can control almost every visible part of the UI, including:
- Color
- Spacing
- Padding
- Background
- Shape
Conclusion
DockDoor Pro is still in beta, and there is a warning not to use it on a mission-critical machine, so do not install it on your boss's MacBook and blame me if something gets weird. That said, I have not encountered any instability after two weeks of constant use.
This is an app best suited for power users, especially those with multi-monitor setups or workflows that shift throughout the day. If you use the same five apps all the time and do not care about customizing your workspace, you can probably skip it. But if you have ever wanted the Dock to be more useful, more contextual, and less stubbornly Apple-like, DockDoor Pro is worth a look.
DockDoor Pro Website - DockDoor Pro - Official macOS Dock Replacement
Privacy Policy - DockDoor Pro | Privacy Policy & EULA
Price - $20
Bartender Enters a New Era with Top Shelf
For the past few weeks, I’ve been beta testing a new release of Bartender; an app with an interesting, and at times slightly controversial, history. Despite that, it’s a utility I’ve relied on for years. I recently did a deep dive into the problems macOS changes have created for menu bar managers and what those changes mean going forward. Even with a few lingering issues in the category, I still came away viewing Bartender as the best overall option for serious Mac users.
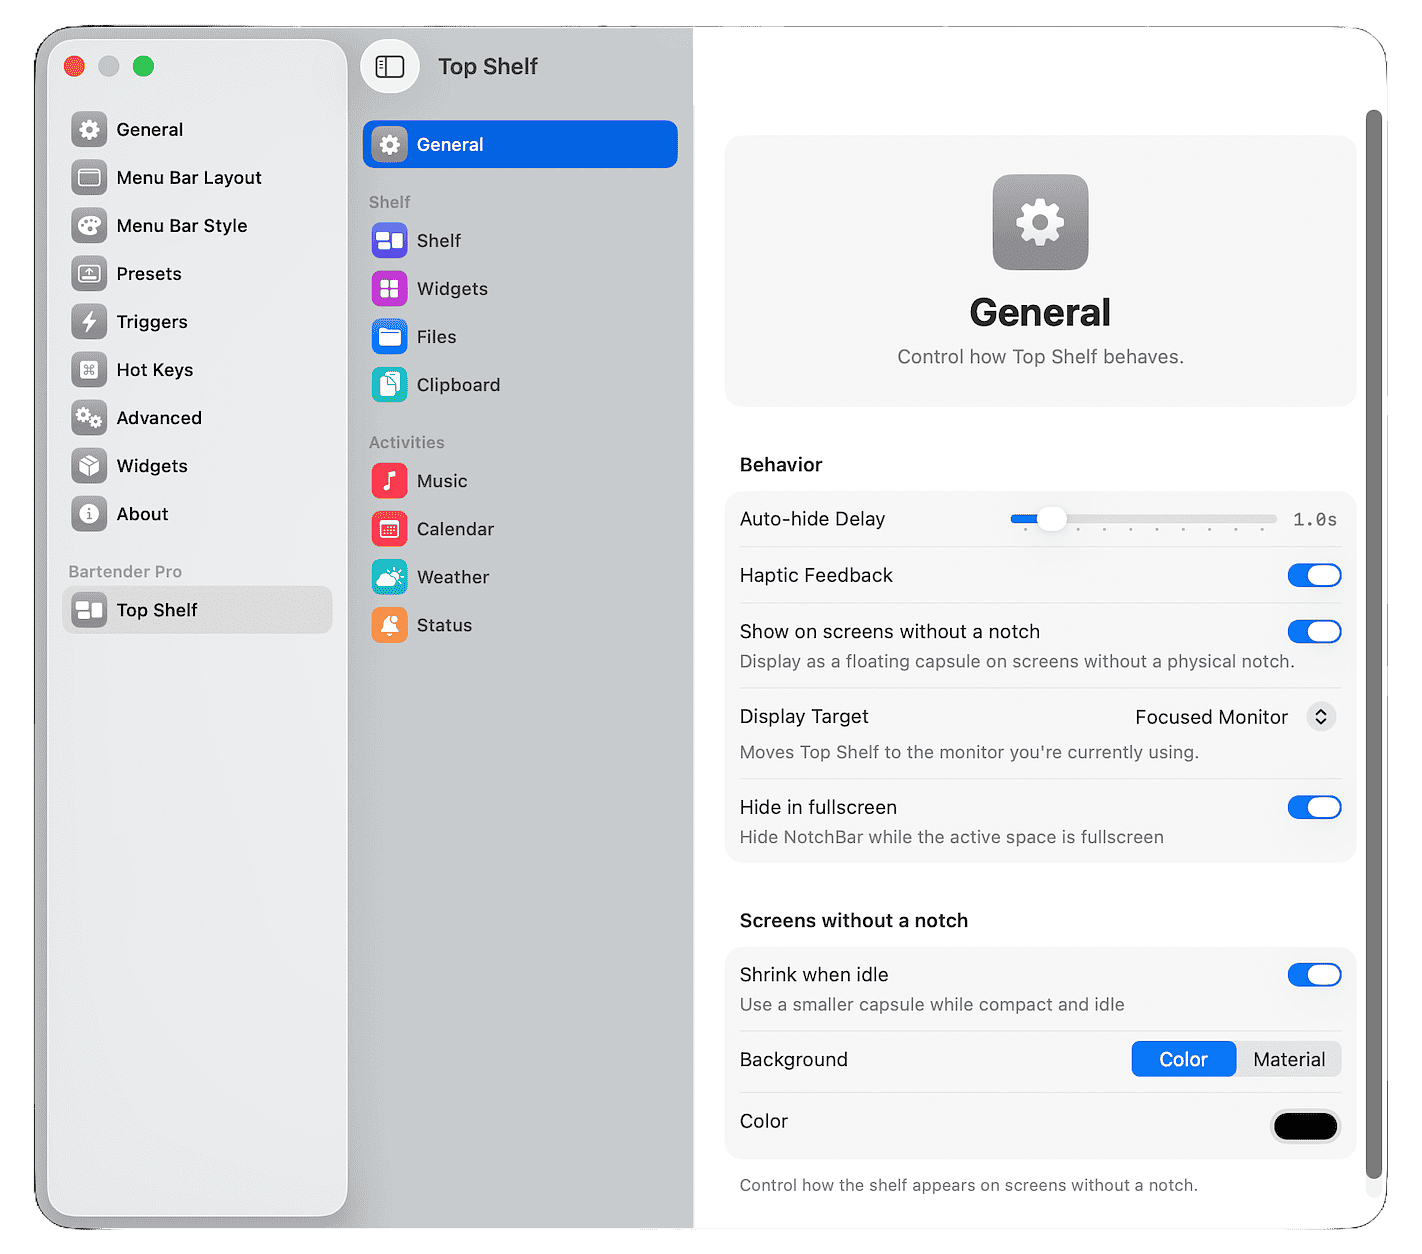
The new release, called Bartender Pro, expands beyond traditional menu bar management with a feature called Top Shelf. The idea is simple: turn the MacBook notch into something genuinely useful instead of leaving it as dead space. The developers are entering an increasingly crowded area occupied by apps like Droppy and DynamicLake Pro, both of which are also trying to claim that piece of Mac interface real estate.
Top Shelf supports temporary file storage, clipboard history, AirDrop access, widgets, media controls, live weather, calendar views, and what Bartender calls “live activities.” One particularly interesting addition is support for displaying the status of running Claude Code or Codex sessions directly from the notch area. That puts Bartender Pro in direct competition with Droppy for AI-focused workflow integration.
I’m fortunate to have a small home lab with several Macs available for testing. I’ve been running Bartender Pro on my M2 MacBook Air with the latest version of macOS, and overall the implementation feels thoughtful and mature. The developers have integrated the new functionality cleanly into Bartender’s existing settings architecture rather than bolting on a second interface.
The Top Shelf interface itself is polished and visually cohesive with macOS. More importantly, it offers enough customization that power users should be able to shape it around their workflow instead of adapting to someone else’s idea of how the notch should work. Enabling or disabling features is straightforward, and the configuration process never feels overly complicated.
One feature Bartender Pro offers that I have not seen handled as well elsewhere is its dynamic interaction with the Bartender Bar itself. The app intelligently avoids hiding menu bar items behind the notch interface, which sounds minor until you actually start using multiple notch utilities and discover how messy that problem can become.
Importantly, none of this replaces the traditional Bartender experience. The new functionality is strictly additive. Bartender 6 is still available as a standard one-time purchase for $20, and the company has been explicit that core menu bar management is not being moved behind a subscription wall.
For users interested in Top Shelf and the broader Pro feature set, Bartender Pro is available as a $15/year subscription. That includes Bartender 6 along with all upgrades released during the subscription period.
The Bartender team has clearly invested serious effort into getting this release right. During the beta period, updates arrived constantly, feedback was actively incorporated, and bug reports received prompt attention. That responsiveness matters, especially for utility software operating this deeply inside the macOS interface.
If you are evaluating notch utilities or trying to build a cleaner AI-oriented Mac workflow, Bartender Pro deserves a serious look.
New Droppy Release is a Full Featured Utility Suite
An update to Droppy by developer Jordy Spruit dropped this weekend. What started as a free notch app has evolved into a paid, but still inexpensive, suite of Mac productivity tools.
The licensing recently changed so that Droppy’s one-time payment now gets you a license for two Macs instead of one. The change is retroactive and applies to all users. From now until May 31st, the price is €6.99. After that, it will be €9.99. Both prices include lifetime updates, including major version releases.
Droppy is written in native Swift. It’s signed and notarized by Apple, runs on macOS 14 and later, and ships without analytics or third-party trackers.
Spruit says, “v14 contains more than 100 user-visible bug fixes and dozens of performance improvements, all driven by feedback from the Discord testers I’ve been working with daily for months.”
My Personal Use Cases
In previous versions of Droppy, I’ve used the notch based shelf, the menu bar manager, and the heads up displays extensively while dabbling with the other features. With the extensive additions in the new version, I plan to see what else feels like a good fit for my work style.
Five Functions, One App
You can roughly classify what Droppy v14 does into five areas.
-
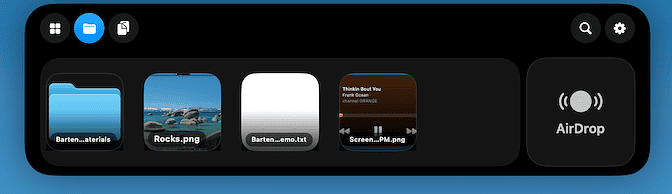
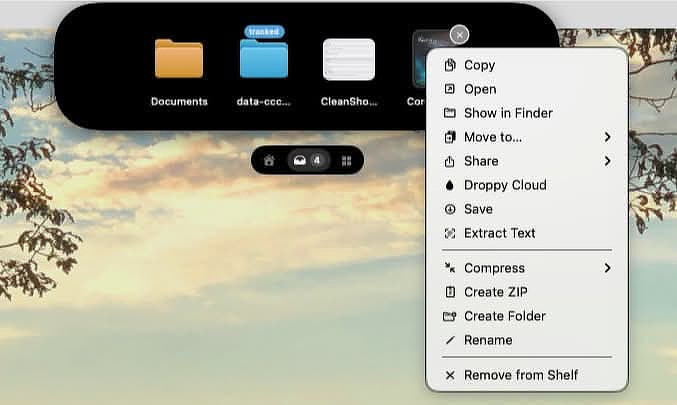
Drag-and-drop shelf that lives in the notch
Drop files onto it to stash them temporarily, then drag them back out when needed or run quick actions like move, copy, share, zip, unzip, compress, or convert. -
Clipboard Manager
Includes live previews, pinned and favorited entries, OCR, a built-in screenshot editor, custom tags, and more. -
Floating Shelves
Droppy calls them “baskets,” but the concept is similar to the shelf in the notch. You can designate watched folders that automatically populate baskets with files, and the interface supports multiple baskets at once. -
Heads-Up Displays (HUDs)
You can selectively enable notch-based HUDs for things like: - Volume or brightness changes
- AirPods connections
- Internet connectivity loss
- VPN connections
- Low battery warnings
- Music playback
- Notifications
- Caffeine activation to prevent sleep
-
Extensions
Droppy calls them “Droplets.” These are add-on features that plug into the notch interface.
There’s no extra charge for extensions, and several of them realistically replace standalone apps.
Included extensions include:
- Voice transcription, including live transcription feedback while speaking; something many competing apps still don't offer (new)
- Mechanical keyboard typing sounds routed only through headphones during meetings so you don't blast everyone else on the call
- An AI coding companion that surfaces activity from Claude Code, Cursor, and Codex directly in the notch, with one-click return to the active app
- A major overhaul to menu bar management via an internal version of Thaw, a fork of Ice, bundled directly into Droppy
Clipboard manager - Droppy Cloud; a temporary file-sharing service that generates 24-hour share links (new)
- Meeting controls for Zoom, Teams, and similar apps
- Pomodoro timer
- Tiny terminal, and more
Replacement Suggestions
Dedicated apps will usually go deeper in specific areas, but if you mainly need solid day-to-day functionality, Droppy v14 could realistically replace:
- MacWhisper or similar transcription apps
- Bartender, Hidden Bar, or Barbee for menu bar management
- Yoink, Gladys, or Unclutter for shelf-style workflows
- Clack or other mechanical keyboard sound apps
- PastePal, Paste, Copy 'Em, and similar clipboard tools
- Dropover or DropShare
- A separate Pomodoro timer app
Some Notable New Features
Droppy Cloud
The sharing limits are generous:
- 100 MB per file
- 1 GB per share
- 25 files per share
- 1 GB of active shared data per installation at a time
The generated links open into an iCloud-style interface with:
- Image previews in a grid with click-to-expand
- Inline video and audio playback
- Inline PDF viewing
- Individual downloads plus “Download All” ZIP support
- A clean, mobile-friendly layout
Lock Screen Display
When playing music in Apple Music, the lock screen now displays expanded album artwork. Synced lyrics scroll over a soft blur effect that keeps them readable even against busy animated art.
New UI
According to the developer, every animation in the app has been rebuilt by hand. When the shelf opens, a HUD appears, a widget swaps, or the notch reacts to your cursor, the motion now shares one consistent spring-based feel.
The small floating pill below the notch expands similarly to Dynamic Island on iPhone, and the shelf physically drops down from the notch instead of simply fading in.
Feedback on the Update
Droppy makes reasonable demands on system resources based on what it does. At idle it consumes about 5% of my M4 CPU and around 275 MB of RAM, about the same amount as the apps, Drafts and Mona for Mastodon use on my system.
The new interface is subtle, but well executed. Nothing feels over-designed just for the sake of animation demos.
Since Droppy Cloud runs on the developer’s own infrastructure, the 24-hour expiration window makes sense. Features with ongoing hosting costs usually end up behind subscriptions sooner or later, so it’s refreshing to see this included in a one-time purchase.
I was accustomed to the previous menu bar manager, so the switch to the integrated Thaw-based system took a little adjustment. But after using it for a bit, it feels like a real upgrade rather than a cosmetic replacement. It exposes more functionality than the older implementation and fits better with the rest of the app.
Droppy already does an almost unreasonable number of things, but I still have one request: I’d love to see a lightweight notes or scratchpad interface added somewhere in the ecosystem. Nothing elaborate; just a quick place to park temporary text while working.
Wrap-Up
Droppy v14 feels less like a “notch utility” now and more like a modular productivity platform that happens to live around the notch. Some people will absolutely think it’s trying to do too much. Fair enough. But if your workflow already overlaps with clipboard managers, shelf apps, menu bar utilities, lightweight sharing tools, and small workflow helpers, there’s a good chance Droppy consolidates more of your setup than you’d expect.
Liqoria: The Mac Dock Player That Should've Been Built In

The promise: A universal music controller that lives in your Dock and unifies Apple Music, Spotify, browsers, and more with animated artwork, real waveforms, and native Apple design.
If Apple were the company that so many people pretend that it is, it would make a music controller lives in your Dock and plays not just Apple Music but also Spotify, Youtube and more with animated artwork, real waveforms, using real native Apple design. The reality though, is that Apple Music is a storefront, not a music player.
Thankfully, we now have Liqoria, which quietly removes the whole category of app-switching annoyances that plague every other macOS music player. The Dock placement is better than notch-only players. The feature set makes it more than just a controller. The design is more native-feeling than 99% of indie apps.
Liqoria proves three myths wrong at once:
- that all miniplayers belong in the menu bar
- that you need multiple apps for different services
- that Apple will one day build a proper music widget.
What Liqoria Actually Does
Four player modes in one app:
- Dock Player -- Dynamic Island-style player docked to the macOS Dock, controls integrated directly where apps live
- Floating Player -- Draggable desktop player with full controls
- Menu Bar Player -- Compact menu bar integration
- Lock Screen Player -- Full-screen controls with animated artwork
Liqoria doesn't just pass commands to Apple Music and call it a day. It is a standalone music player with built-in search, queue management, and playback control. You can search Apple Music and Spotify directly, manage your Now Playing queue (including Apple Music), and control playback without ever touching the source app.
The multi-player view is the real weapon. See all active music sources at once -- Apple Music, Spotify, browser playback, anything exposing to Control Center -- and switch between them. Most competitors show one source or force you to cycle. Liqoria shows everything at a glance.
The visual polish is borderline aggressive. Real FFT waveform visualization (that pulsing audio graph from Dynamic Island), animated album art for supported tracks (SZA's "Kill Bill" actually animates on lock screen), and that liquid glass aesthetic stolen shamelessly from Apple's design language. It's the kind of UI that makes you check if it's using private frameworks (it is, which is why it's not on the App Store).
Features Set
Built-in search across platforms: Search Apple Music and Spotify directly within Liqoria. No context-switching to the Music app or Spotify client. YouTube search is coming -- dev confirmed it's in progress but won't drop until it's ready.
Apple Music queue management: Finally, see and manage your Now Playing queue from a miniplayer. Apple Music's own app doesn't even show this in mini mode. You can reorder, remove, and see what's coming next without opening the full app.
Playback control that goes beyond play/pause: Like, shuffle, repeat, scrubbing, and the waveform visualization gives you a visual read on track activity. The dock player responds to hover and integrates clean with the Dock's native behavior.
Multi-source control: If you switch from YouTube Music to Apple Music, Liqoria can track the active source. The dev admits Apple's API makes this difficult -- play/pause sometimes grabs the wrong source -- but a dedicated YouTube controller mode is in progress to fix this.
Lyrics support: Already displays lyrics with major updates incoming. Current implementation works; future version will be a significant overhaul.
Customization:
- Switch between liquid glass and standard styles
- Configure dock player position (center/left/right)
- Priority settings for multiple audio sources
- Keyboard shortcuts for everything
The Competition
Silicio, VinylPod, Sleeve:
These are solid but fundamentally limited. Most support only Apple Music and Spotify, lack built-in search, can't display multiple players simultaneously, and ship with the same queue control gap that Liqoria fills. Sleeve's album art integration is pretty, but it doesn't let you search Spotify or manage Apple Music queues without reaching for the source app.
Dynamic Island clones (Menu Bar/Notch):
The notch obsession is the wrong approach. When the Island expands, it blocks menu bar items and reduces usable screen space on the MacBook. The Dock makes more sense for high-frequency controls -- your cursor's already there for app interaction. You can glance at playback without breaking focus on your main window.
Browser-based miniplayers:
Fine for one service, but they don't unify across sources. Liqoria's the unifier -- one player for everything, no matter where the audio comes from.
Real-World Use
The workflow that clicks:
You're working in a fullscreen app, music playing from Apple Music. A track comes up you want to pull up in Spotify to check the original or explore the artist. Instead of:
- Cmd+Tab to Music
- Copy/paste search
- Jump to Spotify
- Search again
You invoke Liqoria's search, switch sources, and never leave your workspace. The 72-hour trial is more than enough to decide if this friction removal is worth $9.90.
The dock player specifically:
I run hidden docks (vertical on the left for screen real estate), so I was skeptical. But the dock player only appears when the dock is visible, and vertical dock support is coming in the next update ETA May-June. Even without that, the floating and menu bar modes cover the hidden dock use case.
The Apple Music queue fix:
I recently switched back to using my own curated music collection over subscription sources. If you rip CDs or build libraries instead of streaming, the queue view alone justifies the app. Apple Music's mini player shows track info and controls, but you can't see what's queued or reorder. Liqoria surfaces this without forcing you into the full Music app.
What's Missing (Or Coming)
Vertical dock support: Confirmed for May-June timeframe. Current version works with horizontal docks and respects hidden dock behavior.
YouTube search: In development, no ETA. Dev refuses to drop a half-baked implementation, which is the right call.
Lyrics overhaul: On the roadmap. Current support works but the dev promised "major improvements."
Local file playback: Not yet supported, but planned. Liqoria can control audio from Finder Quick Look and 99% of apps already, but direct local file playback is coming.
Scrobbling support: Planned (Last.fm, etc.), not yet implemented.
Minor bugs: Some users report the menu panel not opening over fullscreen apps (opens to desktop instead). Dev is responsive -- moved conversation to Discord/email to debug directly. This is active development, not abandonware.
The App Store Question
Why no App Store? The dev uses Apple private frameworks for browser music handling and Bluetooth device control. App Store review would reject this immediately. Direct download via Lemon Squeezy, 14-day refund window, lifetime license for up to 3 devices.
The reality is you trade sandboxed convenience for the kind of deep system integration that makes Liqoria work. If you live inside the App Store walled garden, this isn't for you. If you want your music player to actually control your system, it's the only option.
Pricing & Availability
$9.90 lifetime license (up to 3 devices, deactivatable anytime). Free 72-hour trial -- full feature access, no credit card required. macOS 15.4+ required. Available at liqoria.com.
This is aggressively priced compared to competitors selling subscription models or charging $20+ for similar feature sets. The lifetime model alone puts it ahead of Sleeve and company.
The Verdict
If you use multiple music services or want actual queue control, Liqoria is an instant buy.The multi-player view, built-in search, and Apple Music queue management quietly remove a whole category of friction that nobody else addresses.
If you're happy with one service and don't care about queues, this might be overkill. A simpler miniplayer or the native controls will suffice.
If you have a hidden dock, wait for the May-June update for full vertical dock support. The floating and menu bar modes work now, but you're not getting the headline feature without horizontal dock access.
The Dock vs. Notch debate is settled: The Dock makes more sense for high-frequency interaction. You're already glancing at it for other apps, and it doesn't block menu bar icons or eat screen space. The notch obsession is cool until you try to click that menu bar item and realize the Island ate your workspace.
Real Utility Defined: Not in copying Dynamic Island visual flair, but in unifying disjointed audio sources in one place. Liqoria doesn't look native -- it is native, enough that some users on r/macapps genuinely thought it shipped with the OS.
72-hour trial. If you switch between Apple Music, Spotify, and browser playback daily, you'll know whether this is worth $9 within an hour. The animations and waveforms are marketing; the unified control is why you keep it.
Corel Painter Is Still Alive and Still Ridiculously Good

Corel’s Spot on Memory Lane
I hadn’t thought about Corel graphics apps in a long time until I saw their flagship app on sale recently. I got my first tech-related job in 1994, when my ability to figure things out in Windows 3.1 earned me a promotion from the manufacturing floor to the quality department at the Westinghouse factory where I worked after getting out of the Army.
The tools I worked with felt absurdly expensive at the time: a Pentium PC, a Kodak digital camera, and the first color laser printer I’d ever seen. And then there was Corel; a professional suite of graphics tools I used to produce hundreds of technical work instructions for the people on the shop floor.
Corel still occupies a narrow but devoted niche in the graphics world. It’s loved by a small community of artists and designers and mostly ignored by everyone else in favor of mass-market tools from Adobe, Affinity, and a handful of others. The current version is Painter 2023. I took it for a spin and it’s more capable than anything else I’ve seen in its niche, but the real question is whether those capabilities matter to you.
But What Is It?
Painter isn’t a drawing app or an image editor in the conventional sense. It’s a digital canvas simulator built for artists who want the feel of oil paint, watercolor, ink, and charcoal without the mess. The brush engine is the entire product. Everything else exists to support it.
The target user is a professional illustrator, concept artist, or fine artist working with a Wacom or another pressure-sensitive tablet. If that’s not you, Painter probably isn’t for you, and Corel doesn’t pretend otherwise.
The Brush Engine
The reality is that no software on any platform simulates natural media the way Painter does. Photoshop’s brushes are powerful but fundamentally digital. Procreate feels great on an iPad but remains a raster drawing tool. Clip Studio Paint has excellent line tools but doesn’t attempt to simulate paint physics at this level.
Painter 2023 ships with hundreds of brushes organized across dozens of categories: Oils, Acrylics, Watercolor, Gouache, Pastels, Chalk, Charcoal, Inks, and more. Each category behaves differently at the physics level. Watercolor bleeds and beads. Thick paint builds up and catches light. Impasto brushes create actual texture relief on the virtual canvas.
The Fluid Brushes iappear to be a real game changer. They’re built around layer transparency and allow subtle glazing and blending effects that previously required awkward workarounds. Corel claims they run up to 50 times faster by leveraging both CPU and GPU acceleration. On Apple Silicon hardware (my M4 Mac Mini), the effect is genuinely impressive.
The Feature Set
- 900+ brushes covering nearly every traditional medium
- Fluid Paint with build, sculpt, and blend brushes plus precision opacity control
- Thick Paint with three-dimensional impasto simulation
- Particle Brushes that flow, fork, and react dynamically
- Color Selection Brushes that combine selection and painting workflows
- AI Photo Painting tools powered by Core ML
- Clone Painting for painting directly from reference photos
- Photoshop compatibility with layered PSD read/write support
- Tablet support for Wacom, Xencelabs, and Huion devices with pressure, tilt, rotation, and bearing support
- Customizable workspace with movable palettes, panels, and brush libraries
The Catch
This is not an easy app to learn, even for experienced users. Nobody is going to master Painter in an afternoon. Corel provides tutorials, webinars, and learning materials through its Painter portal, and if you decide to invest time in the app, you’ll probably need them.
The UI looks exactly like what it is: decades of accumulated decisions packed into a single workspace. Tool panels feel cramped even on a large laptop display. Honestly, two monitors feels less like a luxury and more like a requirement.
The current version is still Painter 2023. It runs fine on the last several macOS releases, including Apple Silicon Macs, but there was no 2024 or 2025 release, and it’s unclear whether there will be a 2026 version. I understand that it’s a mature product serving a mature niche, but some transparency about the development cycle would help inspire confidence.
Under normal circumstances, I couldn’t recommend that an individual pay the full perpetual-license price of $429. That’s the kind of software purchase employers are supposed to absorb. Especially when Procreate costs $12.99 and Clip Studio Paint EX runs about $50 a year.
But don’t stop reading yet.
The Justification
Right now, you can get a perpetual license for the full version of Painter 2023 for $49 from BundleHunt. That’s still real money, but it changes the equation dramatically.
If you’re genuinely curious, already own a pressure-sensitive tablet, and have the artistic skills to take advantage of what Painter offers, this becomes much easier to justify. At that price, it’s less a reckless software purchase and more an opportunity to experiment with what is probably the most sophisticated paint-physics engine ever shipped on a desktop computer.
Painter 2023 for Mac
Developer: Corel Corporation
Price: Regularly $429 | BundleHunt Price $49
macOS: Sequoia, Sonoma, Ventura
Apple Silicon: Native (M1 and later, optimized)
Website: painterartist.com
Affiliate links are used on this blog in about 10% of posts.
Substage - A Natural Language Command Line Tool for Finder
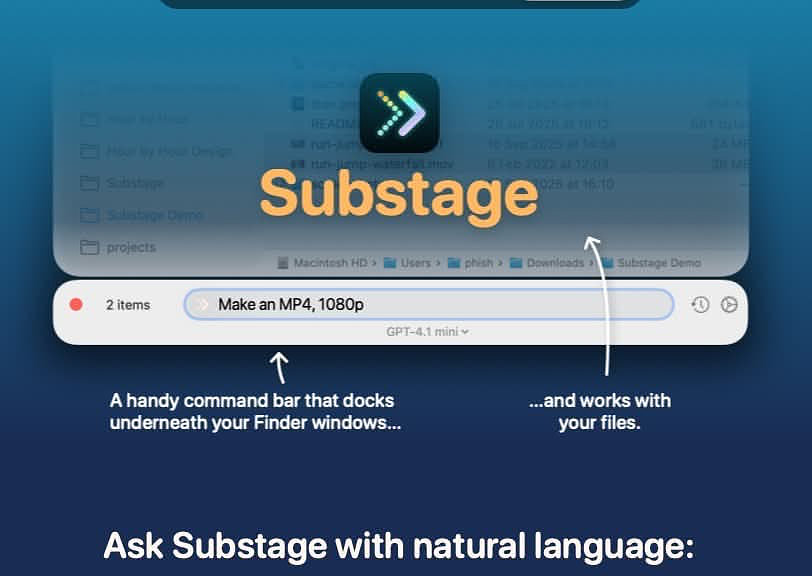
Substage is a command bar that attaches beneath your Finder window. Select files, type what you want in plain English, and Substage generates a Terminal command, previews its side effects, and runs it with confirmation when needed.
Think of it less as an AI assistant and more as a natural language layer between your intent and the Unix tools already built into macOS.
The key distinction; the AI’s role ends once the command is generated. After that, real shell tools do the work: sips, ffmpeg, zip, qpdf, pandoc, git. No hallucinated output. No “trying until something works.” The command either works or it doesn’t, just like it would in Terminal.
Developer: Selkie Design — Joe Humfrey (u/joethephish)
Platform: macOS 15.0 or later
Pricing: BYOK — $39.99. Currently on sale for $5 at Bundlehunt
Website:
Let’s Get One Thing Straight
Even if you’re comfortable in the Terminal, it can still be tedious.
Using natural language to drive command-line tools isn’t about avoiding the shell; it’s about removing friction. I reach for Substage in the same situations where I’d otherwise open a converter app, type out a sips command, or navigate into a deeply nested folder just to run something quick.
The goal isn’t to replace knowledge; it’s to make it easier to apply.
Features That Matter
Substage Predicts
This is what makes the app practical.
Before running anything, Substage simulates the command using a custom interpreter that understands pipes, redirection, and arguments across a wide range of tools. You can see exactly what will happen; which files will be created, renamed, moved, or deleted.
This feeds into Auto-run:
- Read-only operations can run automatically
- Destructive actions always require confirmation
It’s not just a safety layer; it gives you confidence to use it for real work.
Instant Actions
For simple tasks, Substage skips the AI layer entirely. Commands like jpg, zip, or mp4 execute locally with no delay.
That keeps common operations fast and predictable.
Command History
Up-arrow cycles through previous commands, just like in Terminal. Small detail, but it makes repeat tasks and batch workflows much more practical.
Model Flexibility
By default, Substage uses GPT-4.1 Mini; fast and reliable for most tasks.
The BYOK license lets you use your own API keys or local models via Ollama or LM Studio. OpenRouter and Perplexity also work with custom configuration.
Global Shortcut
Ctrl-Space by default. Opens Substage under the active Finder window. Fast enough to become muscle memory.
Real-World Use Cases
This is where it starts to earn its keep:
- Batch image resizing across folders
- Video conversion with control over resolution, FPS, and bitrate
- PDF workflows: merge, split, rotate, password protect, extract text
- Document conversion via
pandoc(DOCX ⇄ Markdown ⇄ HTML ⇄ EPUB) - File metadata inspection - “Where did I download this?”
- Git operations without leaving Finder
- Quick system queries without opening System Information
- Numeric calculations using
bc
It cuts out the need for one-off GUI wrappers around tools you already have.
Honest Limitations
The developer is clear about where things break down.
-
Multi-step prompts are unreliable
Chaining actions like “convert, rename, and zip into subfolders” can work, but reliability drops quickly. Better to split tasks into discrete steps. -
Finder only
No support for Path Finder or ForkLift. If you don’t use stock Finder, this won’t fit your workflow. -
Default Folder X conflicts
Documented in the FAQ. If you rely on it, test carefully. -
No multimodal features
No image analysis, no transcription, no generative features. This is strictly a file operations tool. -
Occasional lag
It can trail Finder updates slightly. Not constant, but noticeable.
The Verdict
Substage addresses a real gap; what macOS can do versus what you can remember how to ask it to do.
- Natural language handles syntax
- The simulator handles safety
- Native tools handle execution
It won’t replace Hazel, and it’s not meant to.
What it replaces is the friction between intent and execution; opening another app, digging through menus, or reconstructing a command you last used months ago.
Caveats matter:
- Default Folder X users should evaluate carefully
- Multi-step commands are hit or miss
- Finder dependency is real
But within its lane; single-step, file-focused operations; it’s genuinely useful.
If you spend a lot of time in Finder and regularly convert, inspect, compress, or manipulate files, Substage removes a surprising amount of friction.
I Got a Sneak Peek at the Spring Sale at BundleHunt

For bargain hunters, BundleHunt makes the holidays happen four times a year. Many well-known and popular apps have appeared there over the years at prices 70% to 90% below what's the apps typically sell for. This current bundle is no exception The oldest receipt I have for a purchase from them is from 2015. I've purchased over 50 different apps without ever having a bad experience.
Here's the current selection. I've posted links to ones I've reviewed in the past.
Apps I've Reviewed
- Find Any File (FAF) -- File search tool that goes deeper than Spotlight, reaching locations Spotlight ignores like system folders and external drives. Supports precise, rule-based search criteria. Find any File for $2: New BundleHunt Sneak Peek | AppAddict
- Picmal -- Batch media converter and compressor for Mac covering images, video, and audio. Handles format conversion without launching a separate app per file type. - Automation Fans Are Going to Love PicMal for Conversions | AppAddict
- ScreenMemory -- Continuously captures your screen activity so you can search and recall anything you've seen on your Mac. Local processing keeps your data private. - Screen Memory | AppAddict
- Integrity Pro -- Broken link checker with sitemap generation, SEO auditing, and redirect tracking for websites. Companion to Scrutiny, focused specifically on link validation and site mapping. - Integrity - Free Link Checker | AppAddict
Apps I Have Experience With
I've been using all of these apps for a while, but haven't written them up yet. I'll give you some details soon.
- DeltaWalker -- Advanced file and folder comparison tool for spotting, merging, and syncing differences across Mac, Windows, and Linux. Handles text, images, and office documents side by side.
- TaskPaper -- Plain-text to-do list app built around a simple, outline-based format that's been a productivity staple since 2006. No database, no lock-in--just a text file you can read anywhere.
- SupaSidebar -- Unified sidebar that surfaces tabs, bookmarks, and apps from all your browsers in one place. Eliminates the need to switch browser windows to find what you're looking for.
- Substage -- Natural language command bar layered on top of Finder windows. Type what you want to do with a file or folder instead of navigating menus.
- Command-Tab Plus -- Enhanced app and window switcher that replaces macOS's default Cmd-Tab with a richer, more controllable interface. Supports window-level switching, not just app-level.
- HazeOver -- Dims all background windows to keep focus on the active one. Configurable opacity and works across multiple displays.
- Duplicate File Finder -- Scans your Mac for duplicate files using content-based comparison, not just filenames. Frees up disk space by safely removing exact copies.
What I'm Buying this Spring
I'm going to try and write reviews on all these while the sale is ongoing.
- Painter by Corel -- The industry-standard digital painting application, delivering Natural-Media™ brushes and
- Notepad.exe -- Lightweight native macOS IDE supporting Swift, Python, and JavaScript with instant code execution and iOS Simulator integration. Includes on-device AI and SwiftPM support.
- Scrutiny -- Full-featured website crawler that audits broken links, SEO issues, metadata, and more. Generates detailed reports without requiring a subscription.
- WonderPen Pro -- Distraction-free writing app designed for long-form content and storytelling. Combines a clean editor with project and document management tools.
- Ebook Converter Ultimate -- Converts ebooks between PDF, ePub, Mobi, AZW, TXT, and other formats. Handles batch conversions for large libraries.
- JSON Wizard -- Native Mac JSON viewer and formatter for quick inspection and editing of JSON data. Part of the enSili utility suite.
- MacMobility -- iPhone companion app that lets you control and automate your Mac remotely. Bridges the gap between iOS shortcuts and macOS actions.
Find any File for $2: New BundleHunt Sneak Peek

The spring sale for Bundle Hunt doesn't officially open until tomorrow, but I have some inside info on what's coming this time around for the bargain hunters out there. One of my favorite apps for over two decades is going on sale for $2.
Mac users have a wide range of file search tools, from the built-in Spotlight to professional options like Foxtrot that cost north of $100. The right choice depends on how you actually search.
I tend to run the same kinds of queries repeatedly, so saved searches and reusable templates matter. I also frequently need to locate a specific file quickly, which means I care about a clean interface and fast launch.
My go-to for day-to-day work is Find Any File (FAF). It’s currently on sale at BundleHunt for $2, which is almost absurd given what it does. More importantly, it finds files that Spotlight simply won’t.
Spotlight is fast. It’s convenient. It’s also quietly omitting large parts of your filesystem.
FAF searches everywhere Spotlight skips: system and Library folders, hidden files, package contents, network volumes, and external disks. Most tools avoid these areas. FAF doesn’t.
Hold ⌥ in the search window and the Find button changes to Find All. Enter your admin password, and FAF relaunches with elevated privileges, allowing it to search other users’ home directories on the same Mac. That sounds niche until you actually need it.
Spotlight only indexes what Apple chooses to include. System folders, many Library paths, network volumes, other users’ home directories, and files buried inside app bundles are often excluded. If you’ve ever tried to track down a preference file, cache, or config in /Library, you’ve probably hit this wall: no results, no explanation, and no confidence the file is even there.
What It Is
Find Any File, developed by Thomas Templeton, has been around for over two decades. The current version is 2.6.
Its core approach is straightforward: it searches the filesystem directly via BSD APIs instead of relying on Spotlight’s index. No index means no blind spots. If the file exists and your permissions allow it, FAF will find it.
This isn’t a full replacement for Spotlight. It’s the tool you reach for when Spotlight comes up empty.
Key Features That Actually Matter
Precise search rules
The search builder supports stacked criteria: filename (including wildcards and regex), extension, size, date ranges, file type, visibility, Trash status, and even Finder comments.
Real-world example: in a large ~/Music library, you can find every file that isn’t MP3 or AAC and is larger than 1 MB. That’s a simple three-condition query here; Spotlight can’t express it cleanly.
Content search
FAF can search inside plain text files and compressed archives, including .docx and .xlsx. With optional Spotlight integration enabled, you can also pull in PDF content results alongside FAF’s direct matches.
Hierarchical results view
Flat lists break down quickly with large result sets. Switch to tree view (⌘2) and results are grouped by folder hierarchy, which makes triage and cleanup work much faster.
Saved searches
Save any query as a .faf file and rerun it with a double-click. This is where FAF becomes a workflow tool, not just a utility.
Example use case: auditing an Obsidian vault for non-markdown files (anything that isn’t .md, an image, or a PDF).
Automation hooks
FAF exposes a URL scheme and integrates cleanly with tools like Keyboard Maestro, PopClip, Default Folder X, and BBEdit. If your workflow is hotkey-driven, this is where it starts to compound.
A Little Reality
FAF isn’t instant. It performs a live filesystem scan rather than querying an index.
On a fast SSD with a narrow scope, it’s quick enough. On a large spinning disk or wide search scope, it takes longer. That’s the tradeoff: completeness vs. speed.
For the situations where you reach for FAF, completeness usually wins.
The UI is functional and very macOS-native. It uses the same criteria-building pattern as Finder searches and Smart Mailboxes, so there’s almost no learning curve if you’ve used those.
Pricing & Availability
You can grab it via BundleHunt during sales, or buy it outright on the Mac App Store as a one-time purchase. There’s also a direct download from the developer that runs as shareware: try it, pay if you keep using it.
If you already purchased the App Store version, you can run the direct version on the same Mac without buying it again. That’s a small detail, but it says a lot about the developer.
Who It’s For
Anyone who has run into Spotlight’s invisible boundaries:
- developers tracking down config files
- power users auditing disk contents
- admins who need full visibility
- anyone who’s ever thought: “this file exists, why can’t I find it?”
FAF isn’t flashy. It’s a precision tool for when Spotlight stops being honest about what’s on your disk.
Tolaria: a files-first Markdown app for Mac designed for Git workflows and AI agents
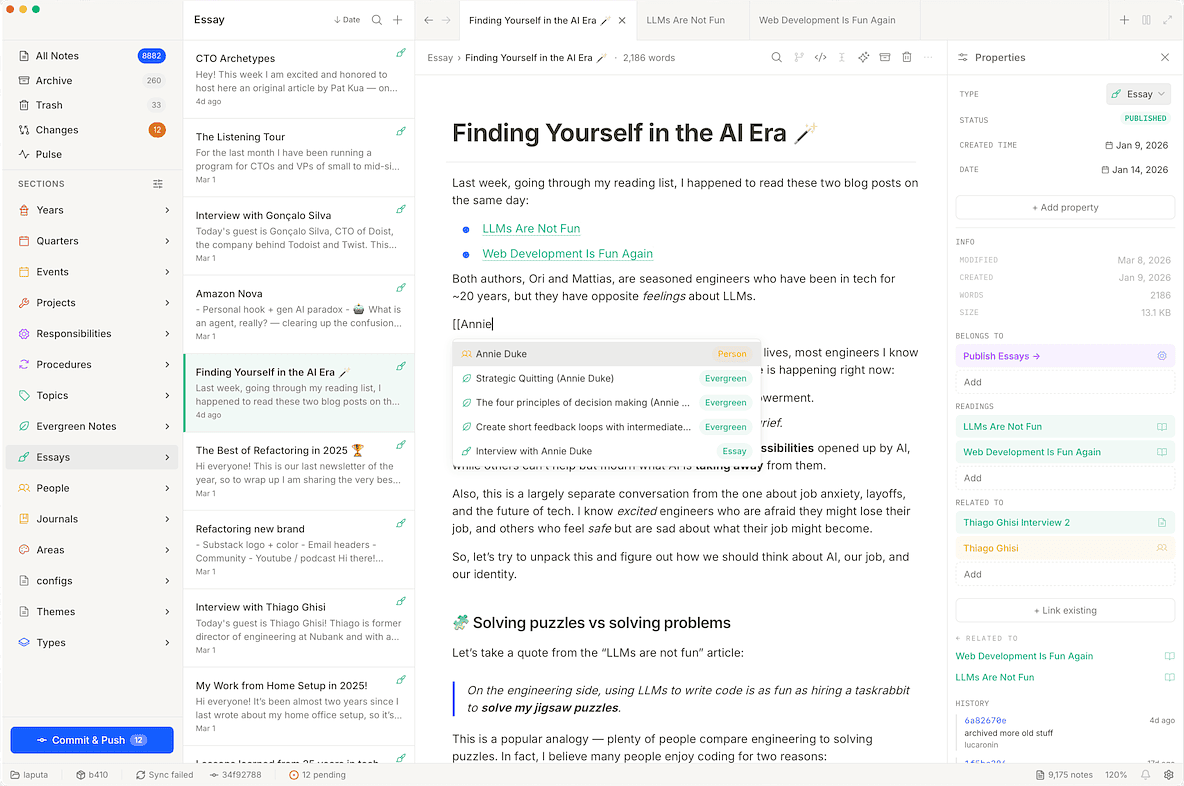
Tolaria is a free, open-source desktop app for macOS and Linux built by Luca Rossi, the author of the Refactoring newsletter. Rossi created Tolaria to manage his own collection of 10,000+ notes.
That origin story matters. The feature set feels like it grew out of solving real problems for a real workflow; not something assembled by a product manager or stitched together from an AI roadmap.
At its core, Tolaria is a very 2026-style Markdown editor; modern, opinionated, and not trying to clone Notion or compete head-on with Obsidian.
The sweet-spot user is someone who:
- Already lives in Markdown and Git
- Is experimenting with tools like Claude Code or other AI agents in their daily workflow
- Wants their knowledge base to be part of their AI context instead of isolated from it
- Treats data portability as a non-negotiable requirement
Tolaria’s Core Principles
These are deliberate design choices from the developer.
Files-first.
Notes are plain .md files on disk. No proprietary database; no export step. Open them in BBEdit, Obsidian, Vim, or anything else that understands Markdown.
Git-first.
Every vault is a Git repository. You get full version history and can push to any remote you like. There are no Tolaria servers; the app doesn’t depend on one.
That alone sets it apart from a lot of the field.
Offline-first, zero lock-in.
No account. No subscription. The vault works completely offline.
Open source (AGPL-3.0).
The code lives on GitHub. You can read it, fork it, and run your own build if you want.
What It’s Not
Tolaria is not trying to be Notion.
There’s no relational database layer, no property-driven schemas, and no team collaboration platform. That trade-off is intentional; those features usually come with heavier infrastructure and less portability.
It also doesn’t have anything close to Obsidian’s plugin ecosystem. If your workflow depends on dozens of community plugins, Tolaria probably isn’t ready to replace Obsidian yet. It’s a younger, more focused tool.
Another practical detail: it runs on Mac and Linux only; there’s no Windows version. For some people that’s a dealbreaker. For others, it’s perfectly fine.
AI Support and Integration
This is where Tolaria earns its “second brain for the AI era” tagline.
Instead of bolting on a chat sidebar, the app treats your knowledge vault as something AI agents can actually work with.
Tolaria includes built-in support for tools like Claude Code, Codex CLI, and Gemini CLI. It automatically generates a shared AGENTS.md file in the vault root. That file explains the structure and conventions of your notes, and every supported AI tool reads the same one.
The practical benefit: you maintain a single source of truth for how your vault is organized instead of writing separate instructions for each model you’re experimenting with.
Tolaria also runs a local MCP (Model Context Protocol) server. When you connect an external AI tool, your vault is registered as a structured context source that the agent can query directly.
Most “AI-enabled” note apps just add a chat window. Tolaria takes a different approach: it lets AI agents navigate and operate on the vault itself using standard protocols.
There are also vault-level permission modes, so agents don’t automatically get full write access to your notes.
Power-User Bonus Feature
Tolaria clearly targets people who prefer keyboards over mice.
The Command Palette is central to the workflow, and the editor is designed around keyboard navigation. If you spend time in tools like Raycast, Keyboard Maestro, or VS Code, the design philosophy will feel familiar.
This is the difference between a command palette that drives the interface and one that feels bolted on as an afterthought.
Availability and Pricing
Tolaria is free and open source.
You can download it from tolaria.md or build it yourself from the GitHub repository.
No subscription. No account. No catch.
Hat tip to Labnotes for once again, being the first to write about a new tool