
Using Orbit to manage the Google accounts I didn't want

TL;DR: Orbit runs each of your Google accounts in its own isolated WebKit session inside one native Mac window, for $89 one time instead of the $50 to $200 a year the alternatives want. It exists because you can de-Google yourself but you can't de-Google your father. The catch is that it only works as long as Google keeps letting Mac apps sign in, and passkey-only and Advanced Protection accounts already can't.
The Google Accounts I Didn't Ask For
My opinion of big tech companies has hardened over the years. Their business models turned into anti-privacy juggernauts, so I started pulling away from them. In January 2025, after using Gmail for twenty years, I downloaded my entire archive, deleted every message off their servers and moved to Fastmail. Drive went to Koofr. Search went to Kagi. Gemini got replaced by ChatGPT. I left the empty account open since it linked me to a lot of legacy logins and contacts.
Then, nine months later, I became responsible for managing the affairs of my elderly father, something that commonly happens to people in my age group. Dad's life ran through multiple Gmail accounts, personal and professional: his doctors, his investments and the guy who cuts his grass all reached him through Google, the company I had worked so hard to get away from. I couldn't ask an 80-year-old man to move house on the internet. I had to log back in.
That's the part nobody warns you about. You can de-Google yourself in a weekend if you're stubborn. You can't de-Google somebody else, and the account that drags you back in was never yours to begin with.
Browsers do this badly on purpose. Google's account switcher runs every account you sign into through a single browser session, so a security re-check on one can sign you out of all of them at once, and the account you're currently "in" is a state you have to remember rather than see. Everybody who lives this way eventually has the moment where they send, or nearly send, a message from the wrong account. Sometimes that's an embarrassment. Sometimes it's worse.
The fix is an app, and the one I recommend is Orbit from Andrew Kwak at Dearnode. It's a one-time purchase of $89. That's a steep number to look at once, and cheaper than every competitor that charges $50 a year and up.
Each account gets its own sealed WebKit session, with its own cookies and its own sign-in, so signing into one never signs you out of another. ⌘1 through ⌘9 switch between them, all preloaded, with unread badges per account. Inside each one is the real Gmail, not a rebuild through the API, so your labels, filters and keyboard shortcuts are the ones you already have. Calendar, Drive and Meet open in the right account too. I have three accounts in mine.
Why I picked Orbit
Orbit is designed around privacy. It doesn't route your mail through a server it owns. There is no Orbit account to maintain. Analytics are turned off by default. It doesn't phone home, and if Dearnode vanished tomorrow, Orbit would keep working until Google changes something on their end.
Because Dearnode has no servers to maintain, the one-time price is sustainable. Kiwi, the app I used for years with Gmail, committed what I consider an unpardonable sin earlier this year when it stopped honoring lifetime licenses it had already sold and moved every customer to $60 a year. It's not the only casualty in this category: Sidekick was absorbed by Perplexity and shut down in 2025, and Mailplane stopped selling licenses in 2021.
Orbit is written in Swift and runs on WebKit. It weighs 9.9 MB on my system, a far cry from the Electron build behind Shift.
Why it might not work for you
To his credit, Orbit's developer publishes the warnings himself rather than waiting for a reviewer to find them:
- Sign-in is per-Mac. Three machines means three sign-ins, and there's no cross-device sync.
- Accounts using passkey-only sign-in or Google's Advanced Protection Program can't sign in at all, due to a WebKit limitation.
- It's Apple silicon and macOS 14 or later. No Intel.
- It's not on the Mac App Store, because the sandbox would break the per-account isolation the whole app exists for.
And one risk that isn't Kwak's fault and isn't in his power to fix. Orbit works because Google lets a Mac app sign in and render Gmail. Google can withdraw that. It has before: Mailplane stopped selling licenses in 2021 when Google started blocking embedded browsers at the sign-in page, and Mailplane was the same idea as Orbit, Gmail's web interface in a Mac shell. The accounts Orbit can't sign in today, the passkey-only and Advanced Protection ones, are that same door already partly closed.
Kwak has built the parts he controls to fail quietly. If Google reshuffles Gmail's page, an unread badge goes stale instead of your mail breaking, because the mail was never his code. That's the right way to build this. It just doesn't help with the failure that matters, which is Google deciding one morning that apps like this don't get in anymore.
The Others
Every alternative here costs you something. Some want a subscription, some run on a browser engine you didn't ask for, and the free ones make you give up the switching and the badges.
- Mimestream is well liked, and it's also $50 a year.
- Shift is $200 a year and it's Electron. There's a free tier some people will find suitable.
- Kiwi for Gmail was my daily driver for years and it worked. Their decision to stop honoring lifetime licenses blunts any regard I once had for them.
- Ferdium is free and open source. Community-built, Electron, and it will hold multiple instances of the same service. I've run it myself. Free is free.
- Safari profiles are already on your Mac, and I've used them for this. Separate cookies and separate sign-ins per profile, no purchase, no keyboard switching, no unread badges. If you have two accounts, try this before you spend anything.
I haven't personally tested Mimestream or Shift and this information comes from their websites.
Who should buy this
Writing about a Google adjacent app doesn't mean I've reconsidered anything. Fastmail, Koofr and Kagi are still where I manage my own life. But I couldn't de-Google on my father's behalf. Pretending otherwise would have cost him his pharmacy, his insurance and his bank. His accounts aren't a preference, they're an obligation, and the software worth paying for is the software that makes an obligation easiest to manage.
If you're carrying three or more Google accounts you didn't choose, you switch between them all day, and you've had the wrong-sender scare, $89 once is a fair price for never having that thought again. There's a 14-day trial that doesn't ask for a card and a 30-day refund window, so trying it costs you an afternoon.
If you have two accounts, Safari profiles are free. If you want a real native mail client and a merged inbox, Mimestream is the app and the subscription is the tax. And if you run Advanced Protection, Orbit can't sign you in at all, which puts it out of reach for exactly the people its architecture was built to appeal to.
Blankie, A Free and Open Source Ambient Sound Mixer is a Breath of Fresh Air, Right in Your Ear
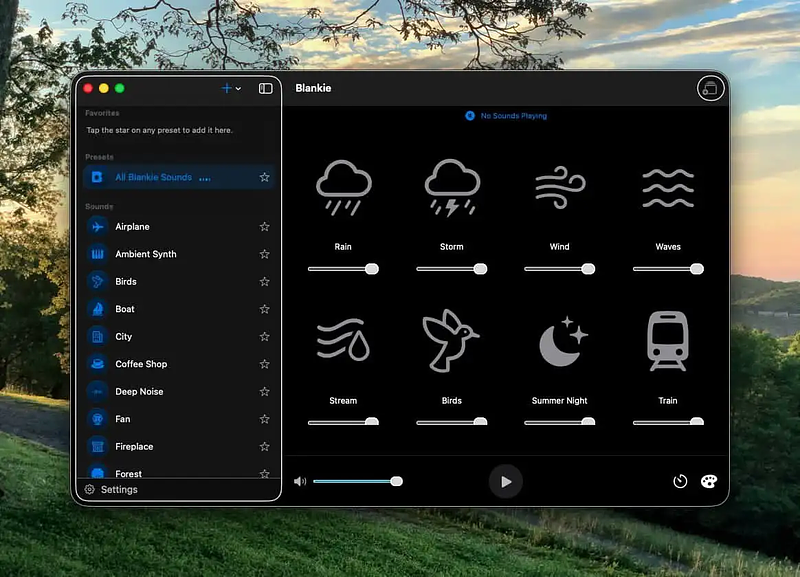
TL;DR: Blankie is a free, open-source ambient sound mixer for Mac, iPhone, iPad and CarPlay; no ads, IAPs, or subscriptions. 24 mixable sounds, saved presets, custom audio import, menu bar control. Stacked against Noizio, Dark Noise, myNoise, and Endel, all of which charge something for depth or convenience Blankie gives away for free.
I'm not usually one to complain about app pricing, but I make an exception when it feels like someone is misrepresenting the complexity of something simple to justify a monetization strategy. Ambient sound apps, at their core, are well-organized loop players, and nothing about them justifies subscriptions, tiered unlocks, and $50 lifetime passes. You get rain, waves, white noise and a coffee shop hum with variations. That's the whole package.
Enter Blankie, a free and open-source ambient sound mixer from developer Cody Bromley that gives you everything you need without insulting your intelligence or your wallet. It also respects your privacy by not collecting any data. It's inspired by Blanket, a Linux app in the same category. Blankie avoids ads, IAPs, subscription tiers and paywalls. It's just free, forever. Better yet, it works on your Mac, your phone, your iPad and your car.
How it works
With Blankie, it's easy to construct custom loops and recall them at will. You get 24 sound elements to experiment with, including several added in the most recent updates: rain, storms, wind, ocean waves, a running stream, birds, forest, crickets, a train, boat, airplane, city hum, coffee shop, fireplace, fan, laundry room, plus a few music-adjacent layers (piano, lo-fi beats, guitar, ambient synth) and the full noise family (white, pink, green, brown).
The features that matter
- Per-sound volume control: every layer has its own slider on top of a master volume, so you're not stuck with someone else's idea of "coffee shop" balance.
- Saved presets: build a mix once for deep work, another for sleep, and switch between them instead of re-tuning sliders every time.
- Bring your own audio: you can import your own sounds or voice notes, and Blankie loudness-matches them automatically so nothing jumps out of the mix. I experimented with the sound of my own box fan and it worked!
- Sleep timer with fade-out: it winds down and stops instead of just cutting off, which matters more than it sounds like it should at 11pm.
- Menu bar control: as of version 2.0 there's a menu bar popover for quick mix and timer changes, plus an option to hide the Dock icon entirely, both added directly in response to user feedback on the App Store.
Do you need an app for this?
One of the under-publicized features available in macOS Accessibility settings is a control for background sounds. You can get a flat layer of white noise without installing anything. If that does the trick to drown out your office mate's Zoom calls, then you're golden. If you want actual combinations you can control, layering rain with a fireplace, mixing to your own balance, saving distinct presets, and importing your own recordings, Apple's built-in version doesn't do any of that.
The apps I complained about
I've tried Noizio and Endel. They work, but they cost more than they're worth.
- Noizio ($9.99 one-time, Mac App Store, also on Setapp) has 40 sounds behind the paid tier versus 5 free, and I covered it here previously; it's the closest direct comparison and the app several Blankie reviewers say they're switching from.
- Dark Noise now runs $2.99/month or $19.99/year for full access after moving off its original one-time-purchase model in 2023, with a free tier limited to eight sounds; there's still a $49.99 lifetime option for people who want to opt out of the subscription entirely.
- myNoise is free to download with a $19.99 in-app purchase ("Full Access") that unlocks its full 300+-soundscape library; it's a much deeper catalog aimed partly at tinnitus masking and therapeutic use, not just background focus noise.
- Endel If you want the adaptive end of this category, runs $19.99/month or roughly $89.99/year (with a ~$249 lifetime option), and generates sound algorithmically rather than letting you hand-build a mix; different product, This may be the most over-priced app I've even seen.
Unless otherwise noted, the alternate apps mentioned above are based on research and not individual testing.
Bottom Line
Use Blankie if you want a free, privacy-respecting sound mixer that doesn't hold features hostage behind a subscription, and you're fine with a smaller sound library (24) than the subscription apps offer in exchange for owning the whole thing outright. If you own something else already or you just really need hundreds of soundscapes and don't mind paying, go with myNoise.
RetroMac is a Free Time Machine for Your Computer
Mac users tend to be nostalgic about the hardware and software they used in their earliest exposure to tech. That doesn't mean anyone wants to try to get real work done on a late-90s PowerPC Mac clone, or go back to 14-inch monitors. People just enjoy being reminded how far we've come, and pretend there was once a time when everything "just worked." (It didn't. I was there.)
German developer Maik Klotz created a free app, RetroMac, that turns your current Mac into a version of the Wayback Machine. It doesn't touch your system. It paints. A Metal shader sits on top of whatever's already rendering: CRT curvature, scanlines, VHS tracking noise. It can also swap your dock, wallpaper, boot screen, and cursor set for a specific era's look: Windows 98, Windows XP, System 6, Mac OS 9, Mac OS X Aqua, Snow Leopard, BeOS, NeXTSTEP. If all that lickable tech scares you, you go back to boring just by quitting RetroMac.
How Much Time Travel Do You Want?
- Get a little or a lot. RetroMac's modular design combines your choice of elements to build a look you're comfortable with. There are toggles for shader, theme, dock, Retro TV, and live wallpaper. Play around with everything but the one window you want your boss to see if he wanders by. That one you can keep sharp.
- Pick a window, or a display. The shader works on a single window, but it's more fun to turn your secondary display into a period piece. Fire up an old game on YouTube and let it run while your co-workers gather round.
- Themes go deep. You get matching cursors, icon sets, boot splashes, and actual .saver modules (Flying Toasters, Flurry, 3D Pipes) in every shipped theme. RetroMac is more than a wallpaper shuffle with a dock overlay.
- Retro TV is its own feature. Play a variety of video streams in a CRT-framed window, or use it in your next Zoom meeting (or Teams, or Meet) if your clients and co-workers have a sense of humor.
- It's easy to go back to normal. Health Check plus one-click restore for wallpaper, dock, and menu bar. Free to use, with a one-time €8.88 Pro upgrade for extra shader presets, custom presets, and the webcam shader. No subscription, no account, no telemetry.
Yeah, But Why?
Sometimes an app is just fun, and this falls into that category, but there are a few semi-practical uses too:
- Screen recording
- Retro gaming
- Showcase setups
- Music videos
Do You Really Need an App for This?
Depends what you're actually nostalgic for.
Glaze ($9.99 one-time) is the closest direct competitor: a live GPU-shader overlay for your whole Mac with 50+ looks, including CRT, VHS, Game Boy, comic-book, and oil-painting filters. It skips the classic-OS theme replication entirely and focuses on the shader layer, so if you just want the tube-TV look on a normal desktop without the Windows 98 cosplay, it's narrower and cheaper.
retroStrip is the odd one out: not a shader app at all, but a modern recreation of the classic Mac OS Control Strip, the little floating bar of one-click controls from System 7.1 onward. The base app is free (retroStrip LE); additional icon theme packs are $2 each or $5 for all three. If what you actually miss is the Control Strip specifically, this is a tighter, single-purpose tool than RetroMac's dock feature.
RetroVisor is free and open source, a ScreenCaptureKit-and-Metal shader overlay clearly modeled on Windows' ShaderGlass. It runs in a floating window rather than full screen and has none of RetroMac's theme, dock, or Retro TV features. Good pick if all you want is the CRT glass effect and you don't want to pay anything.
Two flags on that. First, these three comparisons are based on research, not testing; I haven't installed any of them myself. Second, that actually cuts in RetroMac's favor: you'd have to install and configure all three to come close to what one app does by itself.
Obligatory War Story
Apple released its last CRT-equipped computer in 2003 and discontinued it three years later.. Targeted at the education market, the eMac came in one color: white. It lacked the iMac's convenient carrying handle and weighed in at over 50 pounds, looking for all the world like the front end of the space shuttle viewed from behind. Most of them wouldn't run any version of OS X beyond Tiger. My employer, a rural school district in North Carolina, bought them by the thousands. I was the "Mac guy," so I spent months of my life unboxing eMacs for computer labs and placing them in every K-5 classroom in the district. It gave me PTSD, and to this day I can't look at a 17-inch CRT (or Tiger) without flinching.
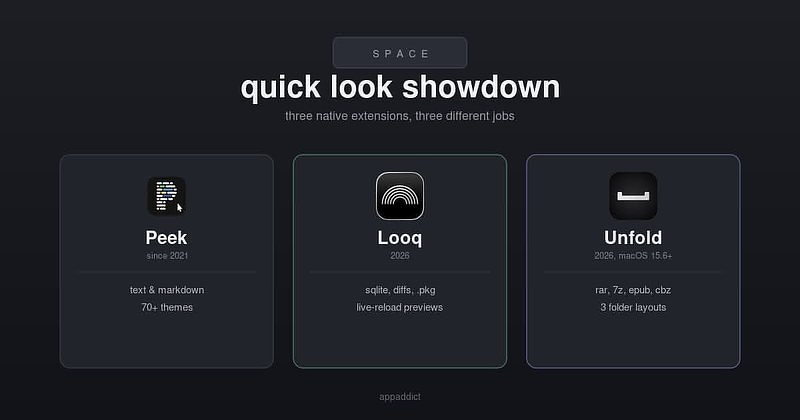
Quick Look Showdown: Peek, Looq, and Unfold
Quick Look extensions have evolved over time. Once the category seemed to be made up of legacy junk: kernel-adjacent hacks that broke every time Apple shipped a point release, the kind of thing you install once, forget about, and eventually blame for a random Finder freeze. That reputation was earned. For years the ecosystem really was a pile of abandoned generators held together by community goodwill.
Then, starting with Peek in 2021, the category was reborn on native QLPreviewingController extensions, sandboxed, App Store-distributed, and stable across OS upgrades in a way the old plugin era never was. Press Space on a file Quick Look doesn't understand, and there's now a real decision to make about which extension handles it. Aside from Peek, two apps released in 2026 are also competing for your attention: Looq and Unfold.
Quick Look extensions built on native APIs are meaningfully more stable across OS upgrades than the legacy plugin era, and the ability to skip the old "extract, view, delete" archive-clutter cycle is worth the price of admission on its own. On the development side, the appeal is inspecting code from Finder mid-workflow without breaking a terminal session. One aggravation is the sandboxing limit that prevents dragging files directly out of a Quick Look overlay onto the desktop. Part of the appeal for me is my preference for single-purpose extensions over bundling Quick Look enhancements into a bigger, always-running utility. If your needs are light (you just want code to have color), take a look at Syntax Highlight, a free, open source alternative featuring code highlighting only, built on the same native extension architecture as the paid options, no rendering flourishes.
Peek - Good But Dated
Peek showed up to solve a specific, well-remembered grievance: Apple killed QLEnableTextSelection back in Sierra, and for six years there was no clean way to select or copy text out of a Quick Look preview. Peek fixed that, added Markdown rendering, syntax highlighting across roughly 200 languages, scroll-position memory, and 70-plus themes, and became the default recommendation for a legitimate reason: it worked, it covered 530-plus file extensions, and it did it without the sketchy Input Monitoring access early competitors needed.
I won't call it abandonware... but is it? Peek's App Store listing shows version 2.6.4 as its most recent entry, dated April 2022, and the copyright footer on the developer's own site still reads "© 2021-2022." That doesn't mean it's broken today, but it's worth knowing before considering it the de facto favorite just because it's familiar.
More to the point for this comparison: Peek was built to make Quick Look better at showing you text. It was never built to show you structured data. There's no SQLite browsing, no diff/patch rendering, and no archive or package-metadata inspection anywhere in its feature set. That's exactly the gap Looq and Unfold showed up to fill.
Peek vs. Looq vs. Unfold
What all three have in common:
- Native, sandboxed Quick Look extensions, no kernel extensions or legacy plugin architecture.
- Markdown rendering with a generated table of contents.
- Syntax-highlighted source code preview.
- One-time purchase pricing, no subscription (Peek and Looq $7.99–$10 depending on storefront; Unfold $10).
- Zero data collection, per each app's own App Store privacy disclosure.
What's unique to Peek:
- The deepest raw file-type coverage of the three: 530-plus extensions, including obscure config and legacy source formats the other two don't bother with.
- Search, jump-to-line, and jump-to-page inside the preview itself: real keyboard navigation, not just rendering.
- 70-plus syntax themes plus a custom CSS stylesheet option.
- The only one of the three that predates the current "developer-file QuickLook" wave by four years, with the review history to show it.
What's unique to Looq:
- SQLite database browsing with pagination, column types, and sortable tables — nothing else here touches this.
- Diff/patch rendering with color-coded, dual line numbers.
- Live-reloading previews: edit and save a Markdown or Mermaid file while Quick Look is open, and the preview updates without you pressing Space again.
- Metadata inspection for
.app,.ipa,.pkg,.dmg,.iso, and provisioning profiles: code signing, entitlements, and notarization status, right from the preview. - A built-in diagnostics tool that detects and repairs conflicting Quick Look extensions.
- A menu-bar recent-files view and a CLI companion tool.
What's unique to Unfold:
- Broader archive format support: RAR and 7z on top of ZIP/TAR/GZ/BZ2, which Looq and Peek don't cover.
- Ebook and comic preview: EPUB, FB2, CBR, CBZ.
- Three distinct folder-preview layouts (Native, Grid, List).
- The lowest macOS floor of the three going the other direction: it actually requires the newest OS, 15.6 (Sequoia) or later, versus Looq's 15.0 and Peek's 10.15.
Which one is right for you?
Peek. Why you'd use it: the deepest file-type coverage of the three, real in-preview navigation (search, jump-to-line), and four years of being the thing everyone already recommends. Counterpoint: it hasn't visibly shipped an update since 2022, and it was never built to handle structured data — no SQLite, no diffs, no archive or package inspection. If your files are mostly text and code, it's still fine. If they're not, it can't help you.
Looq. Why you'd use it: you're a developer, sysadmin, or technical writer who wants Quick Look to actually understand what it's showing you — SQLite schemas without opening DB Browser, diffs without a git client, signed .pkg contents without installing first. Counterpoint: if you only need Markdown or only need code color, Looq is more app than you need, and QLMarkdown or Syntax Highlight get you there for free.
Unfold. Why you'd use it: you deal in RAR/7z archives, or you want ebook and comic previews, neither of which Looq or Peek offer, at the same $10 as Looq. Counterpoint: no SQLite, no diff viewer, no package-signing inspection. If your work involves databases or shipping installers, Unfold is the one of the three that can't help.
Special Purpose Quick Look Plugins
- Suspicious Package is free (mothersruin.com). Does one thing, installer package inspection, better than Looq's broader metadata preview does it, because it's all the app is for.
- QLMarkdown is free and open source (github.com/sbarex/QLMarkdown). Markdown and LaTeX only, nothing else. The move if Markdown rendering is the only gap in your Quick Look setup. Its Homebrew cask is deprecated as of September 2026; manual installs from GitHub releases still work.
- Syntax Highlight is free and open source (github.com/sbarex/SourceCodeSyntaxHighlight). Code highlighting only, built on the same native extension architecture as the paid options, no rendering flourishes.
- BetterZip is $35 (macitbetter.com). Not a Quick Look extension first; it's a full archive manager that happens to ship one. If you're already paying for BetterZip to handle RAR/7z/encrypted archives, its Quick Look generator already does the archive-preview job Unfold and Looq are also doing.
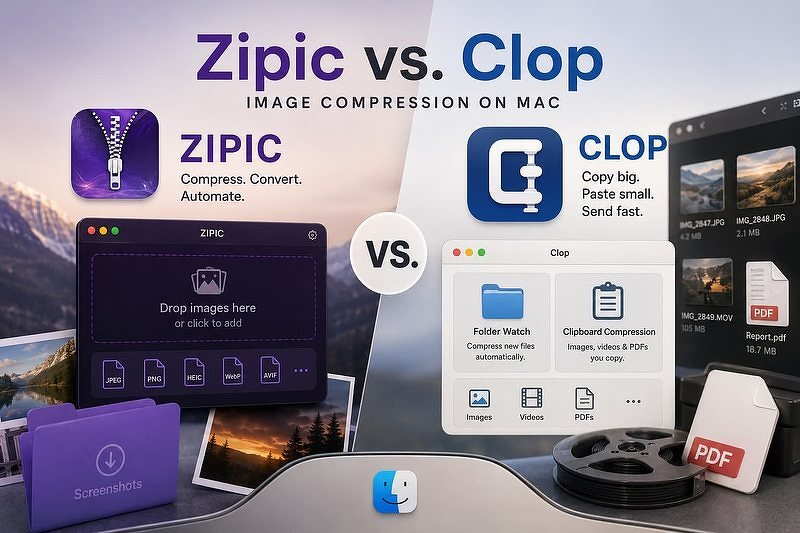
Zipic Is Good. I'm Still Not Switching From Clop.
Is it possible to shrink image file sizes on a Mac using native tools? Yes, but with some big IFs thrown in. Preview can knock a file's size down if you dig into the export dialog and guess at a quality slider, and Photos will do the same on export, but neither remembers what you did last time or watches a folder for you. That's way too much friction when alternatives exist. No one wants to live like an animal.
Image compression is a solved problem and it has been for a while. What separates a good tool from a mediocre one isn't the compression algorithm, it's whether the tool disappears into your workflow or makes you think about it. Zipic is a native Mac app built around that idea: drag, drop, done, with the automation layered on top of an engine, mozjpeg, pngquant, and friends: that's the same open-source stack most of this category runs on.
I compared Zipic to my current image compression stack, and while I found it useful, except for one narrow scenario, it doesn't beat what I currently use.
What it actually does
Zipic, from 5KM Tech, compresses, converts, and resizes 12 image formats, all locally on the Mac with no upload step. Free tier gets you a 7-day full-Pro trial, then 25 compressions a day with basic formats (JPEG, PNG, WebP, HEIC, GIF). Pro is a one-time purchase ($19.99 for one seat, $29.99 for two) with lifetime upgrades. There's no subscription option. Purchasing a license unlocks unlimited compression and additional formats (AVIF, JXL, TIFF, ICNS, PDF, SVG, APNG). The killer features are folder monitoring and clipboard auto-compress.
Why you'd want this
- It turns image compression from a chore into an automated part of your workflow. Point it at a folder (your screenshots directory, an export folder from a design tool) and it compresses anything new that lands there, no interaction required.
- It compresses any image you copy to your clipboard. Pair it with Shottr or CleanShot X to compress every screenshot you take. It starts to feel like part of the OS very quickly.
- Most compression apps stop at JPEG/PNG/WebP. Zipic's Pro tier adds AVIF, JPEG XL, TIFF, ICNS (useful if you're building app icons), PDF, SVG, and animated formats (GIF, APNG, animated WebP) in the same batch window.
- You can access Zipic from the Finder context menu, from Raycast, or from Shortcuts. Rather than forcing you into a single entry point, this tool fits into several popular workflows.
- If you don't have your notch occupied by Droppy or another app, you can use it as a drop location. Drag images to the notch and Zipic compresses them without you ever opening the app window. It's a small feature and a little gimmicky, but it's an easy way to compress one file without breaking your flow when you're busy doing something else.
What I use
I've used two specific tools in this space for a long time. They both have long track records and tons of testimonials from satisfied users, including me. At this point, I'm not ready to let them go.
ImageOptim is free and open source (donationware), the long-standing default recommendation in this category. It's lossless-focused, has no format conversion, no folder watching, and no clipboard automation. It's a drop-a-folder-on-the-dock tool, not a workflow layer. I use it for occasional lossless squeezing since it costs nothing. ImageOptim - Free and Open-Source Utility to Reduce File Sizes | AppAddict
Clop: Copy Big, Paste Small, Send Fast. Zipic's biggest differentiator over ImageOptim is automation. Against Clop, though, that advantage largely disappears. Clop offers the same folder watching and clipboard automation, costs just €15 as a one-time purchase, is open source, and also compresses videos and PDFs, something Zipic doesn't do. Zipic's remaining advantage is its broader support for image formats like AVIF, JPEG XL, ICNS, and SVG. Those formats aren't part of my workflow, so I'm sticking with Clop and The Low Tech Guys.
Daily Skips the Timer Problem Entirely — Now It Talks to Your Other Apps Too
If you bill clients by the hour, it might be time to reevaluate your workflow. Daily, a Mac time tracker from independent developer Niels Mouthaan, continuously supported since 2013, just got a substantial update: a web API, a Zapier integration, and an MCP server. Because it works via user polling and not background process monitoring, it's the go-to privacy-respecting choice in its category.
Based on its review history, Daily enjoys broad support from tech professionals with ADHD and time blindness in particular, and plenty of neurotypical folks too. The human brain just isn't designed to do two things at once, despite all the hype about multitasking. Every timer-based tracker asks you to remember to press a button at the exact moment your attention shifts, which is precisely the moment you're least equipped to remember anything. You close a ticket, Slack pings you, someone walks in, and forty-five minutes evaporate into whatever bucket the timer was left running in. That's not a discipline problem. It's a design flaw.
Daily skips that requirement entirely. It doesn't watch your apps, your browser tabs, or your open documents. It just interrupts you on a schedule, asks what you've been doing, and lets you pick from a list. That's a different model from RescueTime-style automatic trackers.
Newest Features
Daily has quietly had most of its bones (scheduler, AppleScript, iCloud sync to a companion iOS app, CSV/JSON/Toggl-format export) for years. The submission-worthy update is the integrations release, published June 26, 2026, which adds three ways to get data in and out:
-
A web API (
api.dailytimetracking.com) with endpoints for activities, summaries, and timesheets, authenticated by an API key you generate in preferences. - A Zapier integration, with triggers for new/updated time entries and actions to add activities or pull a summary or timesheet -- no code required.
-
An MCP server (
mcp.dailytimetracking.com), which the research note this post started from didn't even catch. This is the more interesting piece for this audience: it exposes tools likeget_summaryandget_timesheet, so an AI assistant or coding agent can answer "how many hours did I bill Client X in February" directly, or use your tracked hours as an input to a larger workflow.
The MCP piece comes with a caveat, and Daily's own docs say so plainly: it authenticates with a custom API-Key header instead of OAuth. Locally run clients like Claude Code, Cursor, and Gemini CLI handle that natively, but Claude's remote connector and ChatGPT's developer mode currently can't call it without a proxy like MCP Beast. If you're expecting a one-click Claude Connector, that's not there yet, and Daily says whether it ships one depends on how much the MCP server gets used.
The two-way workflow the developer pitched in his outreach (import Jira tickets as activities, then push logged hours back into Jira after the day is done) is a real automation, not a checkbox feature. Once you enable integrations in preferences, Daily syncs to its server every 15 minutes, at startup, at quit, and before sleep, and you control retention (default 90 days) from the same screen.
Who Daily Is For
If you're the kind of person who forgets to start a timer, or who resents having to remember to, and you don't want your Mac silently logging every app and URL to do it for you, Daily's prompt-based model solves that problem well. The new integrations turn it from a personal timesheet into a node in an actual workflow: tasks flow in from your project tracker, hours flow back out to invoicing or ticketing, without you retyping anything.
Who Should Look Elsewhere
If you want the tracking done automatically, with zero interruptions, Timing or RescueTime are built for that trade-off, and Daily explicitly isn't. And if the MCP server is the reason you're interested, know that it's aimed at technical users right now: no OAuth, no official Claude Connector, and you'll be running a proxy if your AI client doesn't support custom headers. That's an honest state to ship in for a first MCP release, but it's not turnkey yet.
Not For You? Try These Alternatives
Daily's category is prompt-based self-reporting, not automatic activity tracking, and that distinction changes what actually competes with it.
- Toggl Track is the closest thing to an industry-standard manual/hybrid tracker: free for small teams, Starter at $9/user/month, Premium at $14/user/month for the first year of an annual plan (renewing at $18), all per Toggl's own pricing page as of this writing. It has optional desktop activity tracking as a feature you opt into, which is the opposite of Daily's no-monitoring default.
- Timing is the automatic-tracking alternative: it watches apps, websites, and documents by default rather than asking. Per Timing's pricing page, it's tiered as Professional, Expert, and Connect subscriptions (Connect being the one with MCP and team features), with no lifetime option listed. If you want the machine to infer your activity instead of asking you, this is the one; if you want zero passive monitoring, it's the wrong choice.
- RescueTime is the other automatic-tracking name that comes up in this category, running in the background and logging app/site usage without prompting. Its cheapest individual plan (Solo Focus) is $9/month, or $7/month billed annually, per RescueTime's pricing page as of this writing.
Pricing
This is a professional tool, priced like one. Daily's Mac App Store listing currently lists in-app purchase tiers as Monthly $5.99, Quarterly $17.99, Yearly $34.99, and Lifetime $69.99. You'll see other prices quoted on other sites, but those sources appear to be dated.
Imagin Raw: a 4.3MB, free, open-source Bridge alternative for culling RAW files
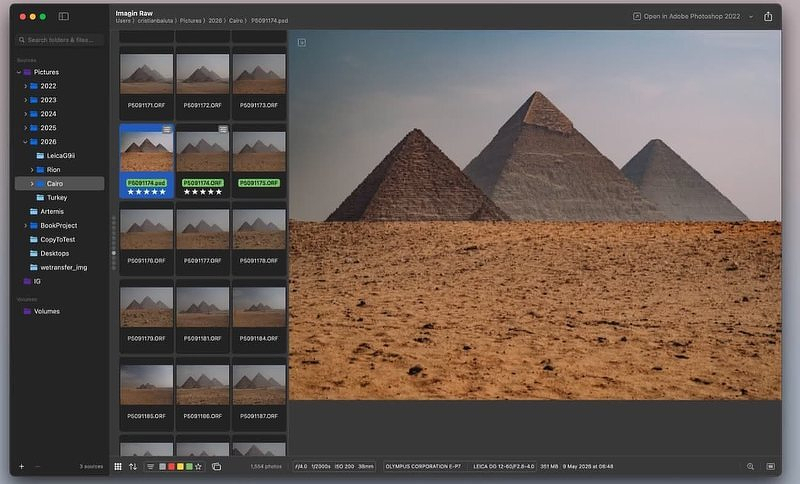
TL;DR Imagin Raw is a free, open-source Mac app (4.3 MB) for culling and rating RAW photos — no import, no library, folders stay where they are. Writes ratings/labels to standard XMP sidecars so Lightroom and Bridge both read them. Compares itself directly to Adobe Bridge (9 MB vs. 2 GB, 0% idle CPU vs. nonzero). It's a few weeks old, Mac-only by design, and has a known issue with Fuji RAF previews. Not a Photo Mechanic replacement for pros yet, but a solid free option if you just need to look, rate, and reject.
Imagin Raw is a new, free, native SwiftUI browser (macOS 14.6+) from developer Cristian Baluta, who also builds Spoto and cmd c. It decodes RAW files with LibRaw, watches your folders with FSEvents so changes show up in real time, and writes ratings and color labels to XMP sidecars, the same format Lightroom and Bridge use. (GitHub or Mac App Store)
If I could do just one thing to my worst enemy today, I'd break into his house and install Adobe software on his Mac. Aside from being a horrible company, in the sense that it's hard to disconnect your bank account from it (a sin for which it had to pay massive fines), Adobe products are massively invasive. If you have a VM or a Mac you don't care about, install an Adobe app. Open it a couple of times. Then immediately uninstall it. Then do a Spotlight search for "Adobe." You'll likely find thousands of files scattered all over your drive that stayed behind to do who knows what.
Adobe Bridge is a 2 GB download that exists to do one job: let you look at your RAW files, rate them, and throw out the bad ones before you open a real editor. It runs a nonzero idle CPU load to do that job, and it takes long enough to launch that you have time to question your life choices. It's nothing more than a free-with-Creative-Cloud culling tool that behaves like it's rendering 8K video.
The reality: culling RAW files is a small problem. You need fast previews, a rating system that other apps understand, and a way to reject junk without touching your master files. That's it. Imagin Raw is a new, free, open-source Mac app that does exactly that, in a 4.3 MB package, and treats your folders as the source of truth instead of asking you to import anything into a library. It's easy to drop into an existing workflow.
Useful Features if You Shoot RAW
- Point it at any folder, external drive, or SD card and it browses what's there. If the app disappears tomorrow, your ratings and labels are already sitting in XMP sidecars next to your files; you lose nothing by switching to another app down the road.
- Rejected images only persist for a single session. If you don't remove the images from whatever media they live on, you can have a second pass if you need it. Deletion is easy though; just hit the reject button and right-click to batch delete.
- I shoot Canon and it writes both RAW and JPEG to my SD cards. Imagin Raw de-dupes what I see, showing me only the RAW images.
- Copy a card into dated folders on your Mac while writing a second copy to a backup destination in the same step. It's a built-in workflow enhancement, not a demo feature.
- If you're shooting for someone else's approval, export a pick-list as a PDF. They check boxes beside what they want and you import it back into Imagin Raw, where it gets automatically filtered. There's no need for a web portal, a cloud gallery account, or anything requiring another damn subscription.
Alternatives
Imagin Raw's category is RAW culling and browsing, not RAW editing. That distinction matters because a chunk of the "alternatives" people will suggest are actually editors with a browsing mode bolted on, not dedicated culling tools.
- Adobe Bridge is the incumbent and it's free, but only in the sense that it doesn't cost extra on top of whatever Adobe subscription or account you already have. It's the direct target of Imagin Raw's README comparison table: ~2 GB versus ~9 MB, nonzero idle CPU versus 0%, and multi-second launches versus near-instant. Where Bridge still wins: it renders Camera Raw–processed previews with your adjustments baked in, which Imagin Raw doesn't attempt.
- Photo Mechanic is the professional standard for high-volume culling, especially among photojournalists and wedding shooters, and it costs real money: $14.99/mo, $149/yr, or a $299 one-time perpetual license.
- FastRawViewer is the closest thing to a direct, cheaper competitor: a paid RAW viewer built by the LibRaw team (same decoding library Imagin Raw uses), priced at $23.99 for a two-computer license.
- Capture One is worth naming only to rule out: it's a full editor with culling built in. If you're already a Capture One user, you don't need Imagin Raw. If you're not, don't start there just for culling.
Why You Would Use This
You have folders full of RAW files on external drives or SD cards, you don't want a managed library, and you're tired of Bridge's launch times and memory footprint for a task that's fundamentally "look at photos, rate the good ones, delete the bad ones." Imagin Raw does that job in a fraction of the size and stays out of your way, and because it writes standard XMP sidecars, nothing you do in it is wasted if you outgrow it.
Is It a Pro Tool?
Probably not, at least not yet. It's only a few weeks old. The developer says he's building only what he personally needs, so don't expect a Windows version. There's a known issue with Fuji images. If your income is dependent on what you do with your camera, opt for Photo Mechanic to take advantage of its support and overall product maturity. And if you're OK with Adobe, who am I to judge; despite all the drawbacks, it works for many.
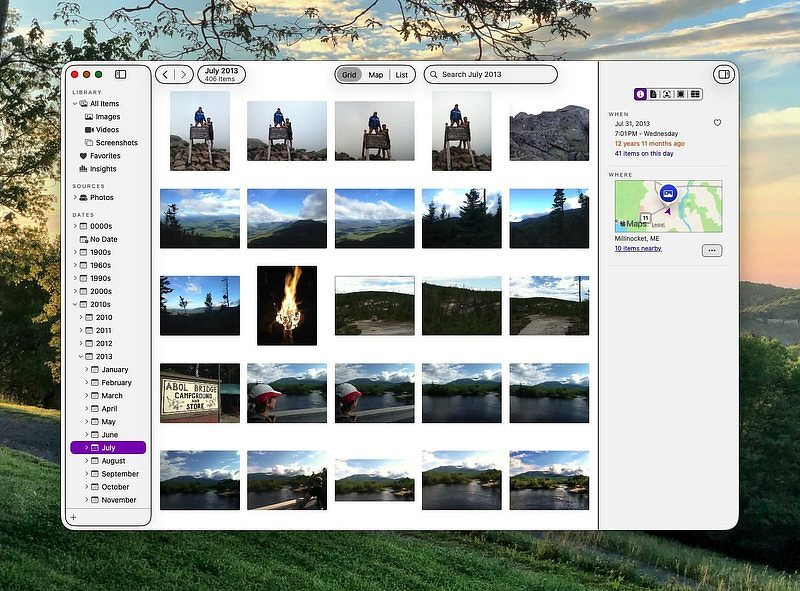
Iris, The Mac Photo App for People Who Don't Trust iCloud With 80,000 Photos
TL;DR:
Iris is a Mac photo viewer that indexes photos where they already live (folder, external drive, or your existing Apple Photos library) instead of importing them into a managed database. It does on-device face recognition, OCR/speech search, and a real map (Photo Trails) that plots every geotagged photo so you can browse by location. No cloud, no account, no subscription; one-time purchase, 14-day trial. It's a viewer, not an editor, so RAW/Lightroom workflows aren't the target use case.
Tyler Hall has a new app, Iris, a photo management app built for a very specific kind of workflow. I am a Tyler Hall fan. He is a respected Mac developer with a proven track record operating a one-person shop out of Richmond, VA. Longtime Mac folks will remember his web-developer tool VirtualHostX; he sunset that in 2021 and rebuilt around a small set of native, single-purpose apps. The rest of his catalog is made up of the kind of apps I love:
- TextBuddy ($19): a Swiss Army knife for plain text; faster than opening your IDE, easier than remembering the right command-line incantation.
- Fastmarks ($9): search and open your browser bookmarks from anywhere with one hotkey, 100% keyboard-driven. This is exactly the kind of friction-remover I adore.
- Ears ($9): an instant audio-output switcher for hopping between speakers, AirPods, and that one weird USB mic.
- Steve (free): a casual daily puzzle game for when you need to not be productive for five minutes.
Iris is currently being offered for $19 on the app's website or the Mac App Store., and will be $29 after the introductory period is over. You can get Iris for free, believe it or not. All you have to do is donate $20 to any one of a variety of causes and submit a receipt. (Includes St. Jude's Children's Hospital, The Electronic Frontier Foundation, 988 Suicide & Crisis Lifeline, and others.)
As a certified old person, I have been accumulating digital photography a lot longer than I've had an iPhone. I have over 80,000 photographs from a variety of sources: scans of black-and-white images from past decades of family history, GBs of DSLR images taken with my full-frame Canon Mark V, and a mishmash of images from an assortment of old-school digital cameras and vintage cell phones. An iCloud-based Apple Photos library is a handy tool for day-to-day management of a current working set of photos, screenshots, and downloads, but it's not the tool I would recommend to anyone with a collection like mine, for some very clear reasons:
- Anyone who thinks it's impossible to lose access to their Apple account through no fault of their own is living in denial. A quick web search will give numerous examples of this rare but real nightmare.
- Likewise, accidental deletions of iCloud photos happen on the regular, even to experienced users. A quick trip to r/iCloud on Reddit will show you a whole collection of broken hearts tied to this occurrence.
- Apple Photos is a prime example of Apple's "We know what's best for you" management style. While not exactly impenetrable, it's pretty close to a walled garden where your photos are swallowed by a single .photoslibrary database that Apple really doesn't want you messing with.
Iris takes the opposite bet. It points at wherever you store your photos: a folder, an external drive, or even your existing Apple Photos library in read-only mode. It never moves, copies, or modifies a single original. Then it builds its own fast, intelligent index on top of what's already there and gives you the good stuff (on-device face recognition, a real map, text and speech search) without asking you to hand over your files or your privacy. It doesn't need a cloud account or a subscription.
Iris itself has a long runway behind it. It began as a project called AntiPhoto back in November 2020, and a lot of the multi-year effort went into an unglamorous problem: making a six-figure photo library scroll smoothly. Tyler hit a documented milestone in April 2022 of smoothly scrolling a 101,706-item library. That's the difference between a demo and a tool, and it's why the app feels the way it does. It's also worth knowing that Apple initially rejected Iris from the App Store; it's since made it in, and you can buy it there or direct.
Five features that matter to a Mac power user
- Filesystem-first, read-only, non-destructive: Iris reads your existing folders or Apple Photos library and leaves the originals exactly where they are. Your library is still just files you own; Iris is a lens, not a container.
- On-device face recognition: faces are recognized locally using Apple's own ML frameworks. Nothing leaves the Mac, and Iris will even show a person's age in a shot, calculated from their birthday.
- A real map with Photo Trails: every geotagged photo gets plotted; you can jump to nearby photos, bookmark favorite locations, and retrace where you actually were on a given trip.
- Search that reads your photos and listens to your videos: Iris runs OCR on text inside images and transcribes speech in videos, then makes all of it searchable. This is how you find the whiteboard photo or the receipt you swore you kept.
- Local multi-device, no cloud tax: pair the Mac app with Iris on iPhone, iPad, and Apple TV over your home Wi-Fi. Your Mac stays the source of truth: no re-uploading, no cloud account, no second subscription. And the app itself is a one-time purchase.
This is an app made by a developer who is passionate about quality and principles, so much so that the Iris website features a manifesto that lays out a set of principles and explains: "Iris is not an app for professional photographers. It's also not an app for people who snap photos with their phone, upload them to Facebook, and forget about them. Iris is for people who care about their photos and videos and believe they're worth safeguarding in a private, future-proof format that will outlive their grandchildren. Iris is for family historians and archivists."
Rather than paraphrase the feature set, I recommend just going to the website and reading it over.
To demonstrate why this is a special app made by a special type of developer, let me share this story. I've been following the development of Iris since before it was publicly released. Tyler contacted me, but not as part of a marketing campaign to get publicity. He just wanted feedback on the app's quality. After the release, when the initial (and expected) bug reports filtered in, he had this experience and shared it with me.
I wanted Iris to present a "human" approach to viewing your memories. I didn't want the app to be another endless stream of photos, or half-organized photo albums. I wanted the app to let users explore and get lost in their library the way you might lose time flipping through physical photo albums in your attic, or by following related links around Wikipedia.
Based on feedback, I think I've accomplished that - or gotten close to it. But it's also emphasized how carefulI need to be with how that data is presented. When people feel a connection to a piece of software, it can amplify the severity of bugs.
For example: a woman emailed a bug report that ripped my heart out. She added her mom to Iris - so she can filter by photos of her. She also filled in her mother's birthday, so Iris can surface how old people are in photos. And she filled in the date her mother passed away, too. A bug slipped through where Iris correctly identified her mother in a photo, but that photo's capture date was ten years after her mother passed, and Iris dutifully listed her mom with an age she never reached. (I knew this case would happen and guarded against it, but there were two corner cases in the UI where it slipped through.)
A bug like that isn't critical from an engineering point of view, but it is critical from an emotional point of view. And it hit me harder than any other crash or bug report.
Hopefully, I've made it clear who this app is for.
But it's not for everyone, of course. Iris is explicitly a viewer, not an organizer or editor; if you shoot RAW and work in Lightroom Classic, Iris shows the original unedited file and ignores your catalog's edits and metadata, so it isn't a replacement for that workflow. If Apple Photos already works for you and you're happy in iCloud, the built-in app is free and covers the same three headline features. And Tyler is candid that Iris can still have performance hiccups on complex searches and truly massive libraries, so if your collection is enormous, take the 14-day trial for a real spin before you buy.
How it compares
My focus is on helping people find the right app, not talking anyone into using something just because I like it. To that end, I usually try to list alternatives.
The features Iris bundles are not, individually, unique. Face recognition, maps, and photo search are all just features inside larger apps; Apple Photos ships all three for free, and pro catalogs like Lightroom and Peakto fold them into much heavier tooling.
- Apple Photos (free, built-in): the incumbent Iris wants to replace. It already does faces, maps, and search well, but it imports your photos into a managed library and steers you toward iCloud storage. If that model already suits you, the built-in app is free and fine; Iris is for people who specifically don't want the walled garden.
- Lyn (~$20 one-time, lynapp.com) [Verify This]: a lightweight, long-running image browser that reads folders and even Aperture/Photos/Lightroom libraries, and adds actual non-destructive editing. It's the closest one-time-purchase competitor, but it's more of a classic viewer/editor and lacks Iris's on-device face recognition and video transcription.
- digiKam (free, open source, digikam.org): the power-user's DAM, with faces, tags, geotagging, and duplicate detection, and it can even live on a NAS. It's the most capable free option by a mile, but it's cross-platform, not very Mac-native, and considerably heavier to learn. This is what I use for my own heavy lifting.
- Mylio Photos (free tier; Photos+ $99.99/year, mylio.com): also filesystem-based, and syncs across your devices without cloud storage fees. Broader in scope than Iris, but the features most people want tend to sit behind the subscription.
- Peakto (subscription ~$10/month or a ~$270 lifetime license, cyme.io): AI cataloging and search that spans multiple folders and editing catalogs at once. Powerful, but subscription-priced and aimed at working photographers rather than someone who just wants their family archive to make sense.
An Internet Love Letter

As a Reddit user for over 20 years, I feel qualified to do a deep dive on my favorite subreddit, r/MacApps. I recently analyzed the culture that's developed there.
I've decided I like this place, so I am hanging around despite some of its quirks.
Take your average question, let's say it's someone asking about a simple app to keep a window on top. Within an hour, the replies will include:
- A free open-source utility
- A $5 single-purpose app
- A $30 app that also performs 46 unrelated functions
- A recommendation for Raycast
- Someone saying that Alfred can do it better
- Someone else announcing that subscriptions are destroying civilization
- That guy who accuses everything of "being AI"
- The developer of a completely different app, praising the question and dropping a link to his unrelated app "if you're interested"
This is a feature, not a bug.
Few things make me sadder than someone who confesses that they have been thinking about getting an app like Keyboard Maestro, but they're holding off because they "are not a power user." We need to clear up some misconceptions. First of all, their reaction is understandable: in KM, there are colored blocks, nested actions, variables, conditions, triggers, and mysterious references to shell scripts. The whole thing looks less like a Mac app and more like the control system for a nuclear reactor. Most people just want to open an app, do something, and close it. They do not want to spend Saturday afternoon creating a four-finger trackpad gesture that resizes Finder, launches Obsidian, mounts a server, and tells the kitchen Echo to play London Calling.
Some of us do.
The Power User Defined
A Mac Power User (MPU) is not necessarily someone who knows how to write code, who uses the Terminal exclusively, or has memorized every defaults write command ever posted on Stack Overflow.
A power user is just someone with a low tolerance for friction and a high tolerance for tinkering. That's the whole entrance exam. If you've ever been annoyed enough at a repeated task to wonder whether there's a better way, you're already qualified. The apps aren't the hard part; deciding you're allowed to use them is.
They notice repeated friction, investigate whether it can be removed, and then spend 45 minutes automating a task that previously took eight seconds. This looks irrational until the automation fires correctly for the first time. At that moment, the heavens open, angels sing, and those eight seconds become a matter of principle.
What matters isn't technical skill; it's the persistent belief that the Mac could behave better if only someone would make it listen. When you stop seeing applications as singular entities and begin seeing how they form an interrelated system, that's when you have the mental framework required of an MPU.
A screenshot is not just a screenshot. It must be captured, annotated, compressed, renamed, filed by date, and moved into an archive folder after 30 days. Ideally, none of this should require conscious thought. (Confession: this is my actual workflow via Screenshot X, Hazel, Clop and NameQuick). The question is never just, "What does this app do?"
It is, "Can I trigger it with a hotkey, AppleScript, URL scheme, command-line tool, Shortcuts action, Stream Deck button, or unusually aggressive trackpad gesture?"
They do not:
- Necessarily know how to code
- Have a "clean" setup; most of us are one launcher away from chaos
- Agree with each other about anything, ever
That last one matters. Put two power users in a room and you'll get three opinions about clipboard managers.
We Hold Strong Opinions About Little Things
A power user can remain calm during the failure of an operating-system upgrade or a smoking router. If some app moves one menu bar icon without permission, however, the day is ruined.
Small interface problems become deeply personal:
- An app opens on the wrong display.
- A window refuses to remember its size.
- A network share does not reconnect after sleep.
- A menu command lacks a keyboard shortcut.
- A utility uses 340 MB of memory while allegedly doing nothing.
- A new app is Electron-based, or worse yet, subscription-based.
None of these problems threatens civilization. Still, each one produces the same response: "There has to be an app for this."
There usually is.
It costs $7.99 on Gumroad, was made by one person somewhere in Eastern Europe, and has settings for things you did not know macOS could detect.
Just a Little Too Proud
Every hobby has its peacocks, and ours are easy to spot. The menu bar with thirty icons, curated like a trophy shelf. The person who has "finally settled" on a text editor for the fourth time this year and announced it in a post. The one who describes their file naming convention with the quiet confidence of someone who has never once found the file they were looking for on the first try.
I can make these jokes because I am these jokes. My Mac feels broken if certain utilities are missing, and I have absolutely rebuilt a workflow that already worked because a new app looked interesting. The peacocking isn't malice; it's enthusiasm with nowhere to go. The only version that deserves an eye roll is the one aimed downward, at people who just want their computer to work. Those people aren't doing it wrong. They're the control group.
Enter r/MacApps
The sub is our natural habitat: developers answering questions in their own threads, lifetime-license hunters comparing notes like coupon clippers, and "best clipboard manager?" arriving roughly every eleven minutes and still getting sincere answers. Rarely does anyone get mocked for asking a basic question. The worst outcome is leaving with four new apps you didn't plan to buy.
That's the tell. Power users aren't gatekeepers by nature; they're recruiters. Ask one a question about window managers and your real problem becomes ending the conversation. You'll eventually find out that half of the complex setups presented are just hobbies, not necessities. The best Mac setup gets out of your way and lets you work without fighting you; utility count has nothing to do with it. Conversely, there's nothing wrong with tinkering with apps as an enjoyable pastime IF you have the self-awareness to know that is what you are doing. Always remember, the time preparing to work is not actually work. Don't be the guy who, on the clock, builds elaborate macro chains in Keyboard Maestro to rename screenshots, run them through an image optimizer, and archive them by year; only to capture two screenshots a month.
Wannabe power users are welcome here, and if you don't want that label, that's fine. Someone has to keep us honest
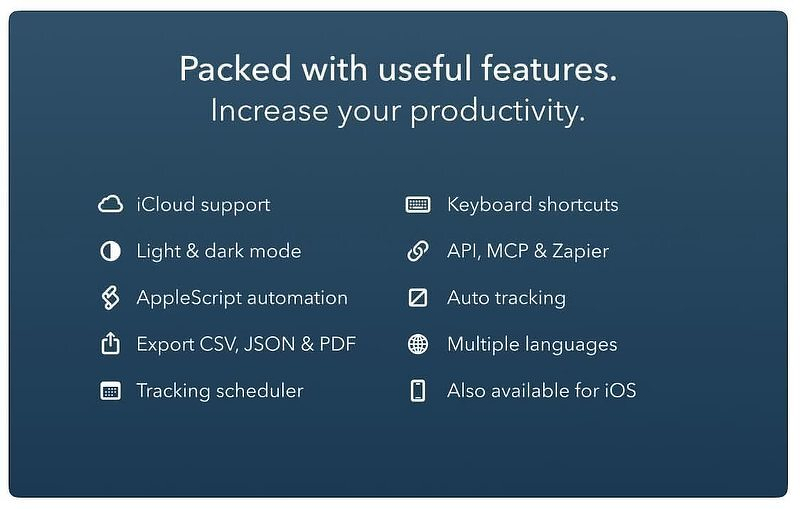
7 Mac utilities I'd fight to keep, and what I actually use them for (not another 'best apps' list)
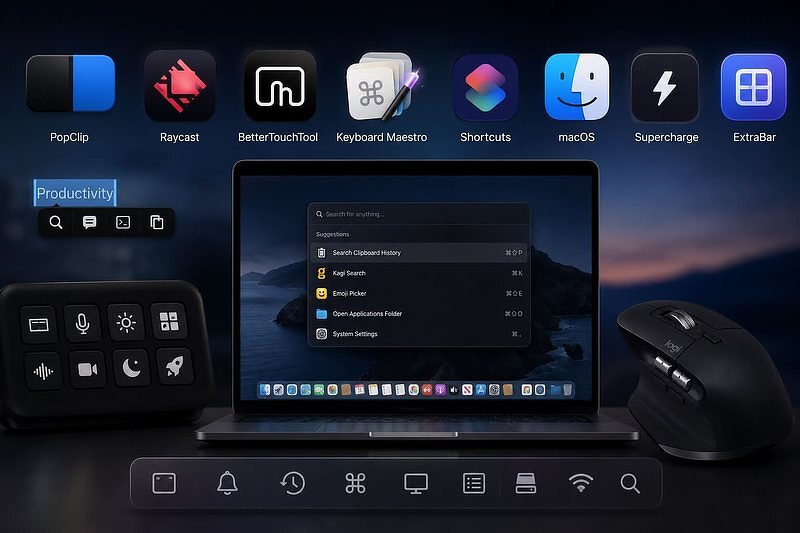
TL;DR: PopClip, Raycast, BetterTouchTool, Keyboard Maestro, Apple Shortcuts, Supercharge, and ExtraBar; concrete daily uses for each, not feature dumps. For people already comfortable on macOS who've hit a specific friction point (clipboard, mouse buttons, background-app switching) and want the tool that kills it.
One of the perks of working on a Mac: with a few painful exceptions, whatever workflow itch you have, some app already scratches it. The longer you're in this ecosystem, the more tweaks and hacks you accumulate, until the line between "native" and "third-party" gets blurry — the good ones just start to feel built in. These are apps I recommend constantly without always explaining why. So here they are: a few Mac powerhouses, and the specific things I actually use them for.
Popclip Performs actions on selected text
PopClip - A Must Have Productivity App
- Either script or use ChatGPT to write your own extensions for any website you search frequently. I have extensions for GoodReads, Anna's Archive and Kagi.
- Send text to Terminal, iTerm or Ghostty
- Add text to the clipboard without erasing what's already there — works multiple times in succession, so you can build up a batch before pasting
Raycast Spotlight Replacement with plugin architecture
How to Get The Most from Raycast
- Even with the huge selection of standalone clipboard managers, I always fall back to Raycast's for searchable categories, editing clips, pinning clips and more
- Shortcut combo for Kagi, my search engine of choice (⌘+k, enter a search term, press enter)
- Built in emoji picker is 🔥
BetterTouchTool Input controlled Mac automation
- No need for a separate app to program my 6-button Logitech mouse — extras include instant Mission Control, show-all-spaces, an application switcher, and a pie menu
- Completely replaced Elgato Stream Deck software (a security nightmare) with BTT, and it works even better
- Uses typed strings for triggers, not just hotkey combos, and it lets you use the Fn (globe) key — something Keyboard Maestro doesn't expose. I've programmed double-taps of all my modifier keys for special functions
Keyboard Maestro 30 different triggers for Mac automations
Keyboard Maestro, The App That Makes Everything Better - Tips for the Automation Curious
- Batch open and batch close apps to switch contexts
- Launch anything on a schedule with time of day triggers
- Mount and unmount selected groups of network drives with a hotkey
Apple Shortcuts Programming for non-programmers
Enhance Apple Shortcuts with These Apps
- Even more scheduled tasks:
- Create an Obsidian daily note and add weather and calendar events
- Build a daily CSV that combines web history from Safari and Firefox into one document
- Text every person in my address book on their birthday
- Run a weekly backup of all my shortcuts
macOS Many, many undocumented tweaks
- Make the dock disappear with no delay
- Make the library folder in my home directory always visible
- Change the default screenshot file type to jpg
Supercharge Huge collection of useful system tweaks
- Close all open apps
- Close everything in Notification Center at once
- Backup and restore the settings for any app, super useful with new computers
- Find out what keyboard shortcuts are in use
ExtraBar Puts anything you want to do into one always-available menu
WIP — Extra Bar Gets Extra Features
- Pick any running application from a list — including background ones — and restart it
- Mark all unread mail as read in Fastmail
- I'm currently running three displays and sixteen virtual desktops, and I keep a folder in ExtraBar with a shortcut to each one
Who this list is for
You already know your way around macOS and you're not looking for training wheels. You've hit some specific friction — clipboard chaos, a mouse with buttons doing nothing, shortcuts that only run when you remember to open the app — and you want the tool that kills it, not a tour of System Settings.
Who it's not for
If you're still getting comfortable with the Mac basics, most of this will feel like solving problems you don't have yet. Raycast's clipboard categories and BetterTouchTool's Fn-key double-taps are answers to annoyances you haven't accumulated. Start with the stock apps; come back when something specific starts bothering you.
Why these and not the alternatives
Every one of these replaces something clunkier: BTT over Stream Deck's software, Raycast over Spotlight and a half-dozen single-purpose clipboard managers, ExtraBar over hunting through Mission Control for a background app. None of them are novelties. They're in daily rotation because pulling any one out would put a specific annoyance back in my life immediately.
CurrentKey, Removing Mac Friction Points with Space Naming and ScreenTime Info You Can Actually Use
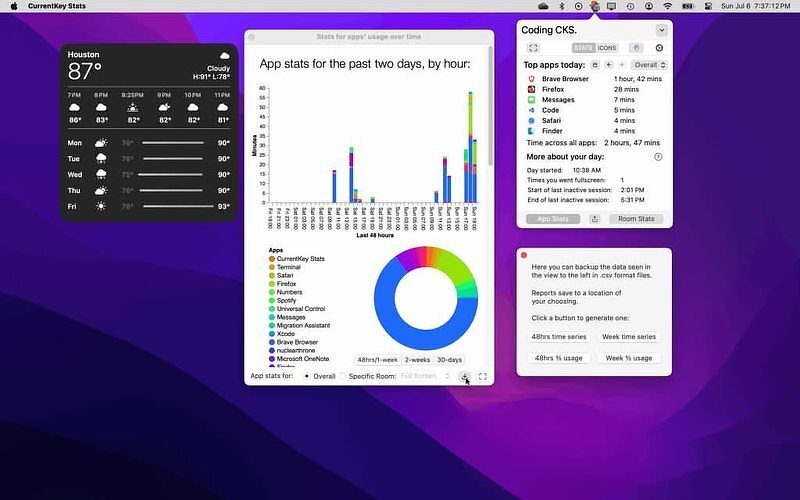
Here are two Mac friction points:
- It's been 16 years since Mission Control was released, and "Desktop 3" is still "Desktop 3." Apple's API doesn't expose Space naming to any third-party app — there's no system-level hook to hang a label on.
- Screen Time gets activated when an app launches and stays that way as long as the app is open; the clock keeps ticking even if the app is minimized or buried six windows deep on your desktop. To me, that makes it practically useless.
There's an app that deals with both of those irritants: CurrentKey (formerly CurrentKey Stats) wraps every Space in a named, icon-coded "Room" you can jump to by hotkey or dropdown, then quietly logs how much time you actually spend in each one, broken down by app. The name lives in CurrentKey's own popover and menu bar, not inside Mission Control itself.
I wrote about CurrentKey a couple of years ago (CurrentKey Stats - A Triple Threat App, when it was working through a subscription model — an admitted turn-off for many. Today the app is free, although if you want to support the developer, Spencer Dailey, you can pay $3.99 to turn on a cosmetic layer that offers custom icon colors, any emoji as a Room icon, custom icon images, and banner images that pop up in a screen corner when you enter a Room. Those are nice to have but don't affect functionality. The basic (free) version has Room naming, hotkeys, switching, AppleScript triggers, and stats/export functionality. (App Store)
Five Features, Well Done
- AppleScript hooks on every Room switch. This is the feature that separates CurrentKey from being just another desktop labeler — you can automatically fire a script the moment you enter or leave a Room, which means bringing a specific app forward, pausing a timer just by switching context or even something crazy, like triggering smart lights.
- Time tracking scoped to foreground use, not just "app open." Unlike Screen Time, which counts an app as active the whole time it's running, CurrentKey only counts minutes an app is actually in the foreground — closer to what a freelancer billing by the hour actually needs.
- Per-Room, per-app breakdowns with CSV export. Eleven charts, 30-day history, daily and weekly summaries, and a real export path if you want to reconcile hours against a client invoice instead of trusting a dashboard.
- Hotkey-driven Room switching, up to 16 per screen. Mac Spaces already cap at 16 per display; CurrentKey lets you actually use that ceiling by making each one reachable without a three-finger swipe and a guess.
- All data stays on-device. No account, no cloud sync required to use the core app — export is opt-in, which matters if the whole point is separating "work" time from "distraction" time and you'd rather that stay local.
Alternatives
- SpaceJump ($9.99 one-time after a 14-day trial) is the more direct competitor — it uses overlay windows to project custom Space name labels onto the Mission Control view itself (no SIP disable required), and it also tracks time per Space. It's not "true" system-level renaming either — Apple doesn't expose that to anyone — but the label appears inside Mission Control rather than in a separate popover, which is a real difference in feel from CurrentKey. Pricier, and it skips the AppleScript hooks.
- Desktop Space Renamer is a lightweight, low-cost menu bar app that does the naming and emoji-labeling part of CurrentKey's job with none of the time-tracking or scripting depth — a fine choice if all you want is to stop guessing which Space is which.
- spaces-renamer (free, open source) is the older, hackier route: a SIMBL-plugin-based renamer that predates Apple Silicon and reportedly doesn't work reliably on M1/M2 Macs or recent macOS versions. It's free, but effectively unmaintained for anyone on current hardware.
If you use BetterTouchTool, and you know how to use it, you already have multi-Space switching, window snapping tied to specific Spaces, and gesture-triggered Mission Control previews as part of a much larger automation toolkit. You lose CurrentKey's purpose-built stats and per-Room AppleScript triggers.
Who This Helps
You can use CurrentKey if your Mac already has more Spaces than you can honestly remember, and you want both the friction of switching between them and the accounting of time spent in them solved by one small, actively maintained, free utility with real scripting hooks. The AppleScript integration in particular is doing work other Space renaming apps don't.
Who This Isn't For
If you want the Space name to actually show up inside Mission Control's swipe-up view rather than in a separate popover, CurrentKey won't scratch that itch — SpaceJump will, for the extra cost.

Apptorium, the developers best known for SideNotes, is running a sale from July 20–31 on some of the most recommended apps in their category. Get Details .
Apps on Sale from Other Developers
- CleanShot at 20% off
- DaisyDisk at 30% off
- ForkLift at 30% off
- MindNode at 20% off
- Nova by Panic for 40% off
- SetApp for 20% off
Apptorium's Own Lineup
Apptorium is putting their entire lineup on sale:
- 40% off SideNotes for Mac, iPhone, and iPad
- 50% off Workspaces and Desktop Composer
- 30% off License Store
- 38% off FiveNotes and Cursor Teleporter, 25% off FiveNotes Mobile & Nano
- LiquidFetch and WindowKeys as free bonus utilities
Other Well-Established Apps on Sale
- Pixelsnap
- Dropzone 4
- Bike
- Taskpaper
- Proxyman
- Tinyshield
My Reviews of Select Apps
AudioBo: The Audiobook Builder That Doesn't Make You Choose Parts 1, 2, and 3
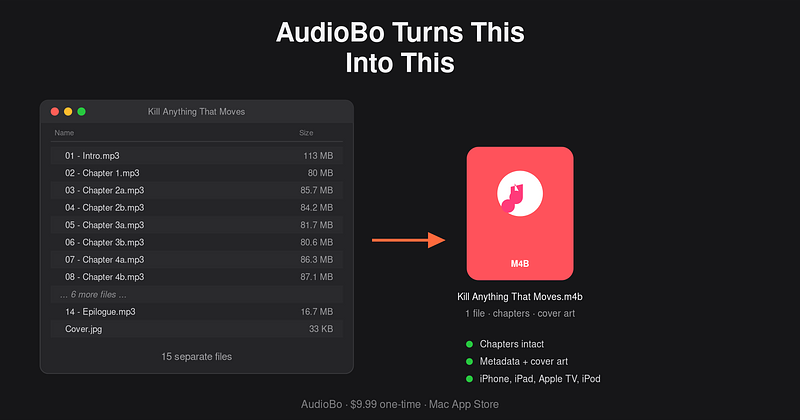
TL;DR - Turn just about any collection of audiobook files (FLAC,WAV,MP3) into a single iPhone compatible M4B complete with metadata and chapters. Mac, $9.99, Solo dev
I've been listening to audiobooks since they were called books on tape. I progressed from there to CDs and then to miscellaneous downloads. These days, the gold standard format, at least for Apple fans, is audiobooks packaged as single M4B files regardless of the book's length, complete with chapters and metadata. That way you can stop and start listening without searching for your place, add bookmarks and get a description and info on the author and narrator. My go-to tool for audiobook conversion is AudioBo, from solo developer Vlad at OrsoLabs, available in the Mac App Store for $9.99. It will turn a folder full of old MP3 files and assorted cruft into something you can listen to on your iPhone, iPad, Apple TV, and yes, even classic iPods. Length is no issue. If you've got a 60-hour doorstop fantasy novel, AudioBo can handle it.
For a long time, Reddit has recommended Audiobook Builder, and it's fine, except for the part where it caps output length and forces you into multiple part files for anything long. That's not a workflow, that's a workaround. For the price of a Big Mac combo, you can get AudioBo which converts MP3, FLAC, WAV, and other common formats into polished audiobooks and simplifies management and playback for good.
Features
The three selling points for AudioBo are:
Metadata Fetch
AudioBo pulls title, author, and cover art from Audible, Apple Books, and Google Books in one click. That's the tedious part of building an audiobook done for you.
Non-Destructive Editing
You can adjust chapters and metadata on an existing M4B without re-encoding. That preserves audio quality and saves real time, since re-encoding a long file is not fast.
No Length Forcing
Long-form audiobooks stay as one file instead of getting split into parts because the app couldn't handle the duration.
Intangibles
While researching AudioBo for this review, I found multiple instances where the developer has responded to feature requests in a thread and then shipped within days. To me, that's a pretty good sign that this app will be maintained going forward. I'm normally wary of App Store reviews because of astroturfing and vague "Good App!" posts, but reading through the reviews left for AudioBo is pretty convincing. The written reviews back it up with specifics rather than vague praise. "Far and away, the best audiobook conversion app I've found," one reviewer wrote. Another called it the "Current Gold Standard of Audiobook Converters on App Store." 9to5Mac gave it a full hands-on writeup, not a roundup mention, and the reviewer's (well-known Mac journalist, Bradley Chambers) verdict after testing it on several massive projects was direct: it delivers, and it's now his go-to.
Roadmap
There are still a few features that the app needs. Currently it doesn't support batch/multi-instance processing. Opening a new window wipes the book you're currently working on, even mid-export. So, don't expect to dump your library in a folder and walk away. The good news is that the feature is coming, according to the dev. The only other hiccup is pretty specific: when re-encoding existing M4B files to go from stereo to mono or to change the bitrate, several people report having issues. That's not something I would ever do, so I haven't experienced it firsthand.
Who This is for
If you're building or maintaining audiobooks on the Mac and you've hit Audiobook Builder's length ceiling, or you just want metadata fetching that doesn't require three separate lookups, AudioBo is the better option. It's Apple/M4B-focused only, so if you need Audible AAX/DRM handling or cross-platform output for Kobo or Kindle, this isn't that tool, and it isn't trying to be.
$9.99 one-time, free demo on the developer's site. No subscription - something we all appreciate.
Finbar is an Indy Gem for Keyboard First Users
In past lives, my bosses pressed me into using a few complex and complicated apps - mostly Adobe and Microsoft stuff, some AutoCAD. One thing they all have in common is crammed menu bars where what you are actually looking for seldom makes sense and when it does, it's buried three levels deep. Those are the ones that Microsoft likes to use as answers to questions on certification exams.
There's no shortage of specialty apps, like Paletro and automation tools like Raycast, Alfred and BetterTouchTool that try to address menu bar searches. Most of them are good at doing 70% of what it takes but they just never seem to get that final burst of polish it takes to solve the problem. That's where Finbar steps in. For $9.99, you get an app that sees every menu bar option, no matter how deep.
- Can't remember the name of what you're looking for? Finbar has fuzzy search.
- Use the same commands over and over? Finbar remembers that and surfaces them for you.
- Don't use part of the app? Exclude its menu choices from what you see to reduce clutter and simplify things.
If your keyboard skills are equal to or greater than your clicking skills, take advantage of the free trial and test Finbar. Outline Mode is the feature to try first--it transforms every menu bar into a keyboard-navigable tree, like Finder's sidebar. You can arrow through, expand/collapse, and commit without lifting your hands.
If your workflow isn't keyboard centric and you aren't regularly drilling into menu items, you don't need this. Use Raycast or Alfred. But, if your daily drivers include the apps I mention earlier, this should be an instabuy.
$9.99, one-time purchase. Free trial available. Download at finbarapp.com or via Homebrew (brew install --cask finbar). Requires macOS Big Sur or later. Roey Biran--@finbarapp on X--built this on the Unix principle of doing one thing well. It shows.
Mac Tools Consolidates Your Utility Bloat — With One Catch
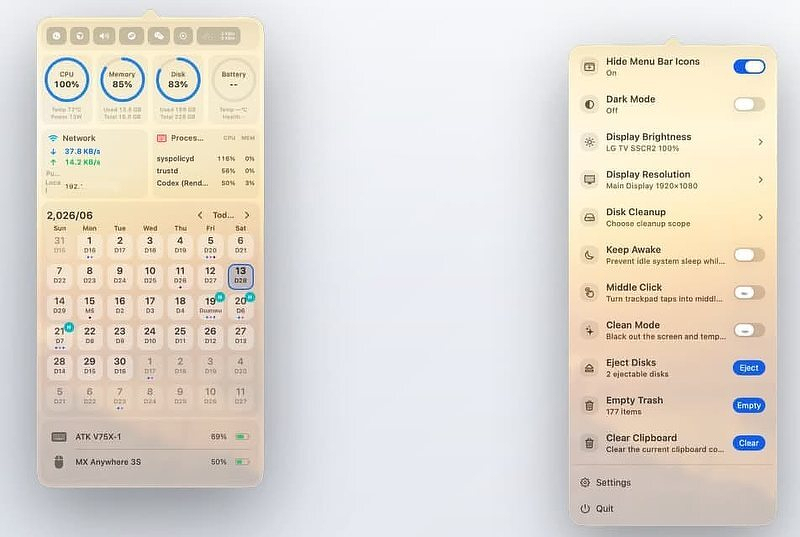
Apple, in its infinite wisdom, buries a great many popular system controls three layers deep in Settings, or worse, leaves them accessible only via the command line. Luckily, we have a community of indie developers who are pretty good at surfacing that stuff, building an app around it, and selling it for $5. An app for brightness. An app for the notch. An app to keep the Mac awake. An app to mute the mic. Then one day your menu bar has 40 icons in it and your login items are out of control.
There's a relatively new, free and open-source app that takes the opposite approach. Currently sporting over 500 GitHub stars, Mac Tools folds more than 40 of those functions into a single menu bar icon. It's built natively in SwiftUI and AppKit; the functions run on native Mac architecture, not scripts. Brightness goes through CoreDisplay, audio through CoreAudio, and disk cleanup runs path verification before it deletes anything. That last one matters: a cleanup tool that checks its work before emptying folders is rarer than it should be.
Check out the Mac Tools website. Mac Tools is available through Homebrew:
brew tap ggbond268/mactools
brew install --cask mactools
What It Does
The features break down into five groups. You enable the plugins for what you want and leave the rest turned off.
Display Control -- resolution switching per monitor, DDC/CI brightness for external displays, True Tone, dark mode, Night Shift, display sleep, prevent sleep, notch hiding, and menu bar icon hiding. This group alone covers what most people buy three or four separate utilities to do.
System Operations -- Stage Manager toggle, system and microphone mute, disk cleanup, Xcode cleanup, eject all disks, empty trash, clear clipboard, lock screen, batch quit apps, and a fix for the "app is damaged and can't be opened" error, which is really just quarantine flag removal with a file picker instead of an xattr command.
Efficiency Tools -- three-finger middle click on the trackpad, a cleaning mode that blacks out the screen and locks input so you can wipe the keyboard, IP lookup, translation, global app hotkeys, a full-screen Launchpad replacement, Finder right-click enhancements, and a zsh config editor.
Monitoring Panel -- CPU, GPU, memory, disk, network, and battery with one-hour history curves; keyboard, mouse, and app usage statistics; battery levels for the Mac plus Bluetooth peripherals and AirPods; fan control; and a charge limiter that defaults to 80 percent.
Personalization -- custom menu bar icons including GIF and MP4 animations, Launchpad appearance controls, 11 languages, and a plugin marketplace.
The plugin architecture is what keeps this from becoming bloatware. Everything can be enabled, hidden, or reordered, so the panel only shows what you actually use.
What It Replaces
The point of Mac Tools is consolidation, not feature-for-feature parity with every indie tool it overlaps. Lunar is still the king of independent monitor control, but if you just need brightness adjustment, Mac Tools handles it. If Amphetamine is only in your Dock to stop the Mac from sleeping, Mac Tools does that too. Across a whole set of single-purpose categories, it's a credible replacement for:
- a notch hider
- a mic mute utility
- an eject-all tool
- Itsycal-style calendar duty
- a Stats-style monitor
- a fan controller
- a charge limiter
- an app usage tracker
The Catch and a Reality Check
This is a relatively new app. After it appeared on GitHubDaily and in a Medium article, its popularity spiked fast. The developer's true identity is unknown; "ggbond268" is a pseudonym, and the project came out of the Chinese Mac community. The README is in Chinese, though the app itself is localized into English and ten other languages. That's not disqualifying on its own -- I run Chinese-built apps like Qspace regularly -- but it's the kind of context you want before you grant an app broad system access, not after.
And several of these features do ask for broad access. Fan control installs a helper with admin rights. Disk cleanup deletes files. The middle-click feature uses an event tap. Quarantine removal is the kind of thing you want done carefully, not casually. The code being open and the app being native counts for a lot -- that's the whole argument for shipping as a public repo instead of a black box. What it doesn't have yet is a public security audit. Worth knowing before you install, not a reason to skip it outright.
Is This For You?
If you're comfortable installing from a Homebrew tap, you like open source, and your menu bar currently hosts a small orchestra of single-purpose utilities, Mac Tools is an easy experiment. It's free, it's light, and the plugin design means you can turn on three features and ignore the rest.
If you'd rather pay for a mature tool with a support address and years of releases behind it, or handing admin rights to a young, pseudonymous project makes you itch, stick with the battle-tested standalones for now and check back in six months. Promising and early -- both are true at once.
Free and Discounted Copies of Sxitch for Reader
Umang Syrana, the developer of Sxitch, a keyboard tree based app switcher gave me 10 free licenses and 10 licenses at a 50% discount to distribute to AppAddict readers.
Get it free: Use code AMERPIE
50% Discount: Use code AppAddict
Sxitch
Sxitch is a variation on the Right-Cmd launcher pioneered by the Low-Tech Guys. Right-Cmd opens a popup; type letters and the list narrows -- "tree-based navigation" -- until one app is left, which auto-focuses. No cycling.
What I like: The tree-based, letter-narrowing mechanic is the clear differentiator versus Cmd+Tab's unpredictable cycling. The free tier includes tree-based switching and themes; Pro adds window switching, a Hide/Quit mode, overrides, blacklists, and priority support via Discord. The developer is responsive to user feedback and has already shipped a list-view feature based on Reddit requests.
Cons: May not be enough of a difference from Raycast or Alfred to justify a separate tool for some users.
Price: $10 for lifetime access on up to 3 Macs, or $2 a month, cancel anytime.
Sources: Sxitch homepage · Sxitch vs rcmd vs Dory
The World Needs More $5 Apps Like NanoClip
NanoClip is a menu-bar app combining clipboard history, text-expansion snippets, and clipboard automation "flows." Free/demo tier; Pro is $9.99 one-time ($5 with code EARLYBIRD through Jul 31). macOS 14+, local-first, optional iCloud sync, no account. By Victor Baro. (getnano.dev/clip)
The world needs more $5 apps like NanoClip. Before you roll your eyes at yet another clipboard utility, this one is actually three utilities rolled into one, and each can be summoned with its own global hotkey, fully remappable:
- Clipboard history (⌃⌘V) -- everything you've copied, searchable
- Snippets (⌃⌘S) -- text expansion with keyword auto-triggers
- Flows (⌃⌘F) -- automations that transform whatever's on your clipboard
Upfront, I'll tell you that you can get a portion (but not all) of what NanoClip offers from Raycast or Alfred. The developer isn't hiding from that; right on the product page he features detailed comparisons against both of those big-name launchers, plus Maccy and Paste.
I'm a heavy Raycast user, and inside it I keep a large set of text expansion snippets I've been using for years, imported from the OG TextExpander app, which is now subscription-based. NanoClip's snippets can go head to head with Raycast's: they support dynamic placeholders for the current date, clipboard contents, or fields you fill in before pasting.
I also use Raycast's clipboard manager, and unlimited history is one of the main reasons I pay for Pro. Raycast, however, doesn't sync clipboard history between machines, and that's why I'm continually tempted to leave it. NanoClip Pro gives me unlimited clipboard history for $5 once versus $8 every month for Raycast Pro (which adds more than just clipboard history, to be fair). It also syncs history and snippets between Macs via iCloud -- optional, for obvious privacy reasons.
The tools power users expect are here too: search, pinned items, and a paste queue that lets you copy several items and then paste them out in order -- handy for forms and spreadsheets. History captures text, rich text, code, links (with rich previews), images, GIFs, files, and color values, each rendered with an inline preview so you can see what you're about to paste.
Although I write a lot, I confess to underusing the text manipulation tools I already own. Flows might fix that. You get 30 built-in blocks across text, image, URL, and AI categories, including regex extraction, JSON formatting, OCR, image resize/convert, URL tracking-parameter stripping, QR generation, and even Bash commands (direct-download build only). The AI blocks are strictly optional and run either locally (Apple Intelligence or Ollama) or through your own API key for OpenAI, Anthropic, or Gemini.
Comparable apps
- Maccy is free and open source, the default recommendation for pure clipboard history, but has no snippets, flows, sync, or rich previews.
- Paste ($29.99/year or $89.99 lifetime) has the prettiest UI and iPhone/iPad sync, but it's a subscription for what NanoClip charges $9.99 once for.
- Raycast includes clipboard history (30-day retention) and snippets free inside its launcher; unlimited history and sync need Pro at $8/month.
- Alfred's Powerpack (one-time, ~£34) similarly bundles clipboard history and snippets into a launcher.
NanoClip's free tier is a demo more than a daily driver (last 5 clipboard items, 3 snippets), but at $5 through July 31 -- $9.99 after -- Pro is a bargain if you need all its features.
Allihat: Good App, Hard Sell
Reviewing software has become a minefield. Post something positive and somebody decides you must be the developer in disguise. Review a paid app and a crowd shows up to litigate every penny; make it a subscription and they bring reinforcements. Privacy-focused readers want to know where every byte goes, and given the state of surveillance capitalism, that's fair. Then there's the elephant in the room: AI. Half the internet bristles at it for reasons that are at least partly justified, while the other half has quietly used it to do things that would have been difficult to impossible without it.
None of that changes what a review is for: what the app does, who it helps, and what I learned from actually testing it. So here goes.
AlliHat
AlliHat is a Safari extension by Nathan Kontny that puts an AI assistant — Claude, ChatGPT, Gemini, or Apple's on-device model — in the Safari sidebar (App Store). Free download, $29.99/year IAP, macOS 14 or later.
Features
- BYOK. Bring your own key from any of the paid models, or use Apple's built-in model entirely on-device. Communication with the paid models is direct — no middleman — and your key stays on your machine.
- Agent Mode (Claude only). Clicks, fills forms, scrolls, and navigates pages for you; essentially Claude-in-Chrome for Safari. If you've de-Googled and want to stay that way, this gets you a Chrome-native feature without Chrome.
- Per-URL conversations. Chats about a page are saved against its URL and reappear when you revisit. In Agent Mode, you can save and reuse workflows for repeated tasks.
- PDF handling. Open a PDF in Safari and AlliHat can read and summarize it, NotebookLM-style. It handles scans and tables too.
- YouTube summaries via video transcripts.
- Native Safari App Extension. 603 KB, no Electron. Global hotkey (⌘⇧C) and right-click actions on selected text: Explain, Summarize, Synonyms.
Comparable Apps
- Sider works in Safari, Chrome, and Edge with a free tier and paid plans from roughly $8.30/month, but it's credit-metered and routes through Sider's servers rather than your own API key.
- Elephas ($9.99/month, $99/year, or lifetime tiers) is a Mac-wide AI assistant that works in every app, not just Safari, but has no browsing agent mode.
- BrainyAI is a free, open-source sidebar alternative to Sider and Monica, but Chrome-only.
Beyond extensions, an AI sidebar is a built-in feature of the AI browsers (Dia, Perplexity's Comet, OpenAI's Atlas) and of Anthropic's own Claude extension for Chrome. AlliHat exists precisely because Safari has none of these.
Who It's For
If you only use Safari for privacy or battery reasons and want page-aware AI without switching browsers or paying a second subscription on top of your API costs. BYOK plus a native extension is exactly the right architecture for that person, and nothing else on Safari that I am aware of offers an agent mode at all.
That's the catch: $29.99/year plus your own API bills for one browser's sidebar is a hard sell when switching to Chrome gets you Claude's extension free, and Apple keeps folding more AI into Safari itself. Good app; the pricing math is the part you have to make peace with.
I spend a lot of time watching the free-software sites, and for a couple of years now one name keeps earning a click: WidgetWorx. There are currently 17 "unquestionably niche, but surprisingly useful apps" on offer, none of them more than $4.99. In a throwback to yesteryear, a few are fully functional donation-ware. Every app is signed and notarized. No subscriptions, no telemetry, no Electron bloat.
The developer answers support quickly and keeps the apps current with bug fixes and new features. You can tell he put real thought into each title, and I've used enough of them long enough to speak to whether they hold up. They do.
My Favorite WidgetWorx Apps
Command Keeper - A searchable, personal library you build over time: command-line snippets, shell scripts, SQL queries, even AI prompts, all a click away. That single click can insert a command or script straight into macOS Terminal, iTerm, Warp, Ghostty, or Alacritty. It lives in the menu bar, but it's useful enough that you'll want to memorize the keyboard shortcut. Once you've invested some time building your library, take advantage of the export (JSON or CSV) as a backup. A lifetime license is $4.99. If you're a try-before-you-buy person, you can use it as long as you like; it just shows a time-delayed nag screen on each launch until you enter a key.
Butterfly Collector - A well-thought-out app for tracking your software licenses, and a lot more than just license keys: version, publisher, category, cost, architecture, minimum OS version, platform, and plenty of other fields. If you use something like Hazel that relies on license files, you can attach those to the entry. Automation fans get 10 built-in AppleScript actions, and there's an import function from another WidgetWorx app, Revok. Once it's populated, you can crunch some sobering numbers on what your software habit actually costs. The nicest touch: renewal reminders, which double as a prompt to re-evaluate your stack. A lifetime license is $4.99, with the same try-before-you-buy mechanism as Command Keeper.
Revok - I'm a little meta about my software; I keep apps about apps, and this is the one I reach for most. Point it at your Applications folder and it scans in a few seconds, returning an almost absurd 171 attributes. Want to see how many Electron apps you're carrying? (I'm down to four.) Curious which framework a developer used? Short on space and looking for what can go? Revok has a "seldom used apps" category for exactly that, and it'll show you which apps installed login items. The user guide is worth a read for use-case ideas. One caveat: you need the Xcode command-line tools installed to use it. Revok is $3.99, works without a license, and gains features once you buy one.
Book 'em Danno - I have the ebook collection of a true data hoarder: 28K titles and counting. I manage my collections with a mix of tools, so when WidgetWorx released Book 'em Danno I imported everything just to see what would happen. TL;DR: it didn't break. Drag your ebook files right in; it handles EPUB, MOBI, AZW3, CBZ, and PDF, extracts the metadata, and builds a searchable database. You can add notes and ratings. If you think Calibre is too ugly to live with, Book 'em Danno covers a good chunk of that ground. Pair it with a free reader like Readest and you've got a genuinely capable setup. The app is free to use, but the developer asks for a donation.
Notcho Libre - There are some clever apps that put the notch to work, but that's cold comfort if you just want to be rid of the damn thing. Notcho Libre is a recently released free app that redraws your display so the notch disappears, and it does it without invasive permissions. Set it as a startup item and get on with your (notchless) business.
Other Free Apps
You can find all of these on the WidgetWorx website.
- DoD - Get word definitions on demand with this pop-up dictionary
- Stim - Keep your Mac awake on a schedule or while specific apps are open
- Disk-O - Monitor your built-in storage
- Menu Snappr II - A screenshot utility for capturing your screen, windows, and selected areas
- Menupedia - Bring Wikipedia into your Mac's menu bar
- A.B.M. Command - A retro-styled arcade defense game for players who like frantic action
DonationWare
- File Fingerprints - Run hash scans at scale with a security angle
- Quill - A menu bar-accessible notes app
Paid Apps
- MountBatten - Apply rules to external drives and disk images before they can mount on your Mac
- Trash Buddy Plus - A shortcut-friendly trash management app
- Unibrow - A task manager focused on speed, structure, and flexibility
- Breakin' - Break reminders throughout the day
Developer Q & A
How did you get started in app development?
During the winter 2020 COVID lockdown. I built a Spotify player that ran in the menu bar to pass the time. It leaked memory like a sieve, but the sense of accomplishment and creative fulfillment was addictive, so I kept at it.
WidgetWorx isn't your full-time job. What else do you do?
I'm a Product Manager at Unity, where I lead a small team focused on mobile game monetization. Over a long, unremarkable tech career, I've worked on everything from simple video games and ad systems to Google's contract management platform and tools supporting US national security.
Which developers do you admire?
Double-Click Software, a long-defunct Atari ST developer from my teenage years who built many elegant, lightweight tools. More contemporary inspiration comes from The Low Tech Guys, who make some really well-designed apps.
Which of your apps do you take the most pride in? Why?
I take pride in all of them to a degree, but if I had to choose: Notcho Libre, for being a surprisingly simple fix for the MacBook's notch; Book 'em Danno, because it does a good job managing your ebook catalog if you invest the time to learn it; and Revok, for the genuinely useful insight it gives users into what's installed on their Macs.
What are you working on next?
I'm trying to work up the motivation to start on Video Cat, a video cataloging app that will share a codebase with Book 'em Danno. That's on top of fixing bugs and adding features to my existing crop of apps.
The Best eBook Readers: Readest vs. Bookshelves
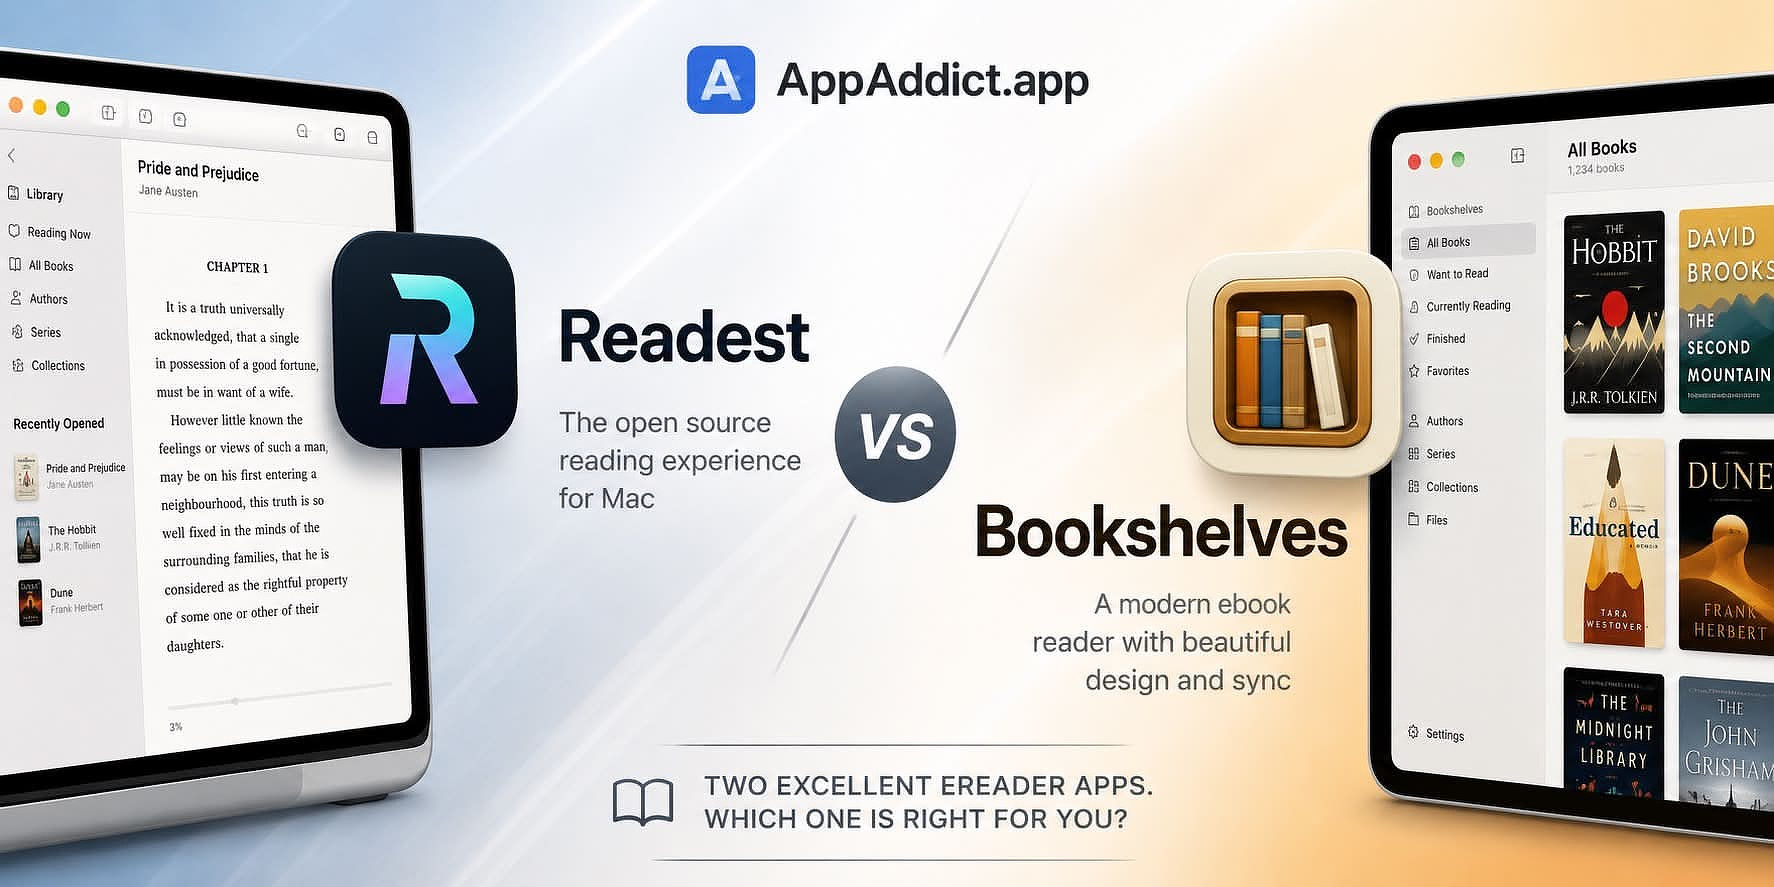
TL;DR: Apple Books is a storefront that happens to read ebooks. If you own your library, the real choice is between two apps. Readest is open-source, runs on everything (Mac, iOS, Windows, Linux, Android, web), and has the deepest feature set I've seen (side-by-side reading, sentence-level translation, KOReader/WebDAV sync), but it's still v0.x and some marquee features are unfinished. Bookshelves is Apple-only and commercial, but it's polished, ships fast, and pairs a strong reader with a 1.5-million-book built-in catalog. Cross-platform reader? Readest. Living entirely on the Mac and want the nicer native app? Bookshelves. Full breakdown below.
I spend a significant portion of every day managing and curating an embarrassingly large ebook collection. For a long time, I was a dead tree books guy and honestly, I can be talked in to visiting a book store with very little effort, but for sheer usability and utility, nothing matches a digital collection.
I still rely on calibre for the heavy lifting. While aesthetically, it may look like a Windows app from 1996, nothing can match it feature for feature for format conversion, metadata retrieval from multiple sources at once, file management and search ability. Using it as a reader is a non-starter though.
Calibre Keeps Getting Better | AppAddict
Apple Books
macOS has included an ereader, Apple Books, formerly iBooks, since 2013 when it was introduced as a stand alone app in Mavericks, Mac OS X 10.9. But even before that, iTunes offered ebook management. For casual readers who buy most of their books directly from Apple, it's enough. You get a clean, distraction free reading experience, annotation support, world class typography and excellent synchronization across Apple platforms. Apple Books is a storefront, first and foremost, just like Apple Music. Both are designed to get you to spend money. Apple Books also has very limited support for library management and for many file formats.
The real ereader competition
While there are a lot of options available to Mac users for a native ebook experience, the top tier as I see it comes down to two apps: Readest and Bookshelves.
Readest
Developer: Open-source community (AGPL-3.0) Price: Free and open-source; App Store version available Formats: EPUB, MOBI, KF8/AZW3, FB2, CBZ, TXT, PDF Platform: macOS, iOS, iPadOS, Windows, Linux, Android, Web GitHub: readest/readest
Readest is a modern rewrite of Foliate (the well-regarded Linux ebook reader), rebuilt in Next.js and Tauri v2. It has 21.5k GitHub stars, 89 contributors, and ships on every major platform including a web app at web.readest.com. It's technically a v0.x release (currently at 0.11.17), but the feature list reads like a mature product.
Readest's feature depth is uncommon: parallel reading (two books side-by-side in split screen), DeepL/Yandex translation at the sentence or whole-book level, text-to-speech with multilingual support within a single book, KOReader sync, WebDAV sync, code syntax highlighting for technical books, a reading ruler, paragraph-by-paragraph focus mode, and full accessibility support including VoiceOver, NVDA, and Orca.
The translation feature alone separates it from every competitor in this category. If you read in multiple languages or work through texts in a non-native language, there is no real competition.
OPDS and Calibre integration are first-class, not bolted on. If you run a Calibre library, Readest slots in without ceremony.
There is a catch: AGPL-3.0 licensing keeps the code open, but the business model is donation-based. That's fine for now (the project is clearly active), but it's a different kind of bet than a commercial app with a defined revenue stream. The v0.x version number also signals that the API and sync behaviors may shift. AI summarization and advanced reading stats are still "building," and audiobook support is currently vaporware.
Bookshelves
Developer: CPE Verm. GmbH Price: Free (10-book limit); one-time Pro upgrade ($6.99) Formats: EPUB, PDF, CBZ/CBR/CB7, FB2, MOBI/AZW3/KF8/KEPUB Platform: Apple ecosystem only (Mac, iPhone, iPad) App Store: Bookshelves eBook Reader
I've been using Bookshelves since the day of the first public release. It has always impressed me as the solution for most design issues faced by Mac App Store ereaders. It's 67.4 MB, currently sitting at #24 in the Books category, and the developer ships new features at a blistering pace. The most recent update dropped localization in 33 languages and a batch of reader and comics fixes.
The reading experience is the priority here. Paginated and scroll modes, 10 themes, 10 fonts, full-text search, highlighting, and annotations: all the basics, executed cleanly. Comic and manga readers get CBZ/CBR support with two-page spreads and right-to-left mode, which most ereaders skip entirely.
The built-in catalog is useful in practice: 1.5 million free books from Project Gutenberg, Standard Ebooks, the Internet Archive, and a Spanish-language collection. Standard Ebooks alone makes this worthwhile; that project produces beautifully formatted public domain texts that most readers ignore entirely.
The Pro tier ($6.99) unlocks iCloud sync (progress, highlights, preferences across devices), Calibre wireless transfer, OPDS server access, and highlight export. If you're in the Apple ecosystem and already use iCloud for everything else, this is the path of least friction.
The main drawback is lack of support for any other platform. It's Apple-only by design. If any part of your reading life happens on Android, Windows, or Linux, Bookshelves has no answer for you. It's also not open source and it's not free.
Which one should you use?
Choose Apple Books if:
- You primarily buy books from Apple.
- You only use Apple devices.
- Syncing notes across your Apple ecosystem matters more than library flexibility.
Choose Readest if:
- You own your ebooks.
- You use multiple operating systems.
- You run Calibre-Web or another OPDS server.
- You prefer open-source software.
Choose Bookshelves if:
- You live primarily on the Mac.
- You want a polished native application.
- You care as much about browsing your collection as reading it.
- Most of your library consists of DRM-free EPUB files.