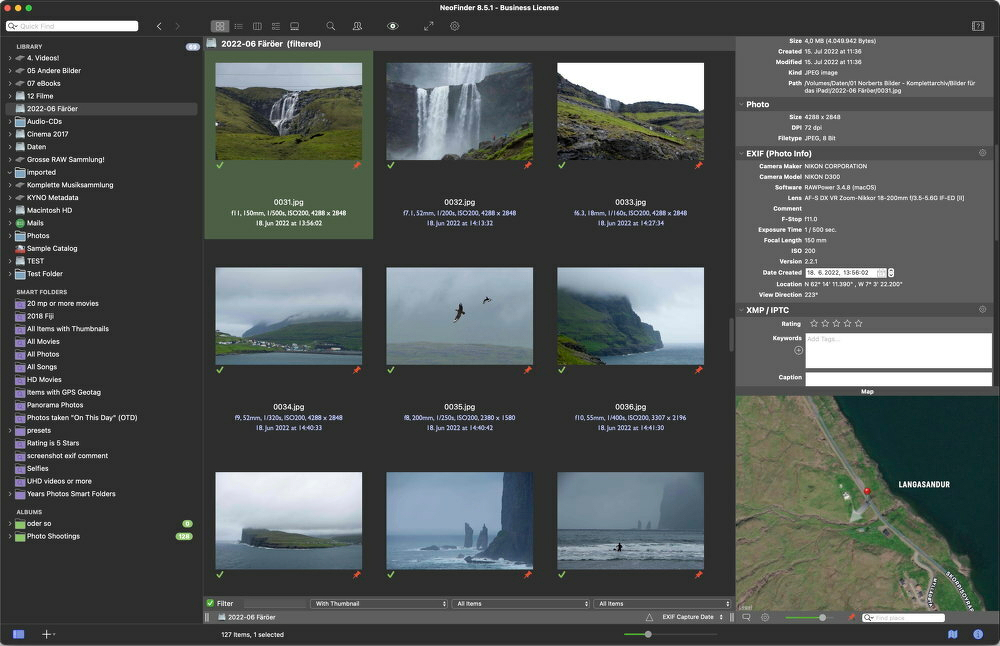
NeoFinder is a macOS app that catalogs disks and media, creating a searchable database of your files no matter where they live: internal drives, external drives, NAS volumes, shared network drives, removable media (CDs, DVDs, USB drives), and even inside archives.
The real magic is its ability to search offline drives; drives that aren’t currently mounted. NeoFinder does this by maintaining an inventory of file names, folder structures, and a surprisingly deep set of metadata. It can even generate thumbnails and previews for many media types, so you can visually identify files without connecting the original drive.
For anyone with a long digital history spread across multiple devices and storage formats, that capability alone makes NeoFinder worth paying attention to.
Who NeoFinder Is For (and Who It Isn't)
NeoFinder's User Base
Families and couples with merged or parallel photo libraries This is where I fit in. My wife and I are longtime iOS users who also shoot plenty of photos with DSLRs. We’ve worn out multiple photo scanners over the years and still have photo discs dating back to the 90s.
Cold-storage users If you have stacks of USB hard drives, binders full of flash cards, or a NAS that only gets powered on occasionally, NeoFinder becomes extremely useful.
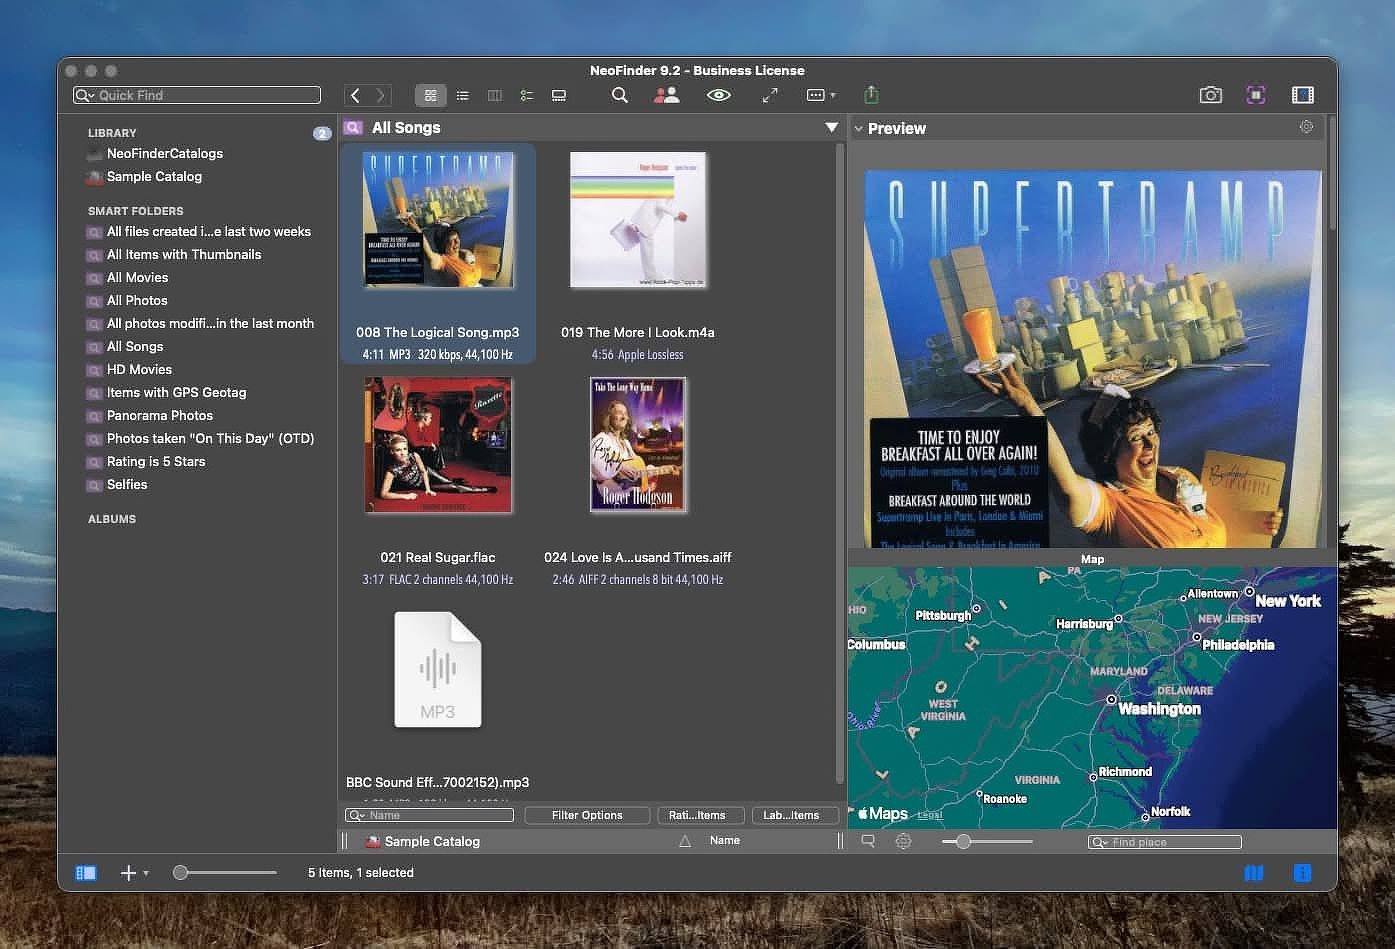
Multimedia digital packrats Tens of thousands of music tracks? A serious movie or TV collection? Huge ebook libraries? NeoFinder shines when that media is spread across multiple volumes.
NAS-centric setups Especially when the built-in search tools on your NAS aren’t good enough or when you want to catalog everything before reorganizing storage.
Small teams NeoFinder can run with a shared catalog database on a NAS or network share so teams can work from a common media index with consistent tags. (Different license tiers apply.)
People Who Probably Don't Need NeoFinder
If your entire media collection lives on a single always-connected cloud service and you rely on its built-in search, NeoFinder probably adds little value. NeoFinder becomes valuable when storage is fragmented across multiple drives, and some of those drives are offline, archived, or only occasionally connected.
It’s also not for someone simply looking for a replacement for Apple Photos without investing time in metadata. NeoFinder works best when you’re willing to use keywords, captions, people, locations, and other structured metadata.
What Makes It a Good Choice
Offline search, even accessible from an iPhone or iPad.
Extremely powerful metadata support, especially for media collections.
Deep macOS integration, including Finder context menus, AppleScript, Quick Look, and compatibility with apps like FileMaker and Roxio Toast.
Media-specific previews, including:
Photo thumbnails
Video metadata extraction via FFmpeg
Audio metadata including cover art, lyrics, and previews
The AppAddict Test
Music
I’m exactly the kind of user NeoFinder was built for.
My photo library is huge and messy. My music collection goes back to the Napster era and includes everything from original Carter Family recordings to spoken-word tracks from Gil Scott-Herron. My movie and TV collection is a mix of rips, downloads, digital purchases, and the occasional file that mysteriously “fell off a truck.”
My ebook library alone contains more than 18,000 titles in twelve different formats.
NeoFinder helps bring order to that chaos.
It can identify duplicates, normalize metadata, and organize photos using standardized metadata fields including geotagging. Finding photos from past trips or events becomes dramatically easier. We photograph a lot of ultramarathon events, and locating images from an obscure mountain race in 2018 used to be a real chore.
NeoFinder’s filtering tools also help with technical housekeeping. For example, you can identify videos using outdated codecs, unusual bitrates, or missing subtitle tracks. That makes it easier to modernize large collections over time.
Even ebook organization becomes simpler; building subject-specific libraries or collections for particular people takes minutes instead of hours.
Similar Apps
DiskCatalogMaker (macOS) A macOS cataloging utility that scans disks and folders to build searchable offline indexes of files, making it easy to locate content stored on external drives or archived media without mounting them.
iView MediaPro / Expression Media (legacy) Once one of the dominant professional digital asset managers, used to organize large photo, video, and document collections with rich metadata and powerful cataloging tools.
Extensis Portfolio / Canto Cumulus Enterprise-grade digital asset management platforms designed for organizations to catalog, tag, search, and distribute large media libraries across teams.
WinCatalog (Windows) A Windows disk cataloging tool that indexes external drives, network shares, and removable media so files can be searched even when the original storage is offline.
Every text expansion app promises the same core trick: type a short trigger; get a longer block of text. What actually matters is reliability, friction, and whether the app helps you build real workflows instead of just automating ⌘V.
Rocket Typistis a one-time purchase Mac text expander from Witt Software. It focuses on dynamic snippets built with simple macros, all managed from a centralized library that lets you preview exactly what will be inserted before you commit.
It’s normally $19.99 for the Pro version; it’s currently on sale at BundleHunt for $3.50. It’s also available through Setapp, although some users report bugs in the Setapp version that don’t appear in the standalone release.
The Mac text expansion space is crowded: TextExpander, Espanso, aText, PhraseExpress, and even Raycast Snippets all compete here. Rocket Typist positions itself as a middle ground: more capable than lightweight snippet tools; less complex and less enterprise-heavy than the big subscription platforms.
What Rocket Typist Actually Does
I’ve used text expanders for years, and the real value shows up in boring, repetitive work:
Standardized responses to common questions, including troubleshooting steps.
Email templates for replies I send every week.
Frequently used URLs, addresses, and signatures.
Blog post scaffolding, AI prompt templates, and structured note headers.
Custom autocorrect for words I still can’t seem to type correctly.
Rocket Typist treats snippets less like a warehouse of static text and more like reusable building blocks. That distinction matters once your library grows past a couple dozen entries.
Macro Library
Macros Are the Real Feature
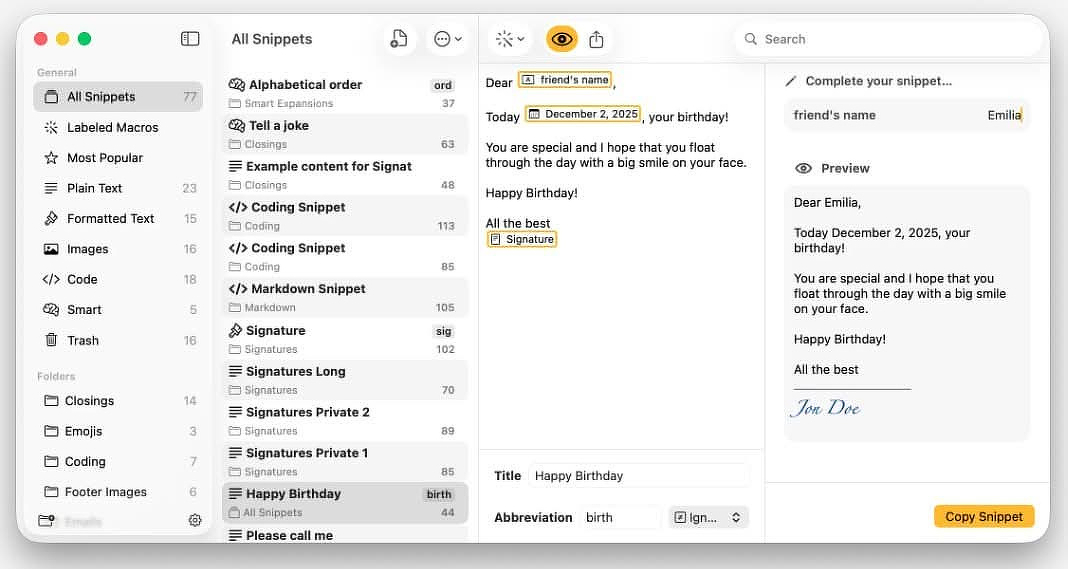
Rocket Typist’s dynamic elements are called macros. These let snippets adapt at insertion time instead of being fixed text.
From the developer:
“Use macros to add dynamic elements to your snippets… The Labeled Macros Hub provides you a central location to edit and apply macros consistently across multiple snippets… preview your snippets, complete with all macros applied, before inserting them.”
Marketing language aside, three things matter in practice:
Multiple macro types: date, time, text input fields, clipboard content, cursor placement, key functions, and more.
A centralized Macro Hub for managing and reusing them.
Live preview before insertion, so you see exactly what will be generated.
That preview feature is underrated. When you’re inserting variable content into a live email or ticketing system, being able to confirm the output before it hits the page prevents sloppy mistakes.
How It Works in Real Workflows
Static snippets are useful. Macros turn snippets into a lightweight automation layer.
Concrete examples:
Consistent date formatting across tickets and reports.
Templates that prompt you for name, ticket number, location, or device type.
Standardized headers for blog posts or Obsidian notes.
Support responses that insert today’s date, your signature, and a preformatted checklist.
Rocket Typist’s macro library also supports batch editing. If you need to update a common element across multiple snippets, you don’t have to touch each one manually.
Compared to Espanso or PhraseExpress, Rocket Typist feels less like you’re configuring a YAML-driven mini-programming environment and more like you’re using a Mac app. For many users, that’s a feature, not a limitation.
Who It’s Built For
Rocket Typist makes the most sense for solo Mac users. It’s not trying to be an enterprise collaboration platform.
1) Writers and Bloggers
You can create consistent document layouts with dynamic fields for titles, dates, categories, or boilerplate disclosures. It’s especially useful if you publish frequently and want structural consistency without copying old files.
2) Support Specialists and Repetition-Heavy Roles
In my tech support days, snippets handled:
Self-service password change instructions.
Campus Wi-Fi connection steps.
Clarifying which ticket type users should submit.
Equipment loan and purchase procedures.
Macros let you personalize these without rewriting them from scratch.
3) Users Who’ve Outgrown Lightweight Tools
Raycast Snippets are convenient but intentionally minimal. Rocket Typist offers:
Rich text and formatted snippets.
A dedicated snippet management interface.
More robust macro support.
Better scaling as your library grows.
If you’ve hit the ceiling with basic snippet tools but don’t want a subscription platform, this is where Rocket Typist fits.
If it already works for you, there’s no urgent reason to switch. Rocket Typist offers a more modern interface and stronger macro tooling at a low one-time cost.
Excellent for lightweight expansions inside an already great launcher. Limited dynamic logic and no centralized macro h
Pricing and Versions
Rocket Typist’s pricing could be clearer. The website describes the upgrade in vague terms:
“Rocket Typist is free to use with a basic feature set. Upgrade to Rocket Typist Pro for the full experience.”
You shouldn’t have to install an app to understand the feature split.
Rocket Typist Pro (as described in-app)
Upgrading unlocks:
Unlimited snippets
All snippet types:
Formatted text
Images
Smart snippets
Code snippets
All macro types:
Date and time
Text
Clipboard content
Cursor placement
Special key macros
Access to future Pro features.
Unlimited snippets plus full macro support is the real value here.
Tiers in Practice
Free: Basic feature set with limits.
Basic purchase ($9.99): App Store version that adds iOS and iPad compatibility.
Rocket Typist Pro for Mac ($19.99; currentlyon sale for $3.50): Full Mac feature set with unlimited snippets and all macros.
If you’re considering it, the BundleHunt price significantly lowers the barrier to trying it seriously.
Final Thoughts
Rocket Typist isn’t trying to dominate the enterprise. It’s not trying to turn snippet management into a side hobby. It’s a practical tool for people who type the same structured content over and over and want dynamic flexibility without a subscription.
If you live in email, ticketing systems, documentation tools, or Markdown editors, and you care about consistency and speed, Rocket Typist earns a serious look
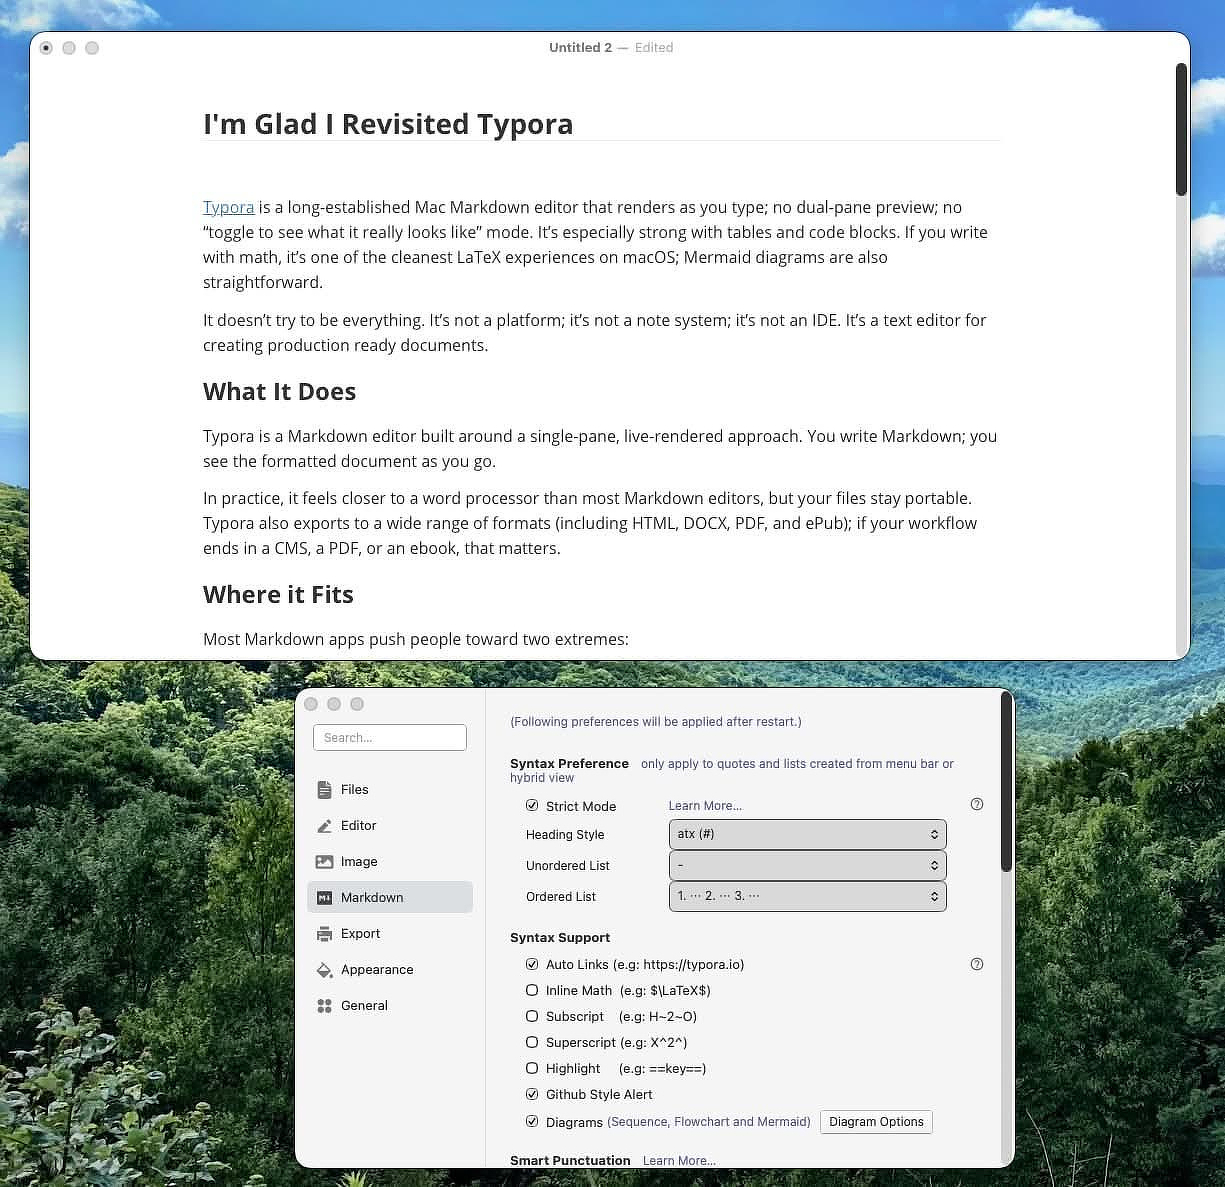
Typora is a
long-established Mac Markdown editor that renders as you type; no
dual-pane preview, no “toggle to see what it really looks like” mode.
It’s especially strong with tables and code blocks. If you write with
math, it’s one of the cleanest LaTeX experiences on macOS. Mermaid
diagrams are also straightforward.
It doesn’t try to be everything. It’s not a platform. It’s not a note
system It’s not an IDE. It’s a text editor for creating production ready
documents.
What It Does
Typora is a Markdown editor built around a single-pane, live-rendered
approach. You write Markdown You see the formatted document as you go.
In practice, it feels closer to a word processor than most Markdown
editors, but your files stay portable. Typora also exports to a wide
range of formats (including HTML, DOCX, PDF, and ePub); if your workflow
ends in a CMS, a PDF, or an ebook, that matters.
Where it Fits
Most Markdown apps push people toward two extremes:
Heavy systems: great for linking, research, and long-term knowledge management; sometimes overkill for drafting. Think Obsidian.
Minimal editors: great for flow; often too limited once you want real structure. Think MarkEdit.
Typora sits between those two. It gives you a calm writing surface, but
it also handles publishing-oriented Markdown without drama: headings,
lists, code blocks, tables, images, and exports.
If you bounced off “note system” complexity but still want more than
plain-text minimalism, Typora is the middle ground.
Feature List (What Writers Actually Care About)
Live rendering in a single pane; structure stays visible while you draft
Clean themes and readable typography; long posts are less fatiguing
Document outline; useful for checking structure before you hit publish
Solid support for code blocks, tables, and math (when you need it)
Practical image handling for posts that involve screenshots
Typora isn’t trying to compete with a PKM ecosystem or a full writing
suite. It’s trying to be the editor you open when you want to write.
What I Like
A Mature Editor that Stays out of Your Way Typora feels
like software that knows what it is. The interface stays quiet; the
feature set stays focused. You can move from outline to draft to polish
without living in sidebars, plugin browsers, or “workspace” metaphors.
Live Rendering Reduces Formatting Mistakes For review
writing, quality comes from structure. Typora makes it obvious while
you’re still drafting whether the post will scan:
Headings are consistent
Lists read cleanly
Emphasis stays under control
Code blocks look like code blocks
It Works Well with Markdown as a Source Format If you
care about plain files, Typora fits the “future-proof drafts” mindset.
You keep Markdown portability without forcing yourself into a spartan
writing experience.
It Is Not a Note System If you expect backlinks, daily
notes, tasks, or a full “second brain,” Typora isn’t built for that.
It’s a document editor.
Export Quality
The real question isn’t “can Typora export?”. It's whether it works with
the tools in your workflow.
Typora can export HTML, but paste behavior varies by web editor. Some
preserve semantic HTML. Some strip styles; some mangle lists and code
blocks. If export matters, test it like you actually publish:
Write a short post with headings, a table, a code block, and an image
Export to HTML
Paste into your CMS/editor
Check what breaks (lists, spacing, code formatting); decide based on that
Details
Latest update highlights — The last major update
(September 2025) brought macOS 26 Tahoe compliance and enabled the Share
Sheet on all supported systems.
Privacy — Typora is primarily local; your content stays
on disk unless you put it in a synced folder. Privacy is mostly
determined by your sync choice; not the editor.
System Requirements — Optimized for Apple Silicon and
supports macOS v11 and up.
Price — 14.99 for a three seat license. (No
subscriptions)
iA Writer - focused drafting; different philosophy
Bear - excellent notes app; different model than plain Markdown files
Obsidian - outstanding system; heavier for pure drafting
VS Code - capable; feels like the IDE it is unless tailored
Conclusion
Typora is worth revisiting because it stays focused. It’s stable, writes
clean Markdown, and helps you ship well-structured posts without turning
writing into an app-management hobby.
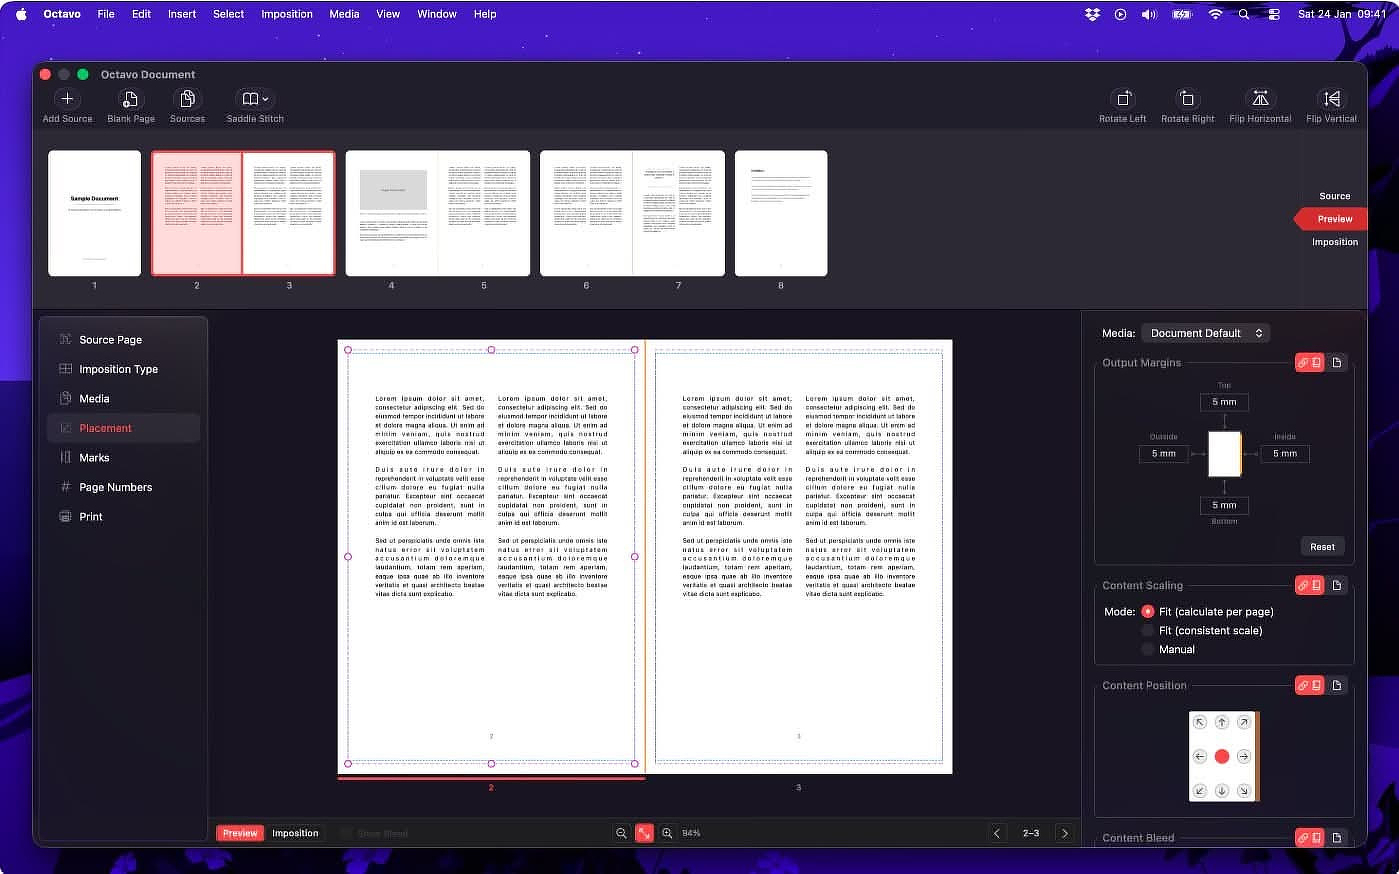
Veteran Mac developer Amy Worrall of Double and Thrice Ltd.
recently released Octavo, a focused macOS app for
booklet printing and imposition.
If you’ve never dealt with imposition, here’s the short version: it’s
the process of arranging individual pages on a larger sheet so that,
once printed, folded, cut, and bound, everything lands in the correct
order. When you see a press sheet with page 1 next to page 16 and page 2
upside down on the reverse, that’s not chaos. That’s math doing its job.
Historically, tools that handle this well have been aimed at print
professionals and priced accordingly, often in the
several-hundred-dollar range. Octavo does the same core job for $25.
It’s available on the Mac App
Store.
You can test it for free. The trial version watermarks output with
Octavo branding, so it’s fine for evaluation but not for production
runs.
How It Compares
Octavo occupies similar territory to Create
Booklet 2, but the experience feels more modern and hands-on.
The multi-pane, task-based interface keeps the workflow linear and
visible. You can visually drag margins instead of typing numeric values
and guessing. There’s also a source cleanup step before layout, which is
especially useful if you’re working from imperfect scans or PDFs that
need minor correction before printing.
Compared to something like InDesign, Octavo is refreshingly direct.
You’re not jumping to a separate properties panel filled with abstract
numeric fields that feel disconnected from the page. You’re also not
importing content into a full layout suite just to produce a folded
booklet.
This is not a layout engine for designing the book. It’s a tool for
correctly imposing a finished PDF so you can print and bind it without
gymnastics.
Printer Compatibility
If you’re wondering whether this will work with a consumer-grade
printer, the answer is yes.
Octavo doesn’t require a PostScript device or specialty hardware. If
macOS can print to it, Octavo can use it. The app relies on standard
macOS printing APIs; it reads available paper sizes, margins, and
printer capabilities from the system. It can also control relevant print
settings such as duplex edge binding where appropriate.
It does not talk directly to the printer firmware. That’s a good thing.
It means you’re working within Apple’s printing stack rather than some
proprietary workaround.
In practice, that includes:
AirPrint printers
Basic home inkjets
Office laser printers
PostScript-enabled devices
If it shows up in your macOS print dialog, it’s fair game.
Design and Fit
Octavo feels like a traditional Mac app in the best sense. It’s focused,
single-purpose, and built for desktop workflows rather than a
cross-platform abstraction layer. There’s no subscription pitch and no
unnecessary feature creep.
Even the icon shows care. Worrall built it in Fusion 360, textured and
rendered it in Blender, then finished it in Photoshop. That attention to
detail tracks with the rest of the app.
Who This Is For
If you:
Print short-run booklets at home or in a small office
Produce documentation that needs to be folded and stapled
Make zines or event programs
Regularly wrestle with page order and duplex settings
Octavo is a practical tool that removes friction from a very specific
workflow.
If you’re laying out a 200-page art book with complex typography and
bleed control, you’re still living in InDesign or Affinity Publisher.
Octavo is for the step after layout, when you need the pages imposed
correctly and printed cleanly.
For $25, that’s a niche tool that earns its keep quickly if you actually
print booklets.
When you're faced with text that you can't select in the conventional
way on your Mac (meaning with the cursor), there are several options.
They all work in slightly different ways, and I use the one most
appropriate for the task.
Live Text Recognition
The operating system has a feature called Live Text
Recognition , an on-device computer vision feature that detects
and extracts text from images and video so you can interact with it like
normal text.
It uses Apple’s Neural Engine to perform optical character recognition;
OCR, directly on your Mac. That means you can:
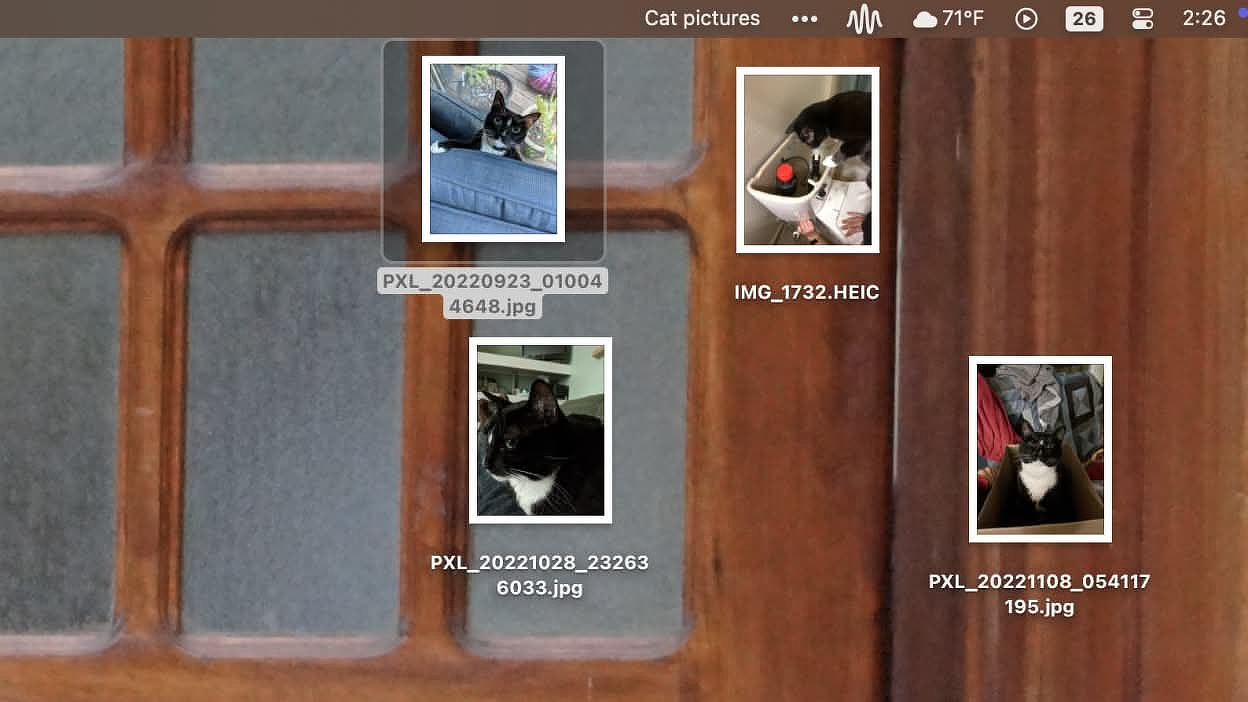
Select and copy text from photos in Finder, Preview, Photos, or screenshots
Click phone numbers to call via iPhone integration
Translate detected text instantly
Look up addresses, track packages, or search highlighted words
The key idea is this: pixels become selectable characters without
sending your data to the cloud. It quietly turns static images into
searchable, actionable information.
Cleanshot X
My go to choice is Cleanshot X, mainly
because it's always running on my Mac anyway. Live Text Recognition
requires you to open an image in an app like Preview first. Cleanshot X
let's you select any region and get text immediately. The downside is
that Cleanshot X is a paid app.
Raycast
There is a Raycast
extension called Easy OCR that combines the features of
Live Text Recognition and Cleanshot X. After you invoke it, Easy OCR can
be used on an image you've already captured, the clipboard or an area
you select on screen. Just search for it in the Raycast Store.
(Free)
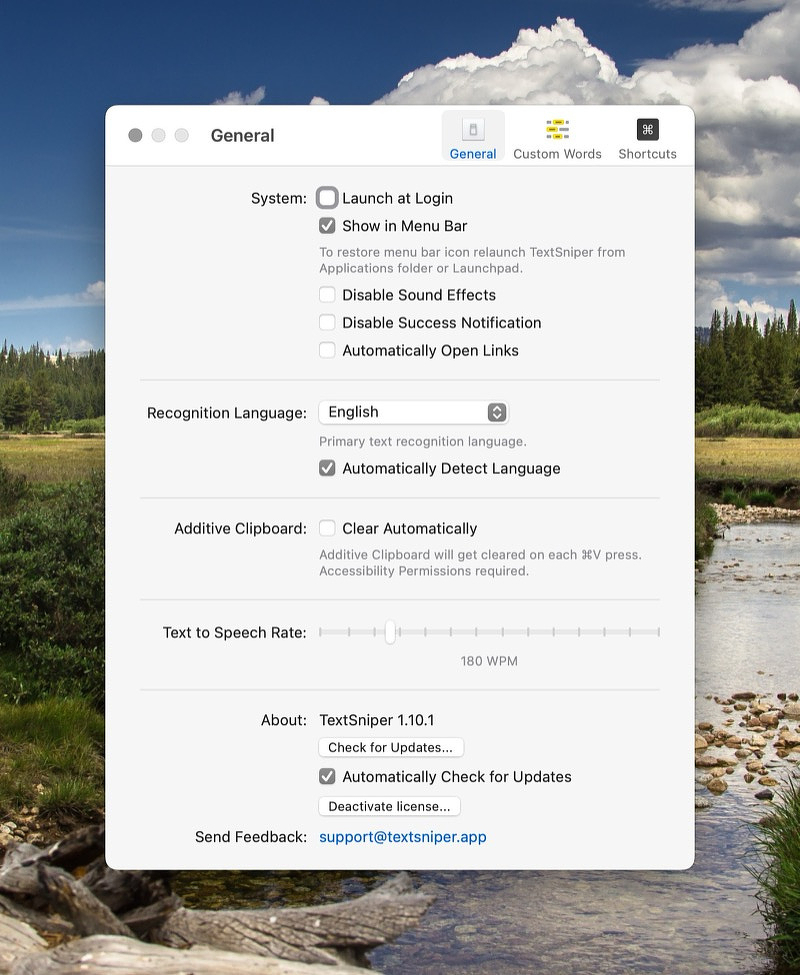
Text Sniper
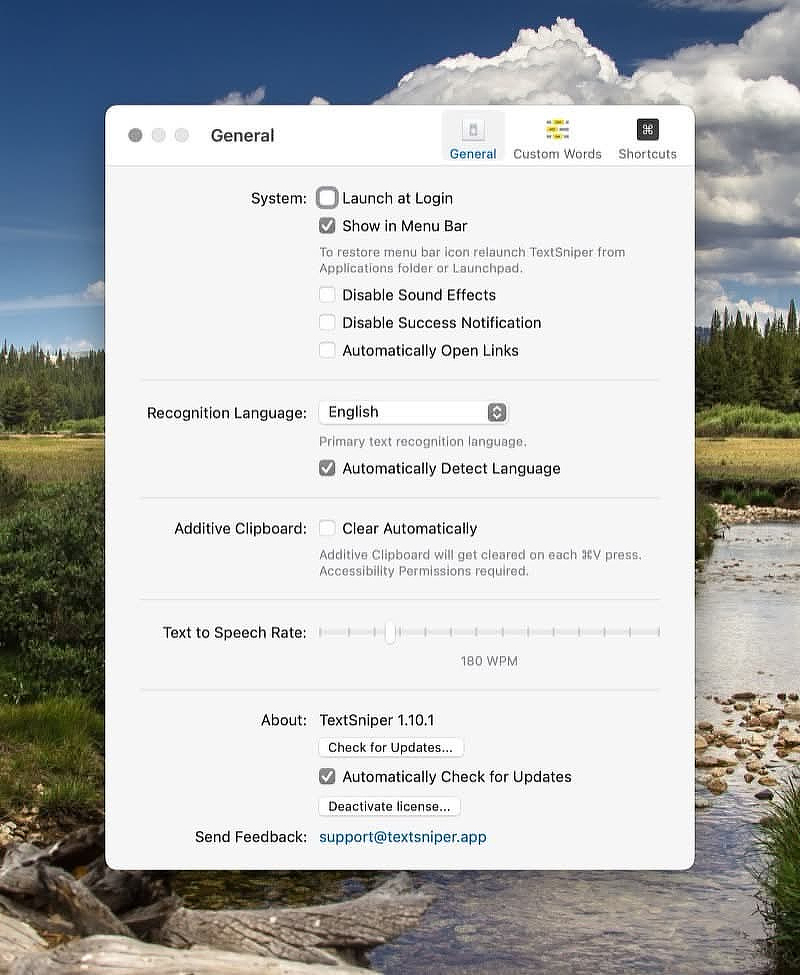
TextSniper Prefs
Even if you have the tools previously mentioned, there should still be
room in your toolbox for TextSniper, an OCR app for YouTube
videos, PDFs, images, online courses, screencasts, presentations,
webpages, video tutorials, photos, etc. Like Cleanshot X, you don't
have to make screen captures and open them in Preview to grab text. In
my experience it works better than alternatives like PDF Pen, Adobe
products, Google Docs etc. As long as you can draw a rectangle around
the text, it doesn't matter if it's rotating, angled or shadowed.
Unique Features
Removes line breaks
Built-in text to speech
Additive clipboard feature if the text you are trying to capture can't obtained on one go
Removes hyphens from words divided across a line.
Decodes standard bar and QR codes. Enabling a keyboard shortcut lets you turn those into numbers.
Text Sniper is currently on
sale for $2. That should be a no brainer. It is also available as
part of SetApp.
OCRmyPDF
OCRmyPDF is an open-source command-line tool that adds a text
layer to scanned PDFs while keeping the image intact. It
creates searchable PDF/A output. You can use it via this
Apple Shortcut..
I have tried a variety of notch apps, and I haven't been truly happy
with any of them. I am not sure whether the novelty of the interface is
the problem, or if it's the design of the apps I've used that bothers
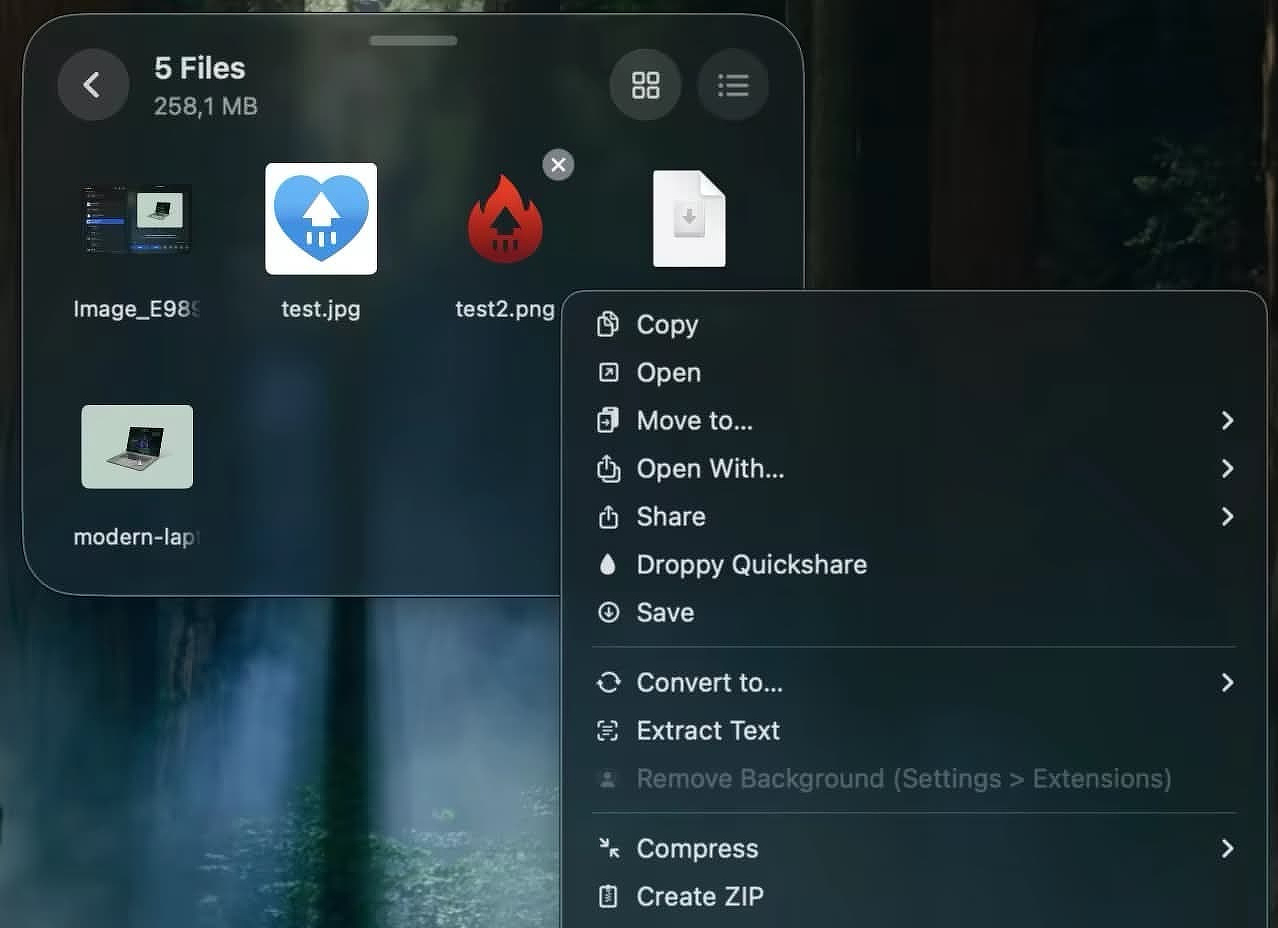
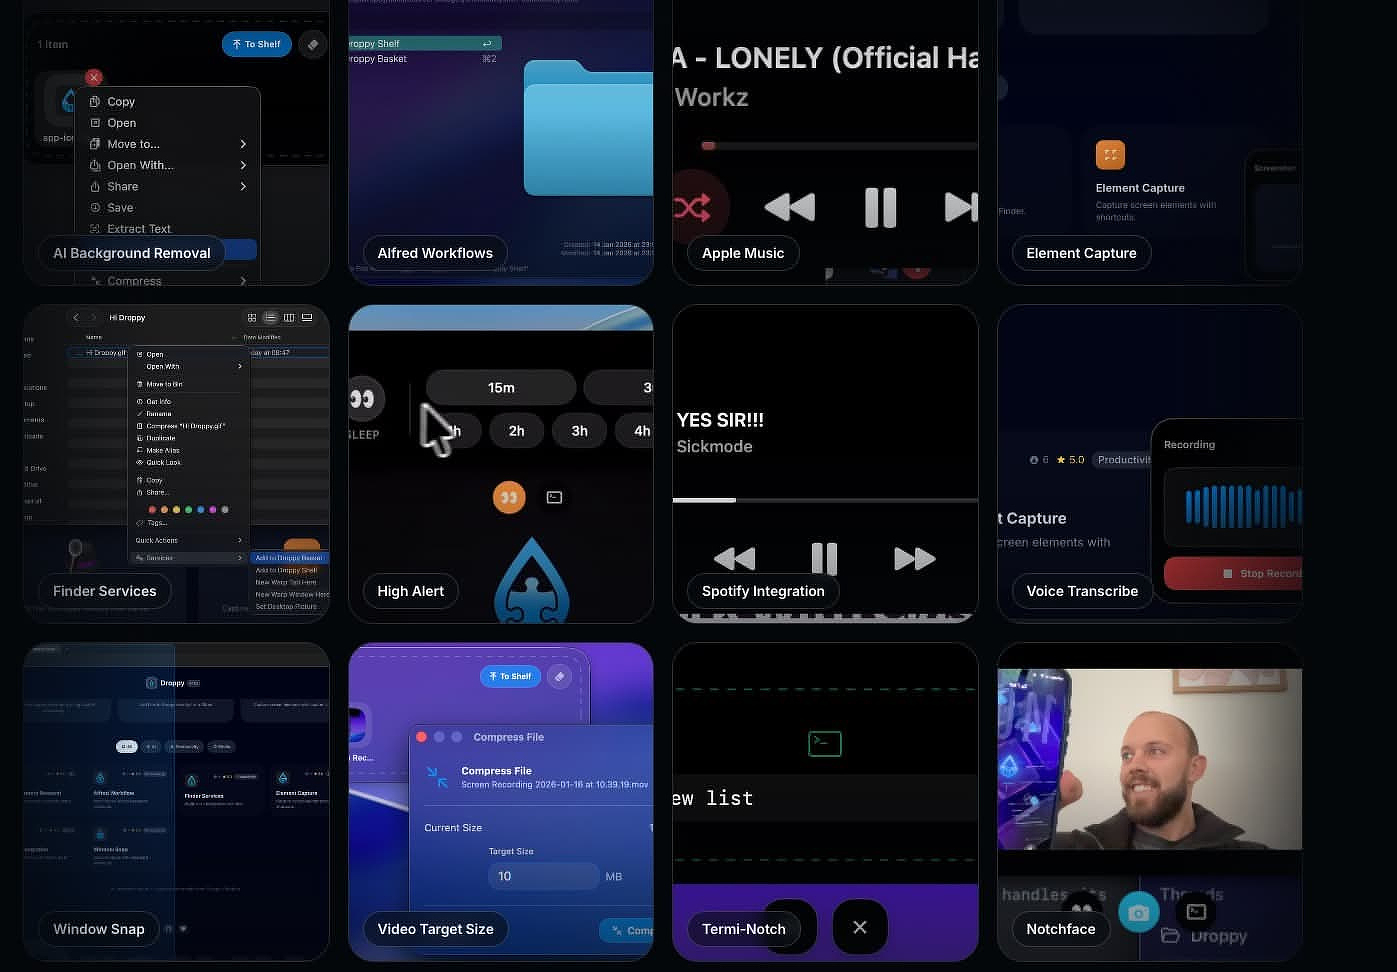
me. I recently installed Droppy, an app built entirely with
Swift for speed and stability, and I like it more than the other notch
apps I've used. I don't say this lightly, but it could be the best $7
you ever spend on software.
It isn't overloaded with superfluous features, and the features it does have can be toggled on and off easily. It also seems very
stable--I haven't encountered any bugs so far.
Utility Replacements
Depending on which features you enable, Droppy can replace several
categories of single-purpose apps:
Clipboard Manager -- Toggled off by default, you can enable a clipboard manager that's accessible from the notch interface. If you cut and paste a wide variety of elements all day long, you'll want something more powerful, but for casual use it gets the job done. It has keyboard controls, lets you choose how many items to keep in your history, and includes privacy protections like disabling password storage or excluding entire apps. If you copy an image containing text--whether it's a photo or a screenshot--Droppy can use OCR to extract that text.
Mini Music Player -- The mini music player displays the current track and album art in the notch, with the usual controls for previous and next tracks, play, and pause.It works with Apple Music and Spotify.
File Shelf -- Droppy lets you drag files in and out of the notch or into a floating window, much like apps such as Dropover, Yoink, and Gladys.
Quick Share - Upload files to the cloud and share the link with anyone
Mini-terminal - Run Shell commands right from the notch
Transcription - Use Droppy to transcribe text that you dictate.
Extensions
Just Some of the Exrensions
Droppy's architecture allows you to add or remove features through
extensions. This keeps the bloat down. You won't be faced with menu
options for Spotify or Alfred if, like me, you don't use either of those
products. The currently available extensions include:
AI background removal
Alfred integration
Adding the Services menu
Spotify integration
Screen capture of UI elements
Window snapping
Voice transcription
Other Features
A heads-up display appears when you use the keyboard controls for brightness and volume. You can also enable an HUD for AirPods if you use them with your Mac.
On my M2 MacBook Air, Droppy uses about as much memory as Apple Notes or Messages--that is to say, not much. It does consume some CPU cycles and power, but it's not going to hog your system resources.
You can choose to have Droppy appear as a notch even on Macs that don't actually have one. Alternatively, you can have it appear as a Dynamic Island to mimic the behavior on the iPhone. The functionality is the same either way.
Other Notch Apps
I tried Notchnook shortly after it came out, and it felt more like a
minimally viable product than a finished app--despite its $25 price tag.
It left a bad taste in my mouth.
My second choice in this category is Dynamic
Lake Pro, which sells for $15.90 on Gumroad. It has a couple of
features Droppy doesn't, such as a weather and calendar HUD and
notification support. It's updated frequently, and the developer is very
responsive to bug reports and user questions.
No Drama
The developer of Droppy was recently subjected to a concerted campaign
of disparagement by a competitor that involved brigading and a lot of
Reddit style drama. That's unfortunate but he handled it with grace and
class. If you have questions, here
is a good explainer.
MacPilot, a
customization and utility app from Koingo Software, normally sells for
$29.95 but it is currently $3.99 on Bundlehunt. There are
similar apps like Onyx and Tinker
Tool out there that are free, but for the price I thought I'd take a
look.
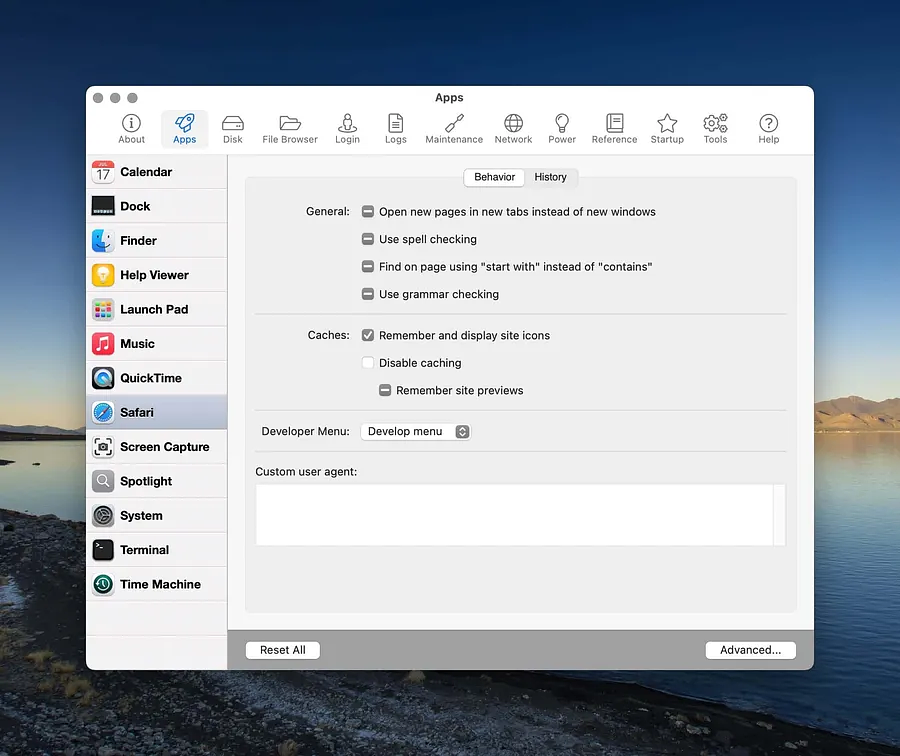
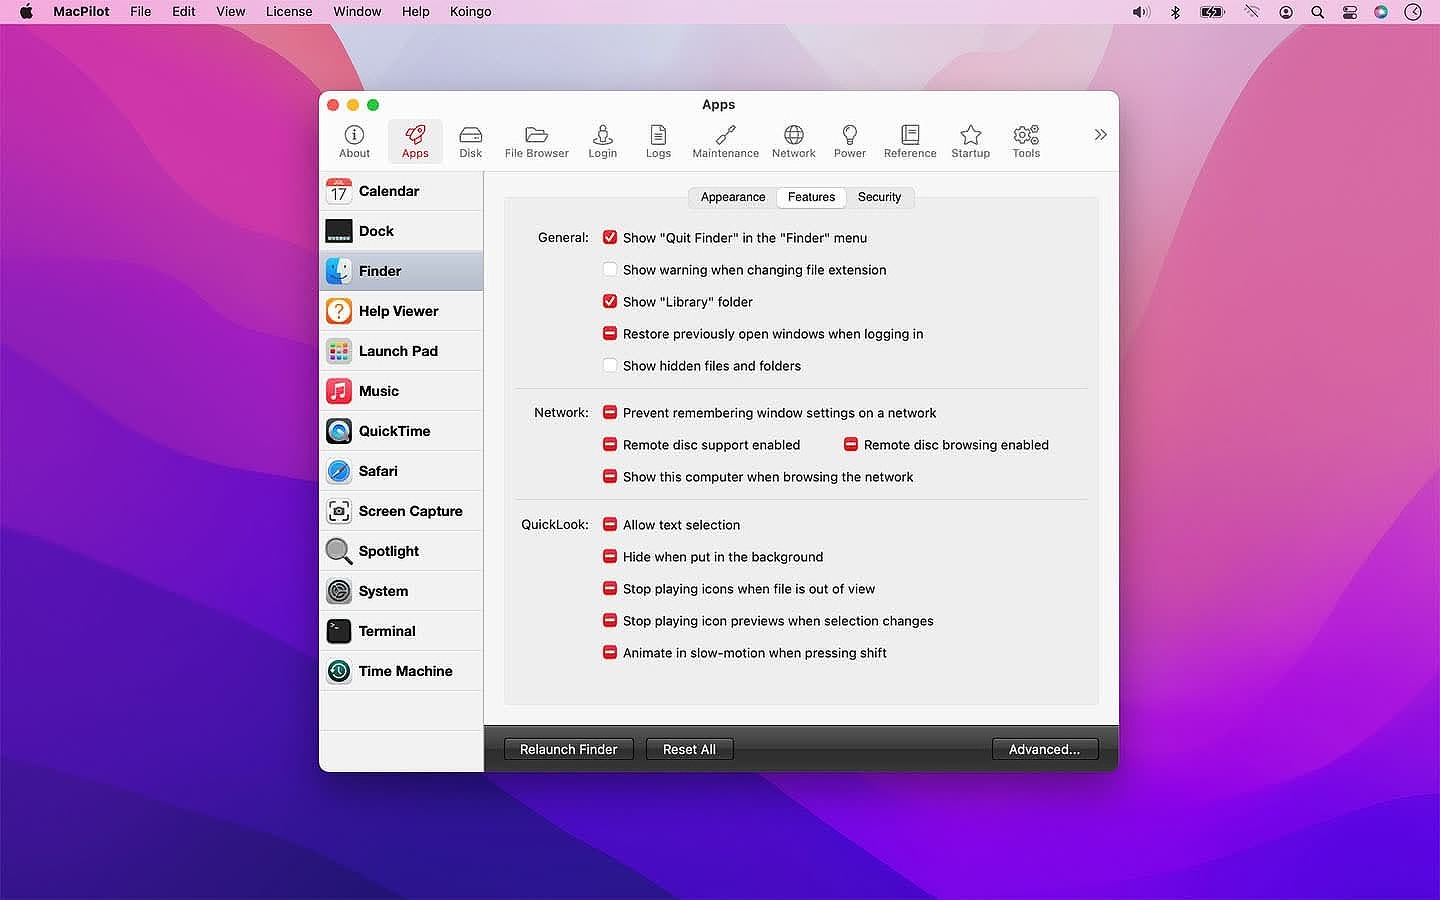
Applications
Apps
Mac Pilot contains settings for several system apps. Here are just of
the few things it can control.
Calendar - change event duration
Disk Utility - modify core storage
Dock - single app mode, enable window previews
Finder - enable "Quit Finder"
Help Viewer - user normal instead of floating windows
Music - enable half-star ratings
Quick Time - Remember open movies on quit
Safari - Backspace goes to previous page
Screen Capture - change file type
Spotlight - Reset index
System - Disable notification center
Terminal - Window focus follows mouse
Time Machine - Do not prompt to use connected drives and allow backup to unsupported device types
Disk
Gives info and lets you perform maintenance on individual partitions
Disks info
Files Info
Maintenance
File Browser
Detailed file information and settings
General - Includes last backup date
Details - Over 30 Unix characteristics on each file
Access - Adjust traditional permissions and ACLs
Advanced - Allows you to lock files
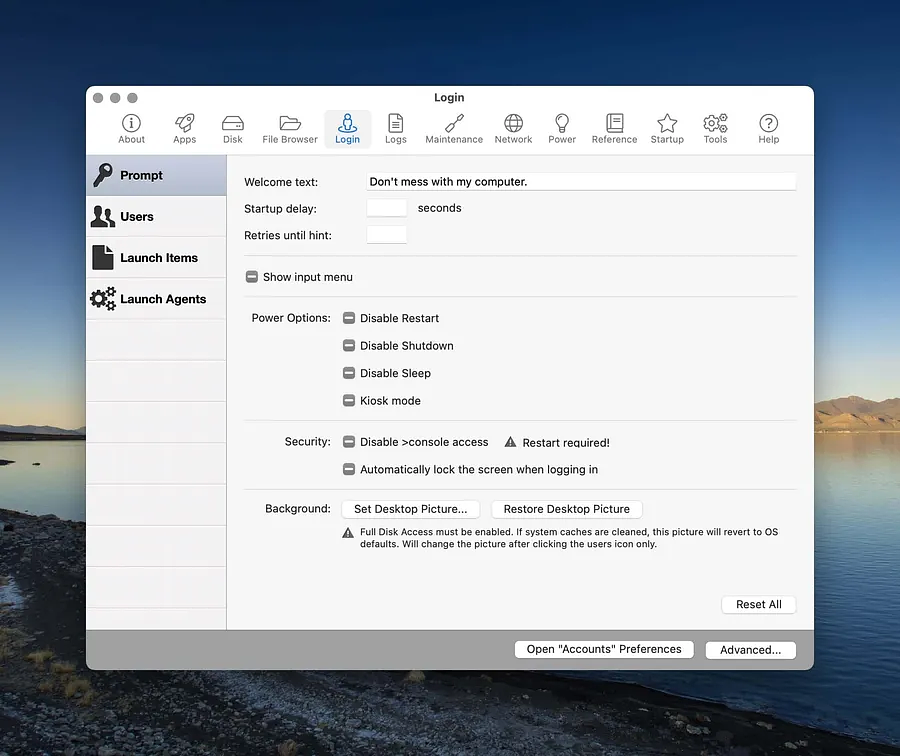
Login
Login
Change many features of your login screen - including the displayed image, which is totally worth the whole purchase price to me!
Show or hide any users of the computer on the login screen
Enable and disable login items and launch agents
Set defaults for window states on login
Logs
Built in log viewer
Complete list of system receipts for installed software titles that issue them
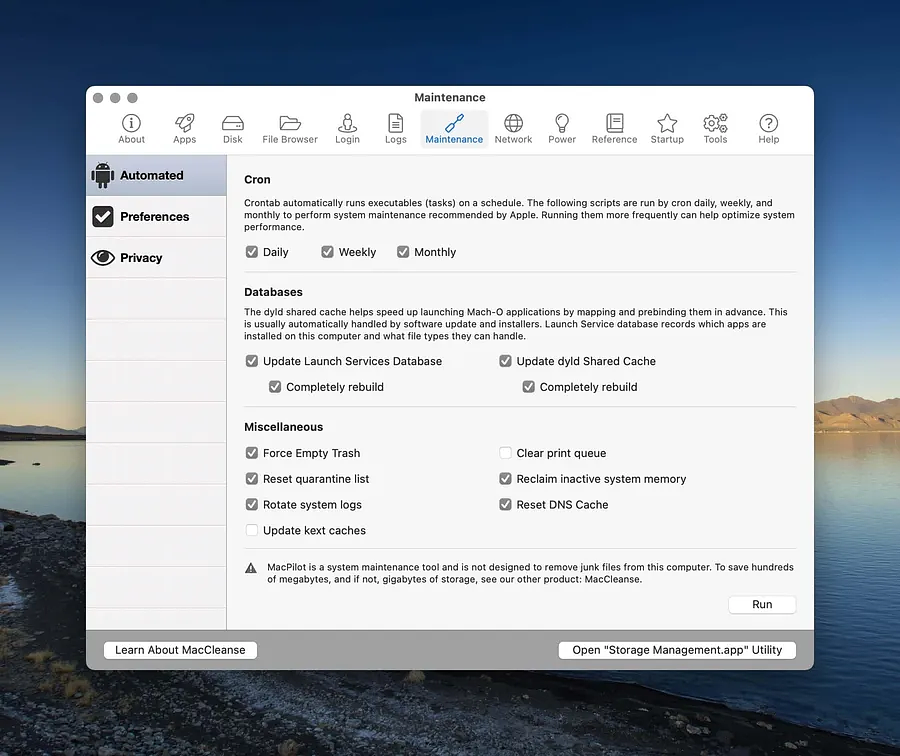
Maintenance
Maintenance
Automated - Enable or disable system cron jobs
Update or rebuild launch services database
Force empty trash and clear print queue - Very Helpful!
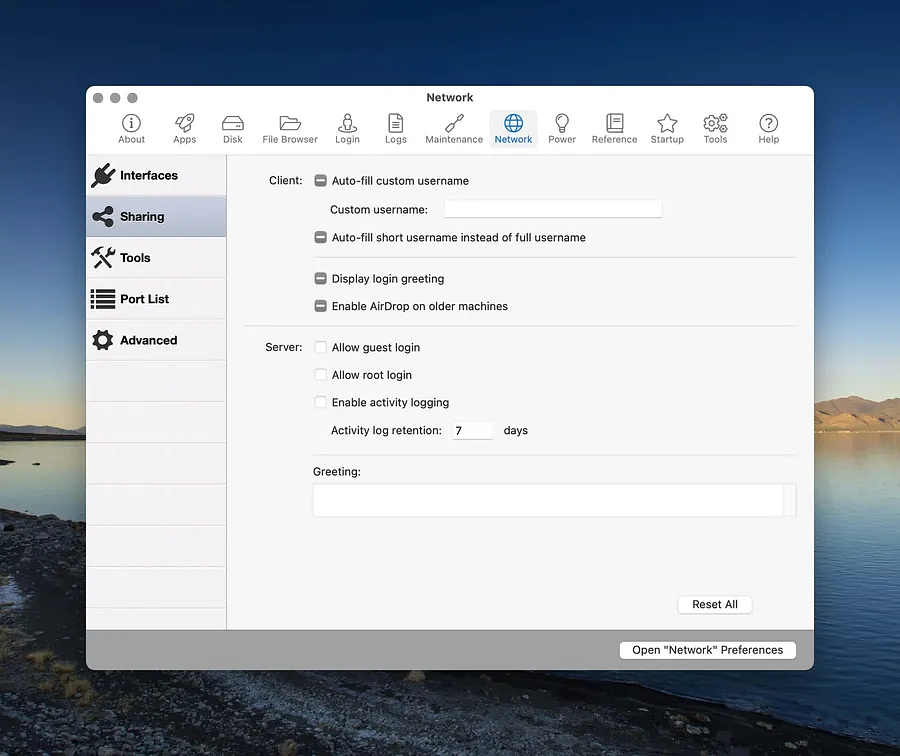
Network
Network
Detailed info for every network interface
Custom sharing settings including enabling airdrop on legacy machines
Shortcuts to hidden utilities: Airport Utility, Wireless Diagnostics
Complete Port List
Network Optimization for selected broadband connections
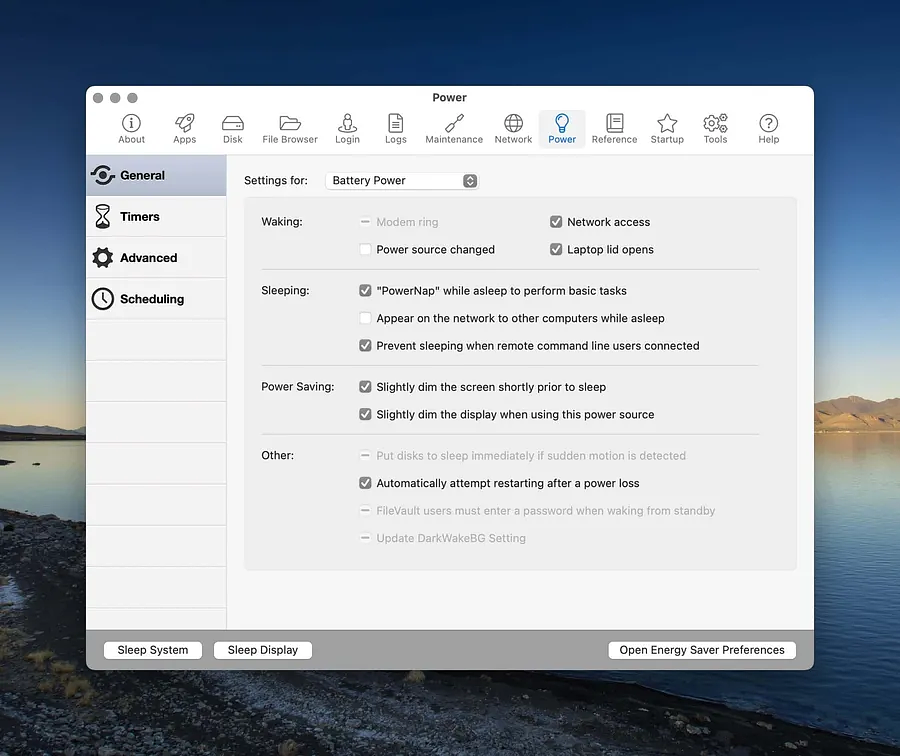
Power
Power
Hidden settings for system, AC and battery
Sleep settings for disks, display, and system. Plus auto-power off settings
Hibernation settings
Scheduling for wake and sleep
Reference
Error Codes
Fonts
HotKey Combos
Manuals
System Profile
In addition there is a section for getting more information and doing
some optimization but it requires disabling System Integrity Protection
and I did not explore that.
The final potentially helpful tool is one that strips out the files from
binaries for either Intel or ARM processors if you are running low in
disk space and want to eliminate things you don't need. I'd make damn
sure I had a good backup before using that.
I would also stay away from disabling SIP (System Integrity Protection)
to use any of the features if you are working on your daily driver or a
Mac with access to sensitive features.
Unless you’re seeing severely degraded performance during large
writes, or macOS is actively warning you that you’re out of space, you
can usually let the system manage storage. It does a solid job.
If you do need to step in and make selective deletions, a newer app from
Switzerland—Trace—offers
genuinely informed assistance.
When it was introduced on Reddit, some commenters dismissed it as yet
another vibe-coded “optimizer.” That assumption doesn’t hold up. Trace
has thorough documentation and a deep feature set. It’s not a one-click
wrecking ball, a “system optimizer,” or a fake RAM cleaner. It’s a disk
analysis tool built for people who want to understand what’s actually
taking up space—usually user-created files—and make deliberate
decisions.
Every removal option is clearly classified as Safe,
Questionable, or Not Safe. That
framing alone separates it from most consumer cleanup tools.
One of the most practical features is its quarantine
system. Instead of deleting immediately, you can move files into
quarantine and run your Mac normally to confirm nothing breaks. If
everything checks out, send them to the Trash. If not, restore them to
their original location with a click. That’s how deletion workflows
should work.
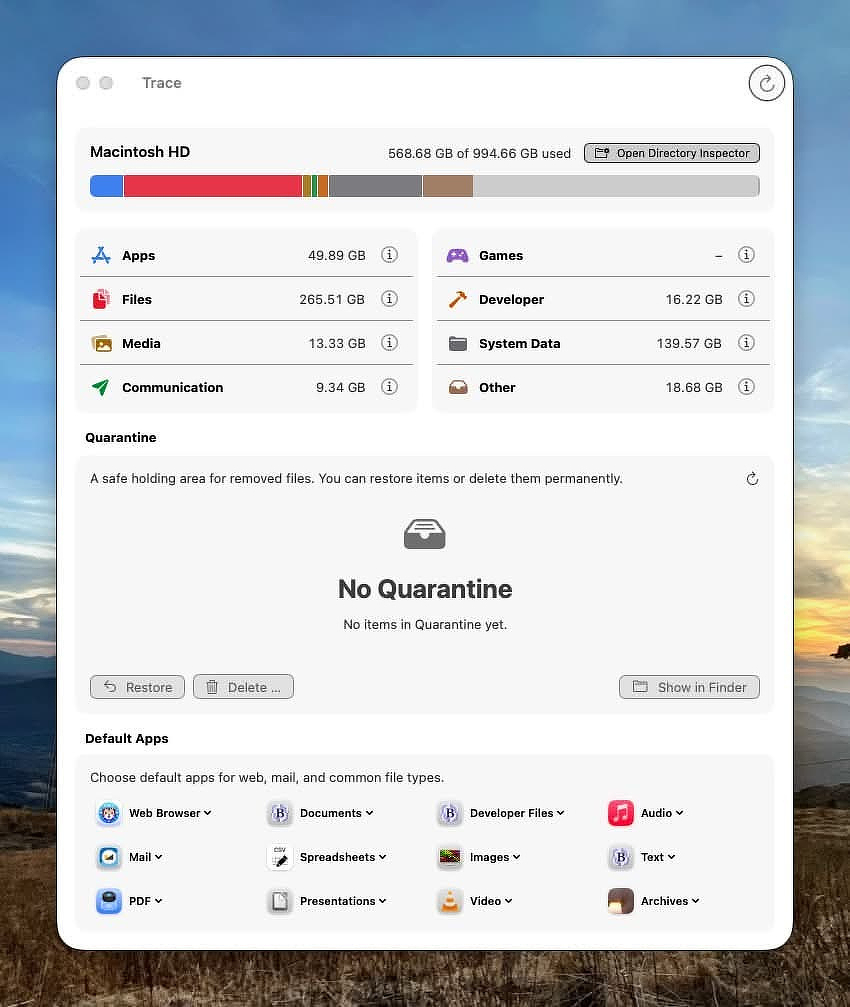
Categories Evaluated
Trace organizes findings into categories:
Apps
Shows the app’s bundle size plus associated support files in ~/Library.
The built-in App Inspector identifies removable caches and estimates
reclaimable space if you reset them. There’s also an uninstaller that
goes beyond simply dragging to Trash.
Files
Lists user home directory files by size. On my system, the biggest
offenders were local LLM models, iPhone videos, and illustrated books in
my Calibre library. The directory inspector lets you drill down into any
folder and its subfolders for precise analysis.
Media
Reports the size of Apple media libraries (Music, Photos, TV, etc.).
Useful for spotting duplicate libraries or old “Previous iTunes
Libraries” folders that quietly accumulate over the years.
Communication
Breaks down Mail and Messages storage.
Games
Separates games from standard apps and exposes associated mods, caches,
and saved games.
Developer Tools
Analyzes Xcode data, Homebrew, Rust, Git, Python environments, and more.
If you’ve been experimenting with toolchains, this view is illuminating.
System Data
Breaks down space used inside ~/Library and other system folders,
including removable caches. On my M2 MacBook Air, Apple Intelligence
alone accounted for 11GB.
Other
If you’ve been experimenting with local AI tools (Open Claw, Ollama,
Parakeet, Osaurus, etc.), this category helps identify where those model
files actually live and how much space they’re consuming.
Trace Agent
Trace includes an optional background process called
TraceAgent. When you trash an app, TraceAgent monitors
the event and later suggests related files that may also be removable.
Important details:
No auto-delete: TraceAgent never deletes anything on its own.
Transparent suggestions: Recommendations are based on documented attributions and vendor profiles.
Optional: You can enable or disable TraceAgent at any time.
Demo-friendly: It’s fully usable in the free demo.
This strikes a reasonable balance between helpful automation and user
control.
Default App Selector
An unexpected bonus feature is a consolidated default app selector. It
centralizes system defaults for:
Browser
Mail
PDF
Documents
Spreadsheets
Presentations
Developer files
Images
Video
Audio
Archives
It’s a small thing, but having this in one interface is practical.
If you download the trial (which I recommend), read through the documentation
and the FAQ. This is not a
“click and hope” utility. It’s built for users who want context.
Trace requires Full Disk Access. It contains no telemetry and has no
cloud dependencies. The developer has stated that if development ever
stops, the code will be released as open source.
It’s not available in the Mac App Store due to sandboxing limitations.
Licenses are transferable and not locked to a single machine. Pricing is
straightforward:
Lifetime license: $29 (includes email support)
Three-seat license: $69
14-day money-back guarantee
This isn’t a magic broom. It’s a diagnostic instrument. Used
thoughtfully, it can help you reclaim space without breaking your
system—or your workflow.
When it comes to disk management, old myths die hard.
Many of us remember when hard drives were tiny and expensive. My first
PC had a 140 MB drive. I was furious that the WordPerfect executable
alone was 12 MB. One app. Twelve megabytes. That felt criminal.
Those early experiences left a mark. Even today, people worry about
“memory” when they really mean disk space. Years ago, I jokingly told a
user she should stop using large fonts because they were filling up her
drive. She believed me.
That’s the level of mythology we’re still dealing with.
The reality: macOS 26 manages disk space remarkably
well. Most users don’t need to think about disk usage until
they’re around 90% full or seeing real warning signs. Yes, bugs happen.
Eventually you’ll encounter a runaway process that eats tens of
gigabytes and refuses to let go. But that’s the exception, not the rule.
Unfortunately, some developers—usually large, marketing-driven ones—sell
fear. For forty years, the internet’s most persistent question has been:
“What program can I run to make my computer faster?” That
question fuels an entire ecosystem of apps that range from mildly
helpful to actively harmful.
Let’s break this down clearly.
Maintenance Apps
macOS automatically runs daily, weekly, and monthly maintenance scripts.
These mainly:
Rotate and trim log files
Rebuild man page indexes
Perform minor housekeeping checks
They do not:
Purge user caches
Clean browser caches
Delete Application Support folders
Fix “System Data”
If you want to manually run those built-in scripts (not required), you
can use tools like:
These apps also include developer-written routines that clear caches and
other temporary files. Remember: caches exist for
speed. Delete them and macOS will immediately rebuild
them—using CPU cycles to do it. You usually gain nothing.
In my experience, the “maintenance” features are useful in narrow cases:
Clearing runaway logs
Machines that have been powered off for months
Systems hovering below 10% free space
Beyond that, it’s mostly cosmetic.
The tweak panels in OnyX, Cocktail, Mac
Pilot Pro, and 1Piece are a
different category. Those are customization tools, not maintenance
necessities.
Disk Space Analyzers
This is where real utility lives.
Even careful users forget about a 5 GB Linux ISO, a duplicated Calibre
library, or a long-abandoned Docker image. A good disk analyzer shows
you what’s actually consuming space.
I use DaisyDisk
occasionally to hunt anomalies. It’s excellent at surfacing:
…then you’re already covering those bases—and usually with better depth.
CleanMyMac trades specialization for convenience.
Another strong suite is MacCleaner Pro by
Nektony. Their apps are consistently high quality, well supported,
and reasonably priced. Their confusingly named App Cleaner &
Uninstaller has one of the better app-update workflows I’ve seen.
The key question isn’t “Is this app good?” It’s “Do I need all these
functions in one place?”
Uninstallers
Dragging an app to the Trash is no longer sufficient for many modern
apps.
Browsers, note apps, and tools like Day One can leave large support
folders in ~/Library. That space doesn’t magically disappear.
Both are excellent at identifying associated files. Still, always review
what’s being deleted before confirming.
What You Can Safely Ignore
In most cases, you can ignore:
Fluctuations in “System Data”
Reported purgeable space (it really is purgeable)
Spotlight index size
Caches under 2 GB
Swap files
APFS snapshots (until you’re near the 10% threshold)
macOS is designed to manage these dynamically.
When Disk Pressure Actually Matters
Below ~10% free space, you may see:
“Out of Space” errors
Noticeably degraded performance during large writes
That’s when you target the real offenders:
Old iOS backups
GarageBand sound libraries
Xcode build data
Docker images
Video renders (Final Cut, etc.)
Downloads folder
Duplicate photo/music libraries
Notice the pattern: you created them.
The biggest disk consumers are almost always user-generated content, not
some mysterious macOS subsystem.
Common Myths
Cleaning caches makes your Mac faster
System Data is all bloat
You need a monthly maintenance routine
Third-party cleaners are mandatory
More free space automatically equals more speed
Speed comes from CPU, RAM, storage performance, and workload—not ritual
cleaning.
Bottom Line
Your best protection is understanding, not software.
The largest space hogs are almost always files you intentionally created
or forgot about. Use visualization tools when needed. Avoid magical
thinking. Don’t let marketing prey on fear.
Plan ahead, keep an eye on the big stuff, and there’s a good chance
you’ll replace your Mac with plenty of free space still sitting on the
drive.
I'm a big fan of BundleHunt,
the quarterly software sale website. Lingon Pro, app app I've covered
several times went on sale today for $4.00. It is also the last day to
get Fluent at the sale price of $4.99.
Fluent
Fluent
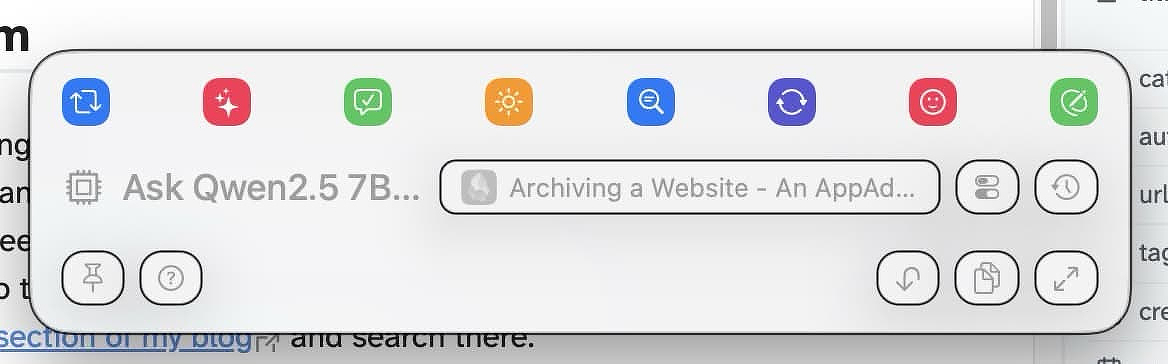
Fluent, by presents a smart panel you interact with
directly. That panel can stay persistent or disappear depending on your
preference. The experience feels less like firing off commands and more
like working alongside an assistant. Fluent is context-aware, supports
back-and-forth conversation, and allows chaining actions together into
something closer to a workflow than a single command.
Fluent also includes RAG (Retrieval-Augmented Generation). In
plain terms, that means the model doesn’t rely only on its training data
— it can reference files you provide to generate responses. You can
organize these files into areas like projects, emails, or a catch-all
bucket for your writing style. In practice, that means it can use past
examples as context rather than guessing blindly. If you’re writing a
billing summary, for example, it can reference previous invoices to
match tone and structure.
Everything you add to Fluent stays on your Mac. Nothing is stored
in the cloud. The output quality largely depends on the quality of the
material you feed it — garbage in, garbage out still applies.
It’s worth clarifying what Fluent is not. This isn’t a
local, continually learning replacement for ChatGPT. It isn’t training a
model on your data or improving itself over time. It simply retrieves
relevant information from your files and uses it as context for each
request.
There’s a broader pattern worth noticing here: AI writing tools
are starting to split into two camps. One camp gives you fast, one-shot
utilities that stay invisible until needed. The other tries to become a
persistent collaborator that remembers context and rides along with your
workflow. Which one fits depends less on features and more on how you
actually write — quick surgical edits versus ongoing conversation with
your tools.
Lingon Pro
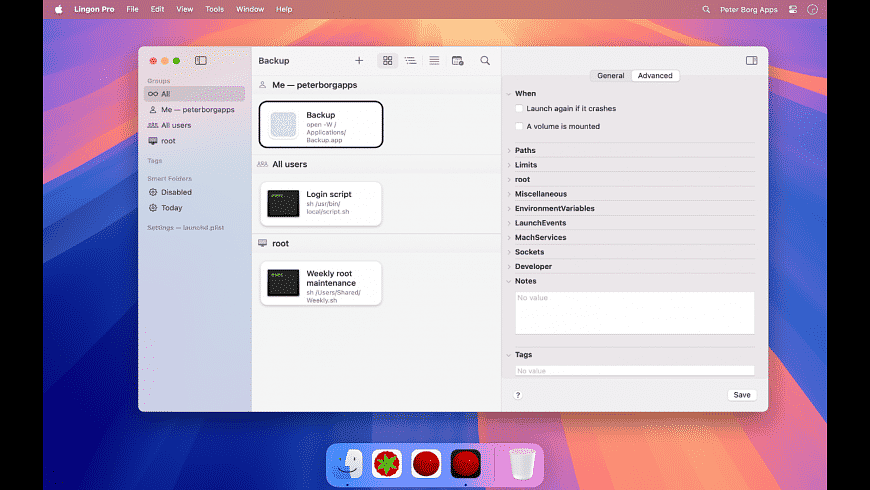
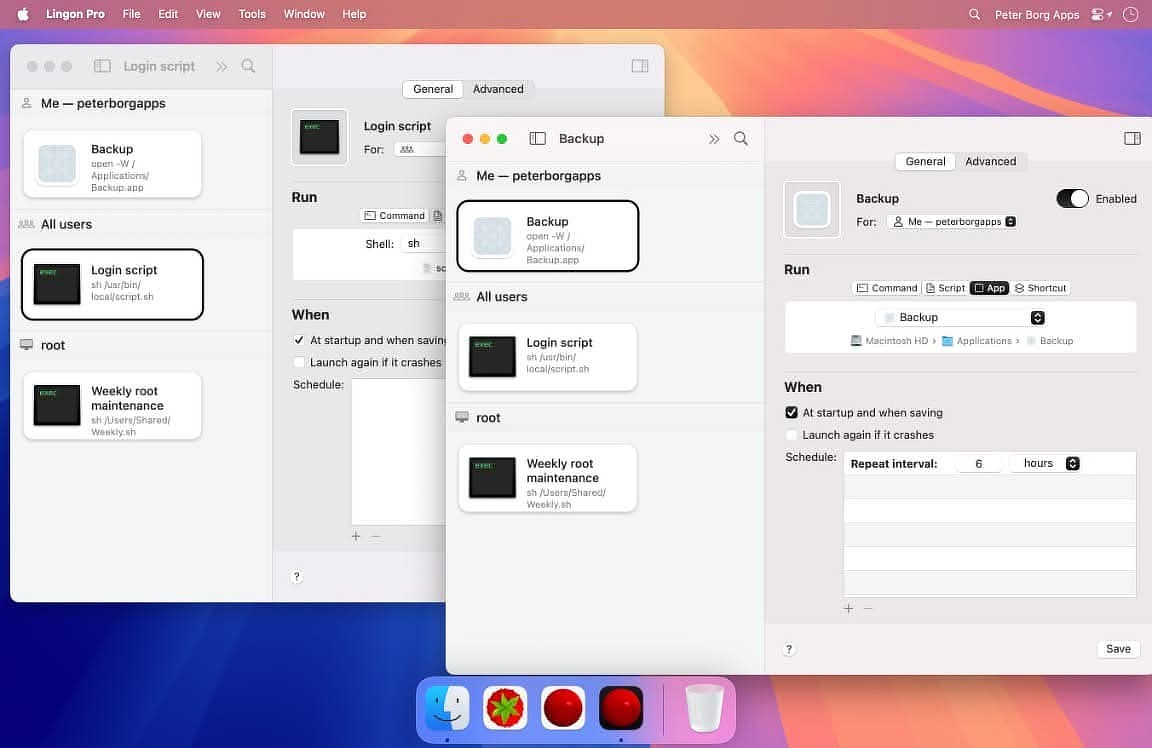
Lingon Pro
Lingon Pro has been around for more than two decades, which is
practically geological time in Mac utility years. It remains one of the
best GUI front-ends for launchd - the scheduling and background-task
system built into macOS.
You can create jobs that run:
whether your Mac is awake or asleep
whether you're logged in or not
with elevated privileges when needed
using keep-alive rules to restart failed tasks automatically
If you run scripts, backups, or maintenance tasks behind the
scenes and don't want to babysit cron files or plist syntax, this is one
of the cleanest ways to do it.
There are a number of apps that can help you incorporate your Desktop
into your workflow in useful ways. You can adapt your desktop to be an
information dashboard, a centralized launcher for applications,
shortcuts, folder access, and bookmarks, and a space for multiple
project-based setups with access to relevant folders, files, and
applications.
Here’s how it works.
Accessing the Desktop
Almost everything I do can be triggered with a hotkey. I use so many
hotkeys that I have trouble remembering them all, so I use ExtraBar
to keep a handy menu of them that I can access from anywhere if I can't
bring a particular combo to mind immediately.
Supercharge
is a multi-purpose tool from uber-developer, Sindre
Sorhus. It has dozens of tweaks, shortcuts, and utilities. One of
these hides all open applications, revealing your desktop. Another
toggles the visibility of your desktop widgets, allowing you to hide or
show them with a hotkey. (Also available on
SetApp)
I also have a Keyboard
Maestro macro that runs two AppleScripts: one shows (unhides) any
hidden applications, and the other shows (unminimizes) any minimized
windows. macOS treats these as two different states, so one command
won't cover both.
Information Dashboard
Using the right combination of widgets, you can quickly access
information about the current state of your workday without having to
toggle between applications. I use widgets for:
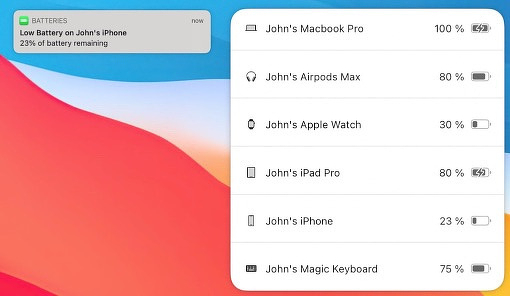
Batteries — to track my keyboard, mouse, watch, laptop, and AirPods (on sale at BundleHunt and on Setapp)
System info for RAM, CPU, disk space, and network throughput with Menu Bar Stats from the App Store
Multiple Desktops for Spaces Users
Image credit: Justin Pot
Infinidesk is an app that lets you
create multiple desktop layouts that you can switch between. When I use
my desktop as a workspace, I just toggle off the desktop widgets to give
myself a blank slate. Each desktop can have its own set of shortcuts,
files, and wallpaper. I use Spaces extensively with multiple displays.
Other elements of my workflow require the System Setting that assigns a
separate Space for each display. When combined with Infinidesk, this
limits the toggling of desktop layouts to a single space, which is
perfect for me. When I need to use a specific desktop layout, I just
switch to that space with a simple hotkey. (Usually $12.99. On sale at BundleHunt
for $3.00)
Building a Control Center
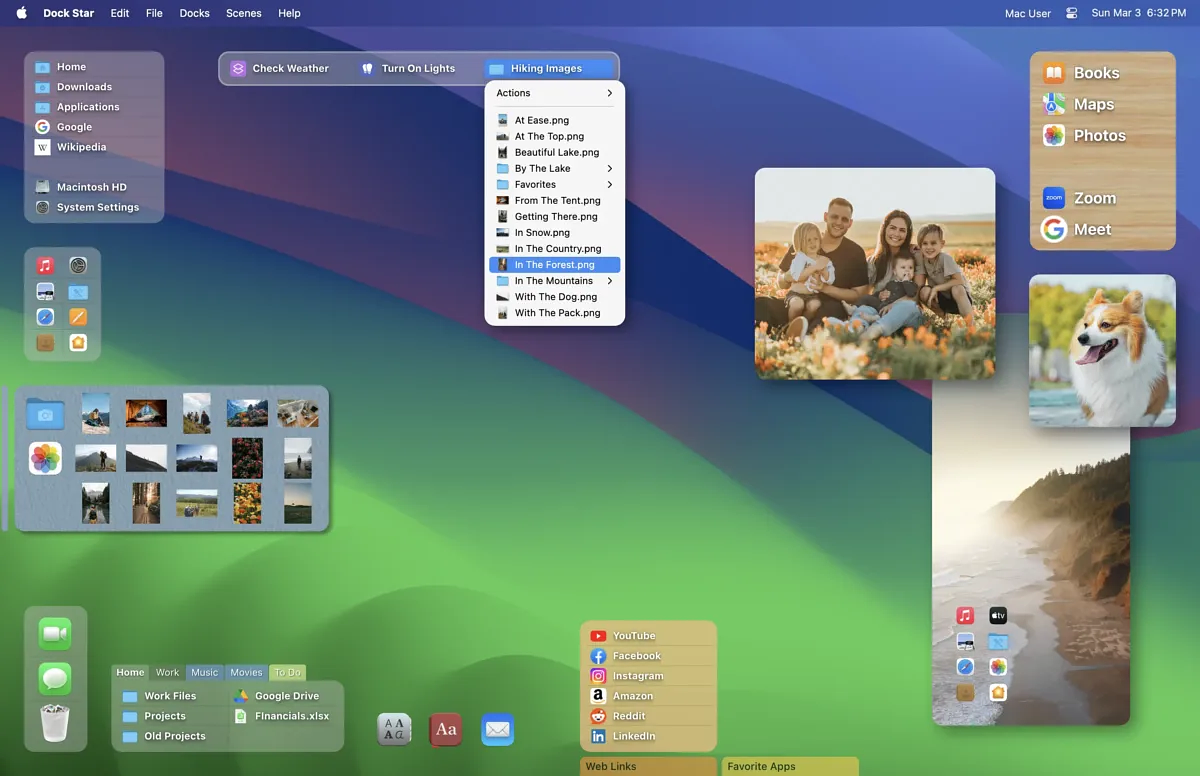
Infinidesk
Dock Star is an app that creates
desktop menus that function as independent docks. It's a visually
pleasing app with a variety of formatting options to make each dock
stand out. You can easily access your docks from the keyboard and move
between them without ever using the mouse. I created four docks with
distinct purposes, but you can combine different elements into the same
dock if you want:
Application launcher
Shortcut launcher
Folder access
Bookmarks
You can also make docks for specific projects or checklists. I have one
I use first thing in the morning to quickly access things I need to
check:
Dock Star docks appear on all the spaces on your primary display. I just
open and close it when needed. It's normally $20 but it's on sale now at BundleHunt
for $4.50.
I'm currently covering apps on sale at BundleHunt. A lot of
these are new to me, and the steep discounts make it a good time to fill
gaps in your Applications folder without paying full retail.
I've never understood why, given its resources, Apple still leaves
obvious friction points in macOS.
Take battery levels. Most of us are running Bluetooth
keyboards, mice, trackpads, and of course battery-powered laptops. Yet
macOS still makes you dig around System Settings to see what's about to
die. That feels like a solved problem.
Or window management in Mission Control. I use it
dozens of times a day to move windows between Spaces and displays. It's
powerful--but incomplete. There's no way to close a window directly from
that view. That omission is hard to justify when third-party developers
solved it years ago.
Then there's local music management. With subscription
fatigue and algorithmic sludge everywhere, more people are curating and
managing their own libraries again. Apple Music works fine for
streaming, but as an ID3 tag editor and metadata tool, it's clumsy at
best. Keeping album art and tags clean shouldn't feel like archaeology.
And finally, Font Book. It looks capable at first
glance. Spend five minutes using it seriously and you'll notice what's
missing: meaningful comparisons, smart organization, and
workflow-friendly tools.
The good news: each of these problems has a small, inexpensive fix
available right now on BundleHunt.
Batteries for Mac
Batteries for Mac
Batteries for Mac is $2
during the sale (normally $8.99). It shows battery levels for iPhones,
keyboards, mice (including third-party), MacBooks, and AirPods.
You can monitor everything from the menu bar or use its desktop widget
for a heads-up display. No digging through System Settings. If you've
ever had a keyboard die mid-sentence or a mouse quit during a screen
share, you know why this matters.
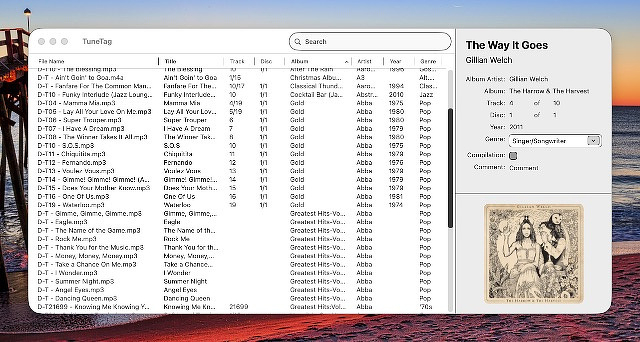
TuneTag
TuneTag
Stop fighting Apple Music for metadata control. For $0.50 (normally
$4.99), TuneTag
gives you a focused ID3 editor that does one job well.
It supports:
Direct metadata editing
Incrementing track numbers
File renaming based on custom patterns
Templates for consistent tagging
If you manage a local library--especially anything ripped, imported, or
sourced outside Apple's ecosystem--this saves time and frustration.
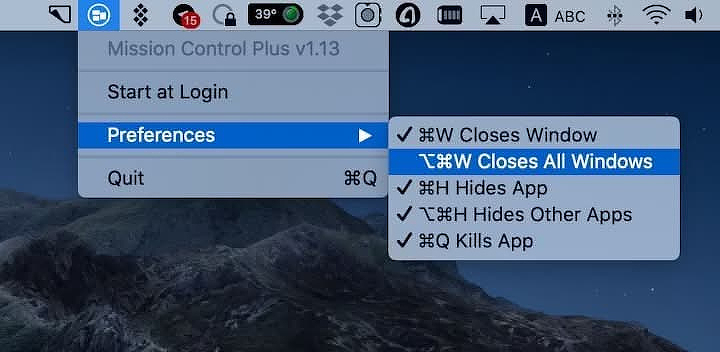
MIssion Control Plus
Mission Control Plus
Mission Control
Plus fills in the gaps Apple left. For $2.50 (normally $8.99), it
adds:
An X button to close windows directly inside Mission Control
Keyboard shortcuts for closing, minimizing, quitting, and more
If you live in Spaces, this turns Mission Control from a viewer into a
control surface. It's one of those small upgrades that compounds over
time.
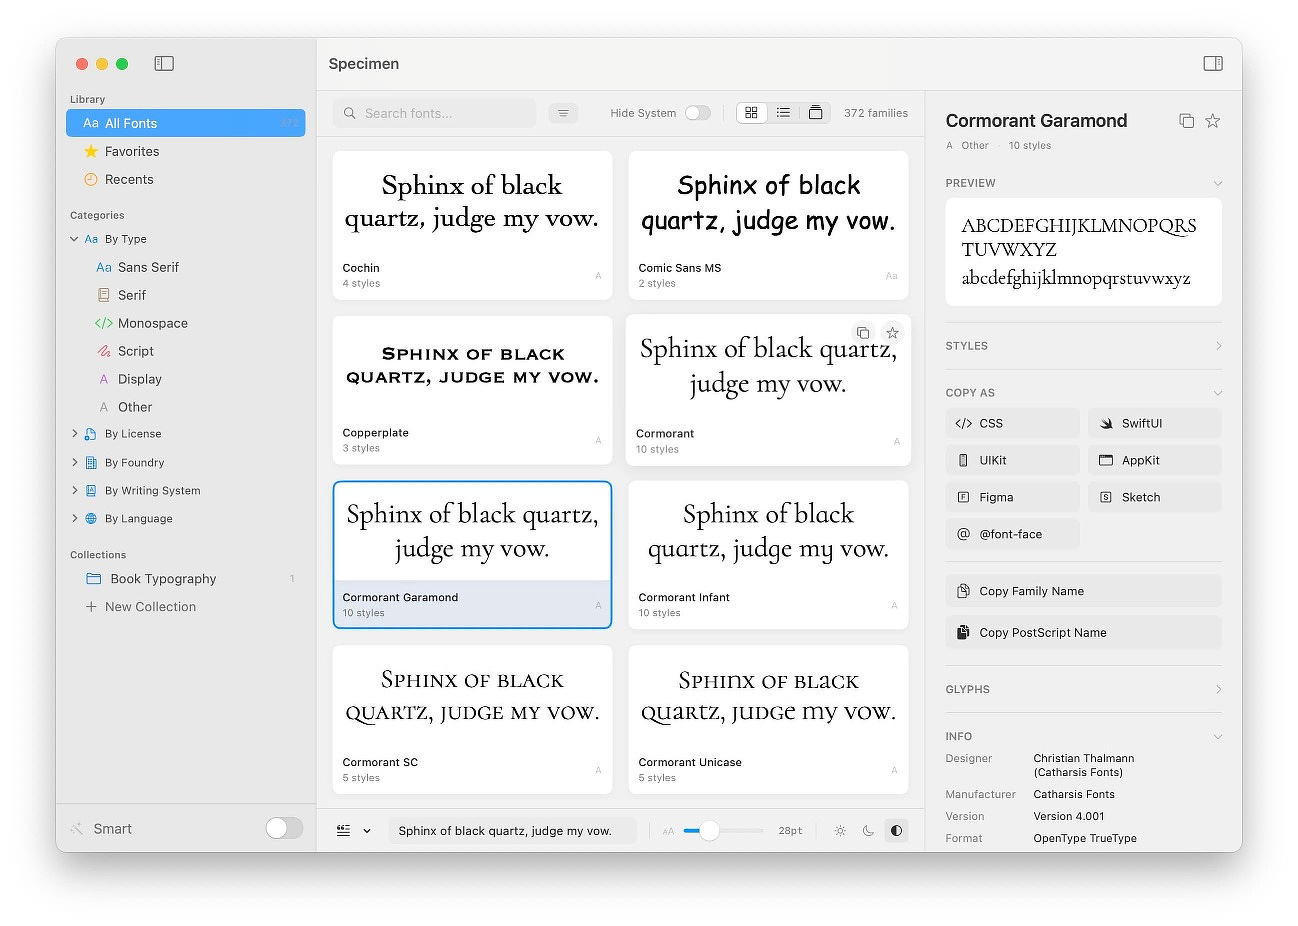
Specimen
Specimen
For $2.50 (normally $29), Specimen is a serious upgrade over
Font Book.
It lets you:
Browse and organize fonts intelligently
Compare fonts side-by-side
Run font health checks
Preview variable fonts
Export PDF specimens
Generate developer-friendly font declarations in multiple formats
If you care about typography--whether for writing, web work, or client
projects--this feels like a professional tool rather than a system
afterthought.
None of these apps are flashy. They fix specific, practical annoyances.
That's exactly the kind of software I like to support--tools that
respect your time and improve real workflows instead of selling you
abstractions.
If you've been meaning to tighten up any of these areas in macOS, this
is a cheap way to do it.
Most Mac power users recognize Ryan Hanson's apps, even if they don't
know his name. Hanson's portfolio of Mac interface enhancements has
earned him a reputation as the editor in chief of the UI improvement
cohort. His apps are a staple of how I use my Mac. His most recognizable
work is Rectangle/Rectangle Pro, regarded by many as the pinnacle in Mac
window management.
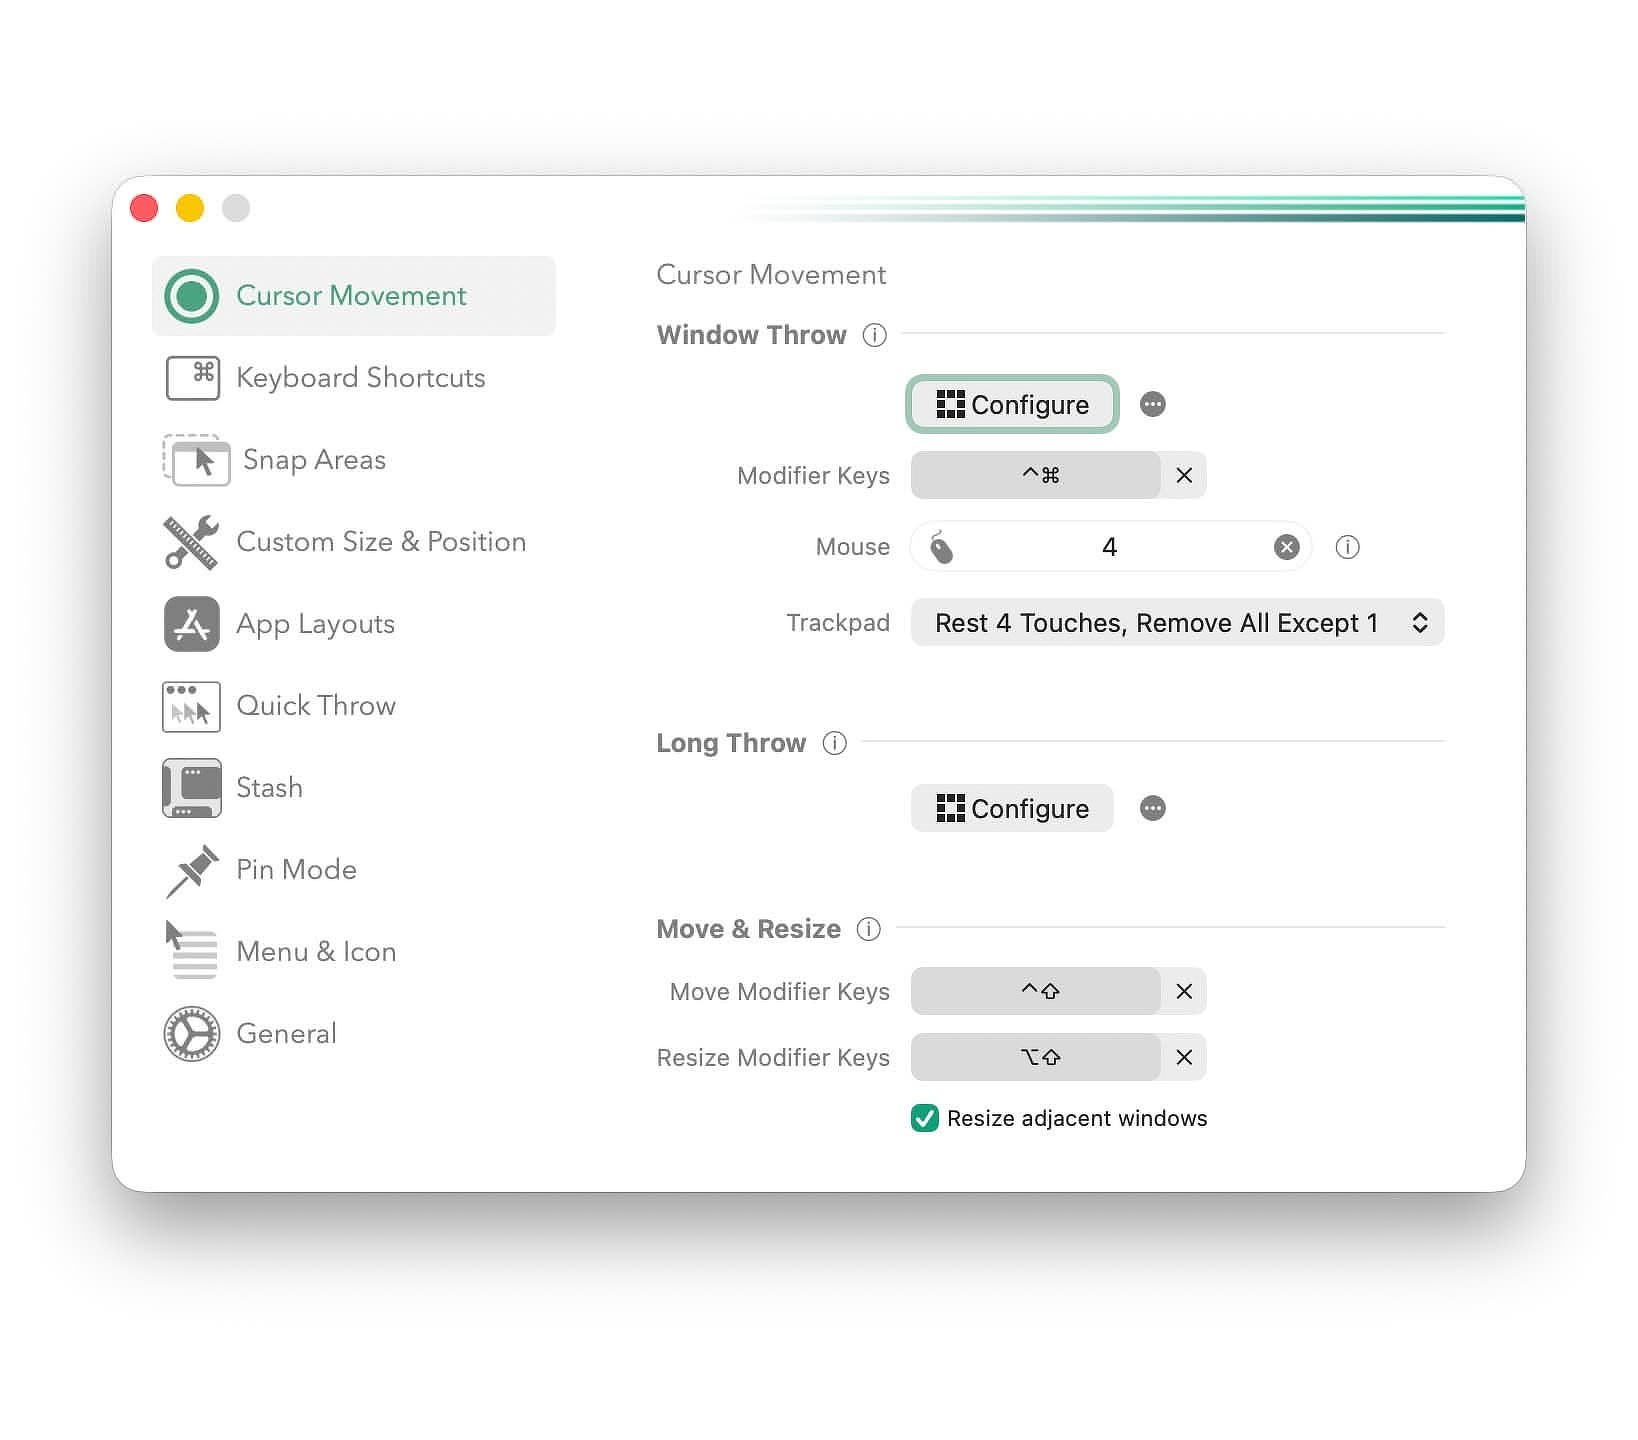
Rectangle Pro Pro
Rectangle Pro / Rectangle
Rectangle Pro is the full-featured window manager
powerhouse, and Rectangle is the free open-source
version that many Mac users still recommend as a must-install tool for
arranging windows quickly.
Basic overview: free/OSS window snapping & keyboard control
for macOS. Pro adds workspace saving, multi-window
actions, custom shortcuts, and cursor-movement positioning.
What I like:
Powerful keyboard shortcuts for tiling and resizing windows -- faster than Mission Control.
Pro adds workspace macros and custom behaviors many pro users love.
A reliable, native-feeling alternative to paid tiling managers.
Charmstone is a spatial app switcher that lets you
launch and switch apps by pressing a modifier and moving your cursor in
a direction -- a fast alternative to Cmd+Tab or the dock.
What I Like:
Intuitive spatial app access once learned
Keeps your hands on keyboard+trackpad, reducing friction switching.
Superkey blends keyboard navigation with screen text
search: type what you see and click it -- all without the mouse. It also
includes built-in Hyperkey functionality
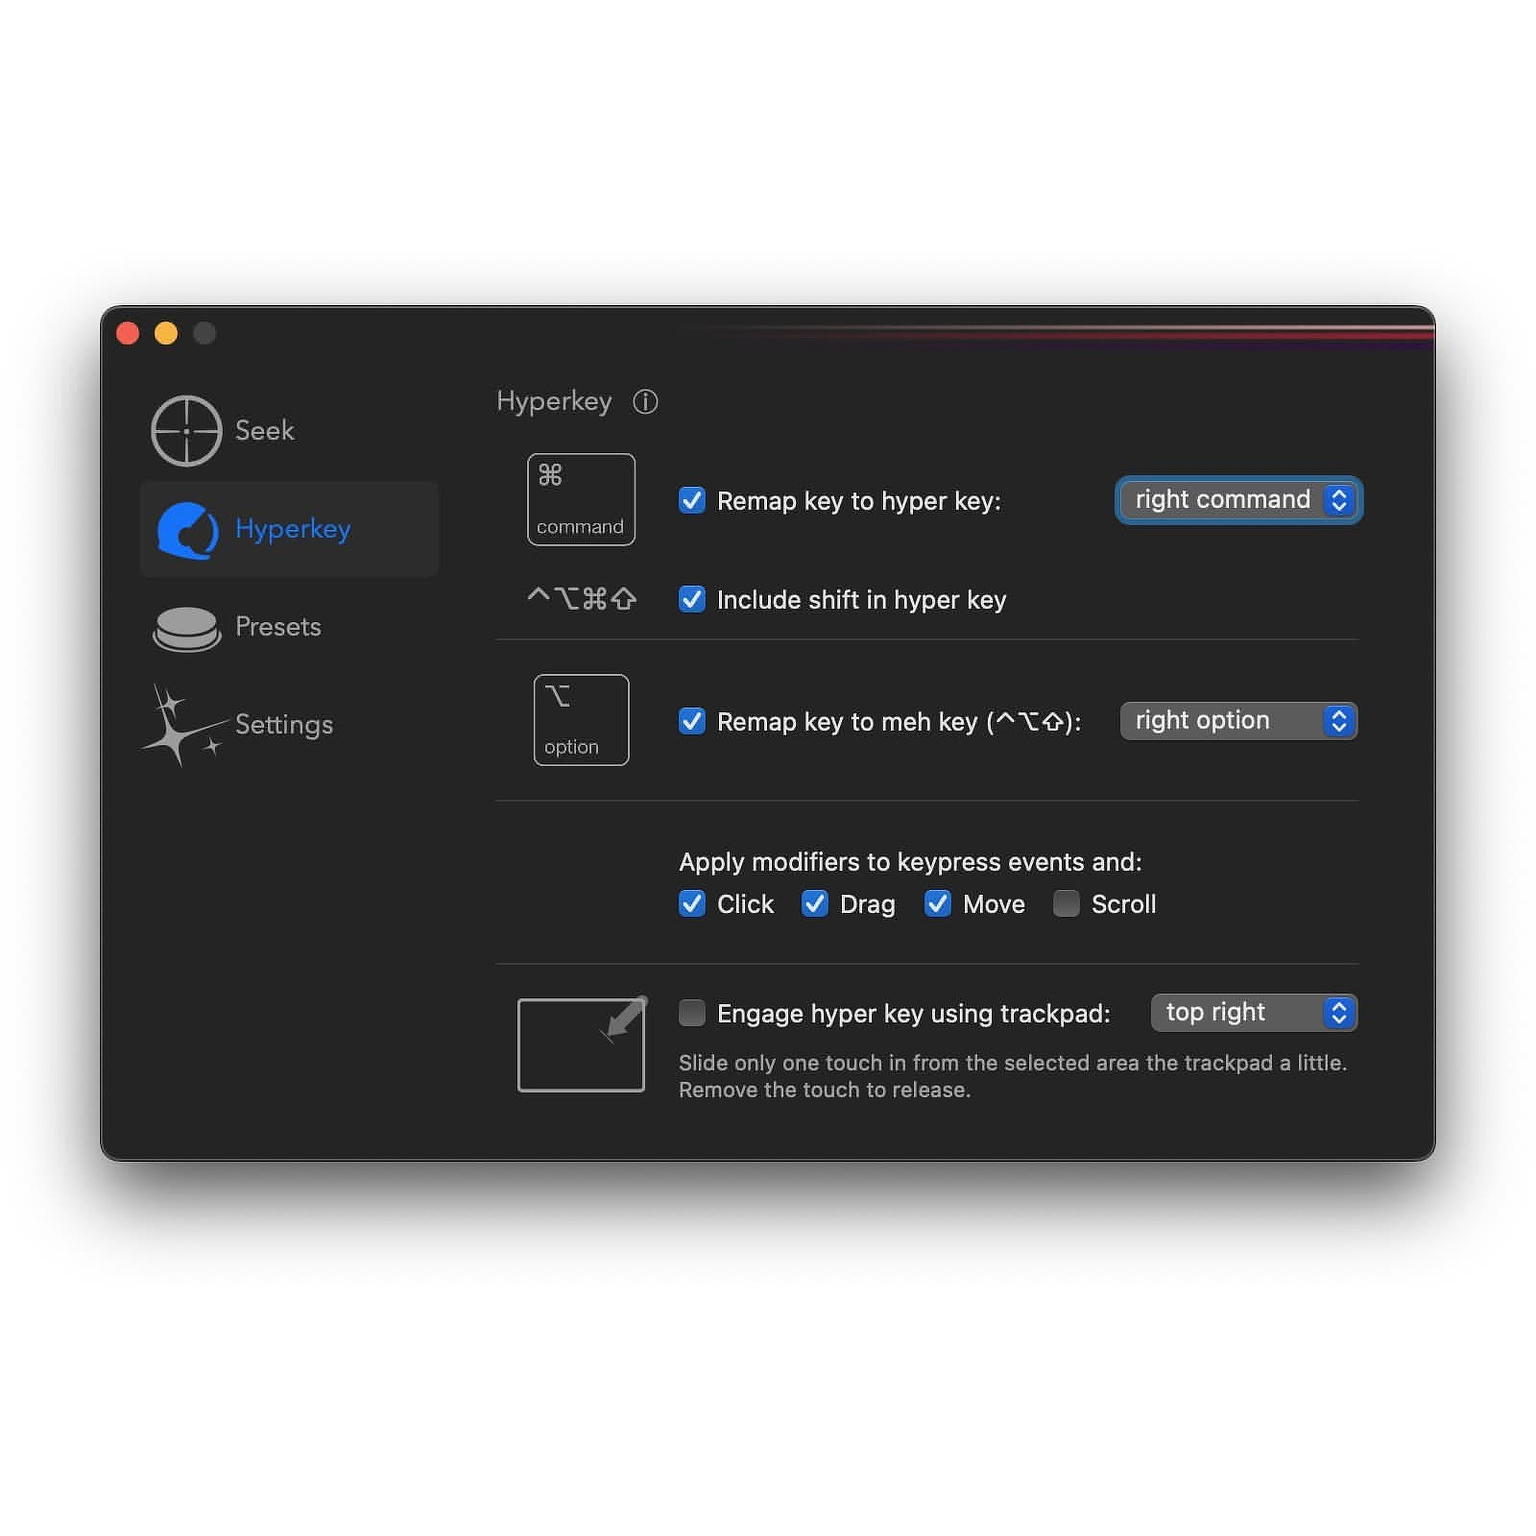
Hyperkey - A small, free tool that turns an unused key (often Caps Lock) into a combined modifier -- Control+Option+Command+Shift -- unlocking tons of shortcut potential. Free
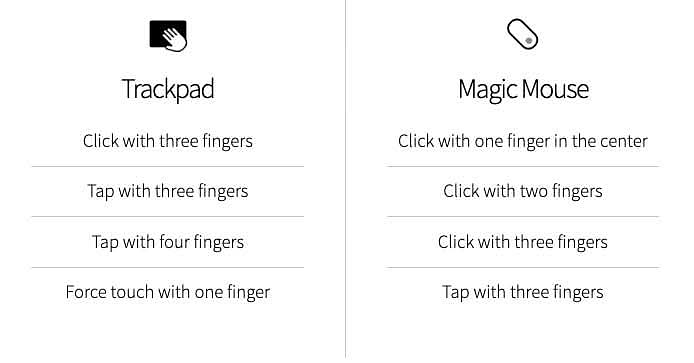
Scroll - A simple scrolling utility that lets you scroll with one finger on Apple trackpads or tame overly sensitive Magic Mouse horizontal scroll. - $9.99
KeyLimePie - A keystroke visualizer that shows your shortcut presses -- handy for screencasts or demos. - $4.99
Space Capsule - A spatial organizer that puts macOS Spaces into a grid layout for faster navigation. - $9.99
Filebar - A fast file-path management bar -- ideal for editing/working with file paths without opening Finder. - $4.99
HighTop - A lightweight macOS file browser with tight integration -- great for quick access to local and cloud files. - Free
Hanson’s apps aren’t flashy. They don’t try to reinvent macOS. They
focus on one thing: removing friction from everyday interactions. What I
appreciate most is that these tools don't try to be ecosystems. They're
focused utilities. Lightweight. Native-feeling. Built around speed and
control. In a Mac ecosystem that increasingly pushes services and
subscriptions, it's refreshing to see software that just makes your
machine more responsive to your desires.
I'm currently covering apps currently on sale at BundleHunt . Many of
these are new to me and taking advantage of steep discounts provides
anyone interested a chance to add missing tools to their Applications.
The Mac ecosystem is currently awash in vibe-coded throwaway apps,
especially in categories like window managers, clipboard managers, and
dictation tools. The problem isn't just volume — it's durability. Many
of these apps come from inexperienced "developers" who can't
realistically maintain or evolve the software long-term. The result is
often a quick version 1.0 followed by silence.
That said, I'm not going to stop looking. Every now and then, a real gem
shows up — something built by people who clearly intend to keep
improving it. VibeSonic
is one of those apps that, despite its unfortunate name, deserves a
serious look.
I'm not a developer, and I'm definitely not a vibe coder. Sorting
through endless new releases can be exhausting. But VibeSonic stood out
because it tries to solve real workflow problems for technical users
rather than just wrapping AI in a shiny UI.
The app normally sells for $29.95 for a two-seat license with a year of
updates, but it is included in the current BundleHunt Sale
for just $3.
Why I Gave It a Shot
Since AI-assisted dictation became practical, I've experimented with
several tools — both free and paid. After spending time with the
excellent Mac Whisper, I eventually moved to Spokenly's free plan. More
recently, I've been testing VibeSonic to see whether its deeper
integrations and workflow features justify switching again.
Like most dictation apps, it's triggered with a hotkey and displays a
HUD while recording. One useful touch: you can insert custom AI
instructions at the start of dictation, which lets the model edit your
transcription according to predefined rules without extra cleanup later.
Features That Actually Matter
Privacy-first transcription
VibeSonic runs powerful models like Whisper and Parakeet locally, so you
don't need a subscription just to get high-quality transcription. More
importantly, your dictation stays on your Mac. For anyone who regularly
dictates sensitive notes or drafts, this alone is a strong argument in
its favor.
Works Anywhere You Can type
If an app supports a cursor, VibeSonic works there. It also supports
voice-activated snippets, which means you can trigger text expansions
while dictating — a small detail that turns out to be a major
productivity win if you already rely on snippets in your workflow.
Notes And Reusable prompts
You can insert predefined notes or prompts into your transcription. This
is handy for recurring writing contexts: canned responses, project
notes, recurring disclaimers, or setup blocks you normally paste
manually.
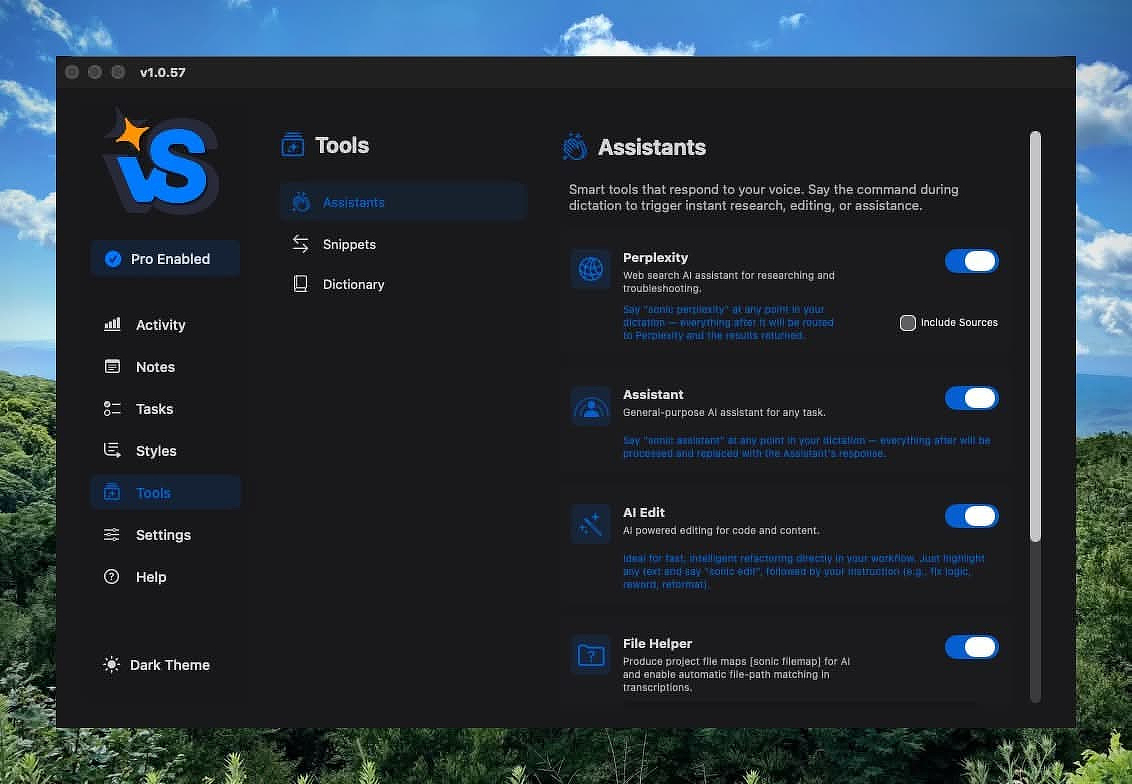
AI-assisted Research (with limits)
Research features rely on the Perplexity model. If you choose to enable
it, you can perform lightweight web research directly during dictation —
useful for quick bug explanations or technical references without
breaking your flow. There's an optional "Include Sources" setting if you
want citations included in the output.
Agentic Assistance mid-workflow
You can invoke a voice-activated assistant while dictating to ask
questions or request explanations without stopping to switch apps. Used
sparingly, this feels less like a gimmick and more like having a
technical coworker quietly standing nearby.
Built For Technical users
This is where VibeSonic differentiates itself. It supports native file
path detection and project mapping designed for code-centric workflows.
You can dictate paths naturally and ask the assistant for coding
examples, debugging help, or explanations directly inside your
transcription.
Multi-language support
It supports dozens of languages for transcription and translation, which
broadens its usefulness beyond English-only workflows.
The Real Advantage: Context and Style Control
One of VibeSonic's more interesting ideas is persistent notes that the
AI uses as background context while editing your text. You can define
instructions like:
avoid SEO-style writing
skip clickbait phrasing
target experienced technical users
prioritize tools you already use in your workflow
That last one is quietly powerful. Instead of explaining your ecosystem
every time, you can teach the app once and let it adapt.
Most of us write in multiple modes throughout the day — business email,
personal messages, blog posts, Reddit replies, quick notes. VibeSonic
lets you define writing styles for each context so the output adapts
automatically. Done well, this reduces the friction between dictating
quickly and sounding like yourself afterward.
Where It Fits (and Where It Doesn't)
VibeSonic isn't magic. If you just want simple transcription, lighter
tools may be enough. But if your work involves technical writing,
coding, or switching contexts frequently, the app starts to make sense
because it combines dictation, editing rules, and contextual AI
assistance in one place.
The biggest compliment I can give it: it feels built around real
workflows rather than marketing copy.
I’m currently covering apps on sale at BundleHunt. Many of
these are new to me, and steep discounts are a good excuse to try tools
you might otherwise ignore — or to fill gaps in a workflow you didn’t
realize had gaps.
First up is Fluent, an
AI-powered writing assistant that handles translation, grammar,
spelling, and style suggestions. The app I’ve been using for the past
year for similar tasks is Rewrite
Bar. They aren’t clones, but they definitely live in the same
neighborhood.
Features in Common With Rewrite Bar
Both apps are aimed at people who don’t want to keep copy-pasting text
into a ChatGPT window every five minutes.
Works in any app — email, browser fields, notes, and pretty much anywhere you can type
Hotkey-driven — minimal UI interruption
BYOK — bring your own API key if you want control over costs and models
Local model support — privacy-friendly options
Custom actions and prompts — designed with power users in mind
Rewrite Bar feels exactly like what it is: a tool. You
invoke it, issue a command, review the result, and move on. The workflow
is linear and quickly becomes muscle memory. It stays out of your way.
It supports session history, versioning, and some iterative editing in
its review window. If you don’t want to manage API keys or models,
Rewrite Bar also offers a subscription that includes model access.
A lifetime license is $29 if
you bring your own model, and it includes 35K AI credits to get
started.
Fluid Palette
Translate, Magic Refine, Fix Grammar, Make Concise Summarize,
Paraphrase Text, Explain Like I'm 5, Continue Writing
Fluent, by contrast, presents a smart panel you
interact with directly. That panel can stay persistent or disappear
depending on your preference. The experience feels less like firing off
commands and more like working alongside an assistant. Fluent is
context-aware, supports back-and-forth conversation, and allows chaining
actions together into something closer to a workflow than a single
command.
Fluent also includes RAG (Retrieval-Augmented Generation). In plain
terms, that means the model doesn’t rely only on its training data — it
can reference files you provide to generate responses. You can organize
these files into areas like projects, emails, or a catch-all bucket for
your writing style. In practice, that means it can use past examples as
context rather than guessing blindly. If you’re writing a billing
summary, for example, it can reference previous invoices to match tone
and structure.
Everything you add to Fluent stays on your Mac. Nothing is stored in the
cloud. The output quality largely depends on the quality of the material
you feed it — garbage in, garbage out still applies.
It’s worth clarifying what Fluent is not. This isn’t a local,
continually learning replacement for ChatGPT. It isn’t training a model
on your data or improving itself over time. It simply retrieves relevant
information from your files and uses it as context for each request.
There’s a broader pattern worth noticing here: AI writing tools are
starting to split into two camps. One camp gives you fast, one-shot
utilities that stay invisible until needed. The other tries to become a
persistent collaborator that remembers context and rides along with your
workflow. Which one fits depends less on features and more on how you
actually write — quick surgical edits versus ongoing conversation with
your tools.
The first BundleHunt
sale of 2026 kicked off today. This round is focused entirely on
lifetime licenses - no one-year subscriptions or short-term trials
disguised as deals. Update eligibility for major or minor releases still
varies by app, so always check the fine print before buying.⌘
In tech, big names rise fast and disappear just as quickly. When a
company sticks around for well over a decade, there's usually a reason.
BundleHunt has been doing its thing since 2010, offering a different
twist on software bundles: you build your own. That means you're not
forced into buying 30 apps just to get the three you actually want.⌘
Over the years, they've built a decent reputation for fixing problems
when a purchase doesn't work out, and I've picked up a few solid tools
there myself - including Keyboard Maestro, Mountain Duck, and Downie.
The catalog always includes lesser-known apps too, which is both fun and
dangerous. Affordable software has a way of convincing you that you
suddenly need something you'll never open again. Discipline
required.
Apps I Can Personally Vouch For
These aren't just random listings - they're legitimate contenders in
their categories.
TextSniper is one of
those deceptively simple utilities that ends up becoming part of your
daily workflow. It's an OCR tool that lets you grab text from almost
anywhere: videos, PDFs, presentations, screenshots, online courses -
basically anything visible on your screen.⌘
Draw a box around the text and it captures it. Rotation, odd angles, and
shadows usually aren't a problem. There's a handy option to remove line
breaks automatically, and an additive clipboard mode that makes
multi-step capture painless.
Real-world use case: grabbing command output from a video tutorial or
copying text from an app that inexplicably doesn't allow selection.
MacPilot is a system-tweaking utility with an almost absurd number of
options - over 1,100 tweaks at last count. Think of it as a centralized
control panel for settings Apple hides or spreads across plist files and
command-line flags.
A few examples of what it can do:
Calendar: change default event duration
Dock: enable single-app mode or window previews
Finder: enable "Quit Finder"
Launchpad: reset layout and control rows/columns
Music: enable half-star ratings
QuickTime: remember open movies on quit
Safari: restore backspace navigation
Screen Capture: change default file type
Spotlight: rebuild index
Terminal: focus follows mouse
Time Machine: disable automatic backup prompts
Power users will appreciate having everything in one place instead of
hunting down obscure terminal commands.
Lingon Pro has been around for more than two decades, which is
practically geological time in Mac utility years. It remains one of the
best GUI front-ends for launchd - the scheduling and background-task
system built into macOS.
You can create jobs that run:
whether your Mac is awake or asleep
whether you're logged in or not
with elevated privileges when needed
using keep-alive rules to restart failed tasks automatically
If you run scripts, backups, or maintenance tasks behind the scenes and
don't want to babysit cron files or plist syntax, this is one of the
cleanest ways to do it.
Infinidesk tries to solve desktop clutter by letting you create multiple
desktop environments, each with its own files, folders, and wallpaper.
Two modes stand out:
Classic Mode - one project-focused desktop across all Spaces
Follow Spaces Mode - desktop contents change automatically as you switch Spaces in Mission Control
If your Mac desktop becomes a dumping ground by noon every day, this
could be a surprisingly practical way to enforce structure without
changing your habits.
Rocket Typist has developed a loyal following fast. It's a text
expansion and snippet manager that regularly comes up in discussions
alongside TextExpander and Typinator - usually because it adds a few
modern touches those veterans don't emphasize.
Highlights include:
folders for organizing snippets
support for plain text, rich text, code, images, and AI-generated snippets
strong search and filtering for large libraries
If you live in repetitive text - support emails, documentation, or code
templates - tools like this pay for themselves quickly.
Bundle sales live in that weird intersection between smart bargain
hunting and impulsive software hoarding. The build-your-own model helps
keep things sane, but the temptation to pick up "just one more app" is
very real. Some might say it's an addiction.⌘
The practical approach: start with a specific workflow problem you're
trying to solve. If an app clearly fits that need - great. If not, leave
it in the cart and walk away. Your future self will thank you.⌘And if you're the kind of Mac user who enjoys experimenting without
committing to subscriptions, this is one of the cleaner opportunities to
stock up without the recurring-cost hangover.
The Result
As an App Addict, I enjoy testing new tools and watching indie developers invent clever ways to get things done. But collecting apps isn't the goal. The real satisfaction comes when those tools solve an actual problem.
Here’s a recent workflow I built using apps I’ve reviewed on this blog.
The Problem
I spend a fair amount of time in r/MacApps, on Mastodon, and in email threads talking software with other nerds. I’ve reviewed hundreds of apps, and I’m often asked for links to older posts.
Offline, I can search the Markdown files locally. But those files don’t include the public URLs. If someone asks for a link, I still have to go hunting.
On top of that, my blog tags are too broad to be genuinely helpful when I’m trying to surface something specific.
The friction wasn’t huge – but it was constant.
The Goal
I wanted two things:
A fully searchable offline index of all 469 reviews -- including their public URLs
An online, full-text--searchable index of the entire site without manually building one
No CMS rebuild. No new publishing platform. Just better infrastructure using tools I already trust.
The Tools
Integrity -- A free crawler that can extract every URL on a domain when configured correctly
A CSV editor like Delimited, Easy CSV, or (if you must) Excel or Google Sheets
The script converts the CSV into a Safari-compatible bookmarks file. Simple transformation, clean output.
4. Import into Raindrop.io
In Raindrop, I chose Import Bookmarks – not “Import File.”
That distinction matters. The bookmarks import preserves structure correctly.
Raindrop then pulled in every post.
5. Import into EagleFiler
In EagleFiler, I selected:
File → Import Bookmarks
EagleFiler fetched each URL and created a local web archive for every post.
No manual downloading. No copy/paste gymnastics.
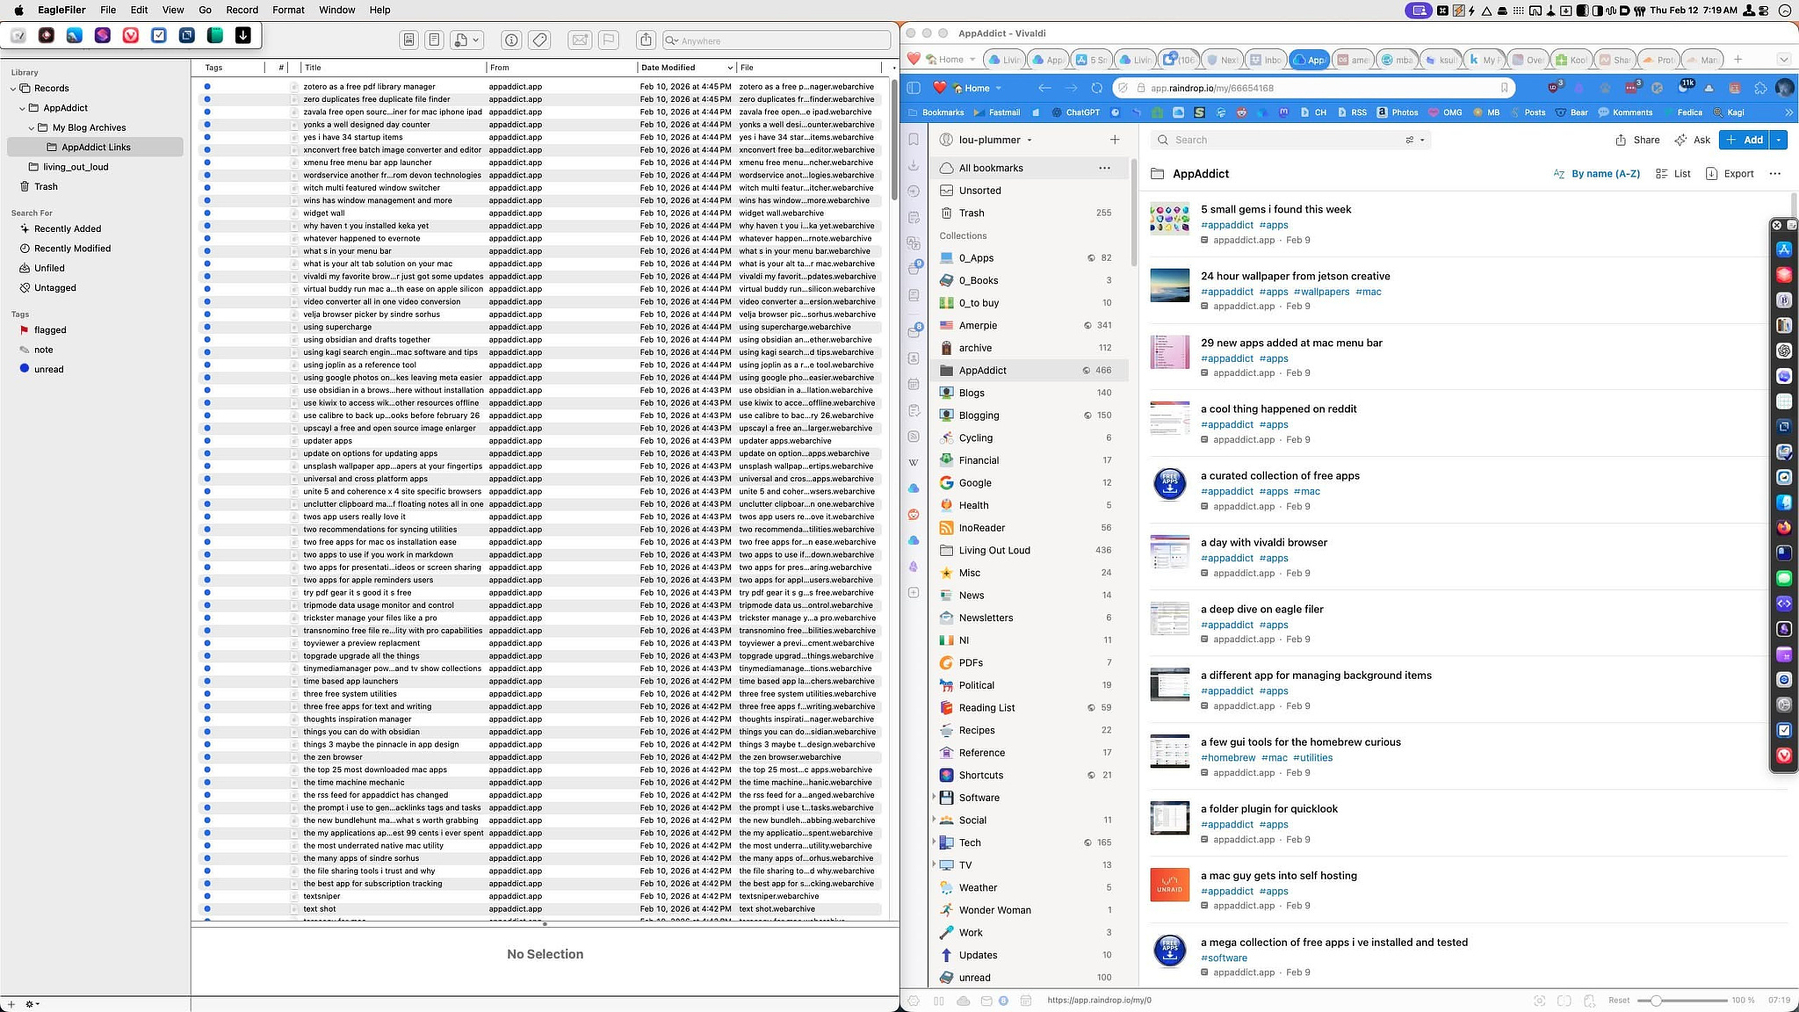
The Result
Raindrop.io
Raindrop created a collection containing every post on my site.
Because it performs full-text indexing, searches aren’t limited to titles. I can search for an obscure phrase buried deep in an article and still surface the right post.
It also stores a permanent copy of each page. If my hosting provider disappears tomorrow, I still have an offsite archive.
EagleFiler
EagleFiler downloaded and archived every URL as a standalone web archive file.
A web archive is a single file containing the full page – text, images, links, styling. It’s searchable, portable, and completely offline.
Now I have:
Full-text search online (Raindrop)
Full-text search offline (EagleFiler)
Public URLs attached to every entry
Redundant archival copies
No rebuild. No database export. No new platform.
Just composable tools behaving like infrastructure.
Why Not Just…
…Use My CMS Search?
CMS search works until it doesn’t.
It requires being online, depends on whatever indexing logic your platform uses, and doesn’t give you a portable dataset you control.
I wanted something I could manipulate, migrate, or repurpose independently of my hosting stack.
…Search the Markdown Files Directly?
I can – and I do.
But Markdown files don’t include the canonical public URL. When someone asks for a link, I need that immediately.
This workflow preserves the published URLs alongside searchable content.
…Export the Database?
That’s fine if you’re running WordPress.
I’m not. And even if I were, a database dump is not a clean, portable, human-friendly index. It’s raw tables.
I wanted something that integrates with tools I already use daily.
…Use a Browser Bookmark Export?
That only captures what I’ve manually bookmarked.
I wanted a complete, authoritative list of everything published – no gaps and no reliance on memory.
Integrity gives me the ground truth.
…Install a Static Site Search Tool?
Client-side search libraries are great for readers.
This wasn’t about improving the reader experience. It was about fixing my own workflow across online search, offline access, and long-term archiving.
No new stack. No fragile automation. Just small tools composed intentionally.
The broader lesson here is simple: sometimes the right move isn’t adopting something bigger. It’s wiring together boring, reliable utilities until they quietly become infrastructure.
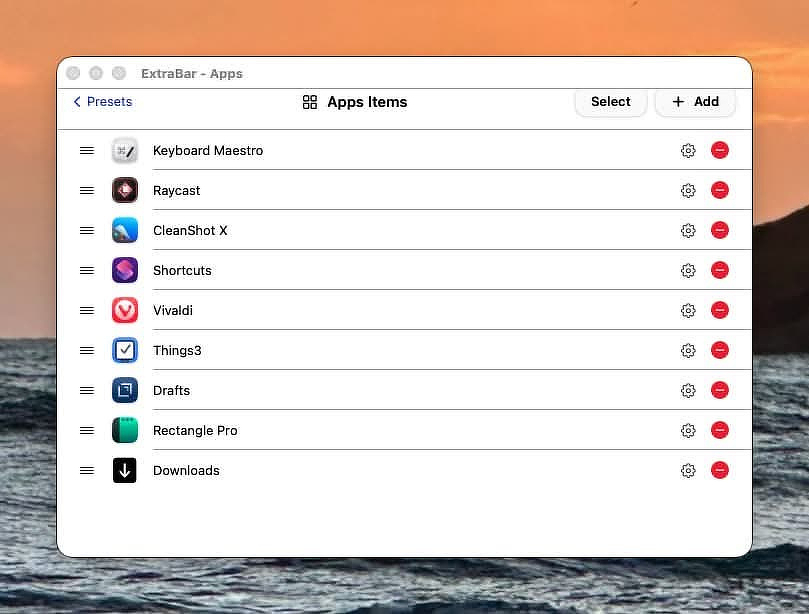
One of My Extra Bar Layouts
Since I installed Extra Bar on New Year's Eve, I have been systematically going through my automation apps, like RaycastKeyboard Maestro, Better Touch Tool, Hazel, and Apple Shortcuts to organize and consolidate the different ways I use them, since there is now a well thought out menu bar access application that can harness the power of all of them in an effective way. The developers of ExtraBar have been very responsive to feature requests from its user base, and a few recently added features are real game changers, particularly one that came out yesterday which allows you to create a menu item for anything on your computer that uses a global keyboard shortcut. You no longer have to find the deep link for the action you want to summon from extra bar.
If you have ever used an Elgato Stream Deck, the Extra Bar developers have basically created an application that mimics that, running in a space on your Mac where you can always access it.
Here’s a list of some of the things I currently can do from Extra Bar:
Batch launch all my applications in groups depending on the task at hand: writing, backup, software testing etc.
Open a new Finder window anywhere at any time by clicking a single function key.
Close all notifications in the Notification Center at one time.
Mark all unread mail in my Mail app as read
Mount network drives from my self-hosted server and unmount them.
Quit all open applications.
Run a Keyboard Maestro macro that allows me to pick from a list of any running application, including background applications, and restart it.
Restart the Finder with a hotkey
Toggle my desktop widgets hidden/shown
Search for Keyboard Maestro macros by name.
Activate the CleanShot X options for capturing a window, an area, running OCR on a screenshot, showing the history of my last ten screenshots, or using the all-in-one tool.
I'm currently running a system with three displays and twelve virtual desktops, and I have a folder in ExtraBar with a shortcut to each one.
Upload the image on my clipboard to OpenAI and have it return an alt text description I can use when posting to social media.
Automatically add today's weather and today's calendar events to my daily note in Obsidian.
Launch Activity Monitor.
Open Control Center.
Empty the trash.
Restart the keyboard maestro engine.
Restart my Menu Bar Manager.
Systematically close all applications, eject all network mounts and attached disks, and log out.
Restart my computer.
Access the bookmarks, history, open tabs, and settings for my browser.
Quickly add a task or project to my task manager and access the views I most commonly look at.
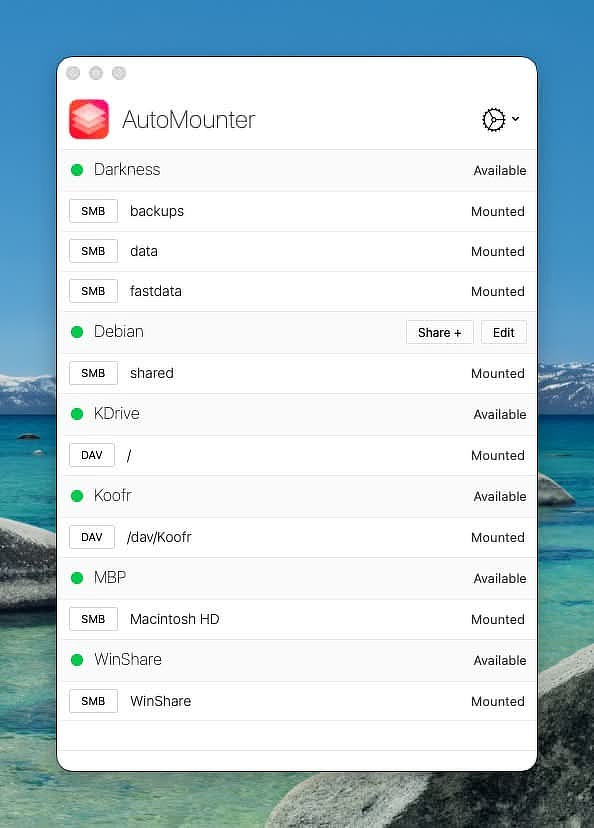
Automounter
I recently discovered an interesting utility called Automounter over at the always-useful Mac Menu Bar website. As the name suggests, Automounter connects you to network volumes automatically. That's handy for home-lab tinkerers and absolutely essential in many enterprise setups.
Automounter supports five protocols:
SMB
WebDAV
AFP
FTP (read-only)
NFS
In my testing, I mounted shares from just about everything I had lying around: a Debian 11 server, a Windows 11 workstation, an Unraid server, another Mac, and two WebDAV cloud services–Koofr and Kdrive. It handled all of them without complaint.
Automounter has a set of features that make it far more useful than a simple shell script or manually connecting through Finder:
Multiple Servers -- There's no limit on the number of shares or servers you can connect to. You can even create multiple connection profiles for the same server if you need different shares mounted under different conditions.
Mount Rules -- This is the killer feature. You can create rules that determine when a share should mount based on conditions such as Wi-Fi network name, running applications, VPN status, time of day, the presence of other volumes, and more.
Wake on LAN -- Exactly what it sounds like: Automounter can wake a sleeping server and then mount its shares automatically.
Mount Options -- Connect as a guest or authenticated user, and optionally hide mounted volumes from Finder. That last option is especially useful in education or managed enterprise environments.
Server Discovery -- Setup is refreshingly painless. You manually mount the shares you want Automounter to manage, and the app detects them automatically. It imports all the necessary connection details into profiles, which you can then edit--renaming shares to something that actually makes sense to you.
Rule Status -- If a share isn't mounted, Automounter will tell you exactly which condition isn't being met. No more guessing why a drive didn't connect.
Files, Apps, and Scripts -- Automation fans will love this. Automounter can launch apps, open files, or run scripts when a share mounts. You can trigger backups, fire off Hazel rules, or pass runtime variables (like the current share path) directly into script arguments.
Configuration Profiles -- For enterprise and education users, Automounter supports managed profiles that can be deployed to multiple machines and locked down to prevent user changes.
Years ago, I traveled between 20-plus sites, each with one or more Mac servers and multiple network shares. Keeping track of IP addresses, credentials, and share names was a constant headache. Automounter would have saved me an absurd amount of time and frustration.
In my current home-lab setup, it solves a different but equally real problem. Automounter reconnects my shares automatically when I switch Wi-Fi networks or reboot a server. Backup jobs that rely on network storage are suddenly effortless instead of fragile. It quietly removes a whole category of annoyances.
You can find more details on the developer’s website, where you can purchase the app and an optional helper utility required for some advanced features. It’s also available in the Mac App Store. The base app is $9.99, and the pro features (mainly the rules engine) are a $3.99 in-app purchase.
For anyone who deals with network shares on a regular basis–at home or at work–Automounter is one of those small utilities that will soon be indispensable.
Early in my career, I used to get annoyed when the old hands would wave away every automation problem with, “Just make a cron job.”
Cron dates back to the earliest days of Unix. It’s simple, dumb, and dependable: once a minute it checks a text file, and if a line in that file matches the current time, it runs the associated command. Like most Unix tools, it works great–once you learn the arcane scheduling syntax.
For example:
0 3 * * * /Users/amerpie/scripts/backup.sh
To cron, that means: run this script every day at 3:00 AM.**
Cron was designed for machines that live in server rooms–powered on 24/7, connected to stable networks, and rarely put to sleep.
macOS laptops are… not that.
The core problem is that cron has zero situational awareness. It doesn’t know or care whether:
you're logged in
the network is available
the laptop is asleep
macOS has changed anything since 1993
modern features like sandboxing, power-saving modes, or System Integrity Protection exist
Cron just runs on schedule. If your Mac is asleep at 3:00 AM, tough luck. That limitation makes cron a poor fit for most real-world Mac automation.
That's Why We Have launchd
Apple introduced launchd over 20 years ago with OS X 10.4 (Tiger) to replace cron and a pile of other legacy services.
Unlike cron, launchd actually understands the modern Mac environment. It can handle:
starting and stopping apps
running background tasks
scheduling jobs
managing daemons
responding to system events
Most importantly, launchd isn’t limited to “run at this time.” It can trigger jobs based on state and context, including:
specific times or intervals
system boot
user login
file or folder changes
network availability
hardware events
on-demand conditions
In other words, launchd is designed for the messy, mobile, power-managed world Macs actually live in.
There’s just one big catch.
You don’t create launchd jobs with a simple line of text. Instead, you have to write XML property list files–verbose, picky, easy to mess up, and filled with cryptic keys you’re expected to understand.
For most sane people, that’s a hard pass.
Useful Third-Party Apps That Make This Easy
Fortunately, it’s 2026, and no one needs to hand-craft launchd XML files anymore. Several excellent Mac apps provide friendly interfaces for building launchd jobs or similar scheduled tasks.
Keyboard Maestro isn’t primarily a scheduler–but it does include powerful time-based and event-based triggers.
Some of the available triggers:
Hot keys
App launch / quit / activate / deactivate
Window events
Clipboard changes
Specific times or intervals
Typed strings
USB device events
Public web URLs
MIDI input
Device connection/disconnection
Login
Network changes
The downside: Keyboard Maestro only works when:
you're logged in
the Mac is awake
the Keyboard Maestro Engine is running
So it’s not a replacement for launchd. But for user-level automation, it’s incredibly powerful.
For example, I have a macro that periodically checks whether Raycast, Hazel, Stream Deck, and BetterTouchTool are running–and restarts them if they’re not. That’s the kind of practical glue automation Keyboard Maestro excels at.
Apple Shortcuts
Shortcuts on macOS has matured a lot, especially since macOS Tahoe. It now supports time-based automations similar to what iOS users have had for years.
But there are important limitations:
You must be logged in
The Mac must be awake
It's better suited to workflows than true background services
Still, Shortcuts can trigger actions based on:
specific apps
power conditions
hardware connections
network changes
file system events
Bluetooth devices
time of day
If you have an always-on Mac mini or studio, Shortcuts can be surprisingly capable. On a sleeping laptop, not so much.
More Apps with Time-Based or Event Triggers
If you just need “run this thing on a schedule” without diving into launchd, these are worth a look:
Task Till Dawn -- Free automation tool for file management, printing, and browser tasks
Alarm Clock Pro -- Far more than an alarm clock; great for scheduled app launching and scripts
Shortery -- Adds real triggers to Apple Shortcuts (Wi-Fi, calendar, time, etc.)
Automator + Calendar Alerts -- Built-in macOS trick: create an Automator workflow, then have Calendar open it at a specific time
Launch Control -- A high-end launchd GUI similar to Lingon Pro, but pricier
Bottom Line
If you’re automating a real Mac–not a headless server, cron is usually the wrong tool.
For anything that needs to run reliably in the background, use launchd. And unless you genuinely enjoy editing XML by hand, use a GUI tool like Lingon Pro or LaunchD Task Scheduler to manage it.
For user-level automations while you’re actively working, Keyboard Maestro and Shortcuts are fantastic.
Pick the right tool for the job, and your automations will actually work when you need them–rather than silently failing at 3:00 AM while your Mac sleeps peacefully on the nightstand.